Soft Sourdough Sandwich Bread
There is something deeply comforting about pulling a soft, golden loaf from the oven, especially when it is meant for everyday slices, toast at breakfast, and sandwiches that actually hold together. This bread has that tender, buttery feel people love in a sandwich loaf, but it also brings the gentle character of sourdough, which gives every bite a little more depth and warmth.
What I love most here is how practical it is. You get a soft crumb, a beautiful rise, and a crust that stays delicate instead of turning too thick or chewy. Trust me, you’re going to love this.
Why This Loaf Deserves a Spot in Your Kitchen
Some breads are made for special occasions, and some quietly become part of your routine. This one definitely belongs in the second group. It is the kind of loaf you bake once, slice into, and immediately start planning how to make again before the week is over.
It is soft enough for lunchboxes, sturdy enough for sandwiches, and flavorful enough that a warm slice with butter feels like a treat all on its own. Let me tell you, it’s worth every bite.
A Little Background Behind This Cozy Classic
Sandwich bread has long been the practical heart of home baking, built for everyday meals rather than dramatic bakery shelves. Over time, sourdough bakers started adapting those soft pan loaves with starter, creating breads that still felt light and familiar, but had a little more flavor and a little more soul.
That is exactly where this loaf fits in. It blends the softness of a classic enriched bread with the subtle tang and aroma that natural fermentation brings, which makes it feel both nostalgic and a little more special.
Why Bakers Keep Coming Back to This One
Once you see how beautifully this loaf fits into real life, it starts to make perfect sense why people return to it again and again.
Versatile: This loaf works for toast, grilled sandwiches, French toast, and simple buttered slices. It is soft, sliceable, and dependable in all the best ways.
Budget-Friendly: The ingredient list is made from pantry and fridge basics, which means no fancy extras are needed. You get a bakery-style loaf from ingredients you may already have at home.
Quick and Easy: For a sourdough-based bread, this one moves along nicely. A little instant yeast helps with a reliable rise, so you still get great flavor without waiting all day.
Customizable: You can brush the top with milk for a softer finish, add sesame seeds, or use honey instead of sugar. Small tweaks work beautifully here.
Crowd-Pleasing: Kids tend to love the soft texture, and adults love the flavor. That combination is a total game-changer.
Make-Ahead Friendly: You can bake it, cool it, slice it, and keep it ready for the next few days. It fits neatly into a weekly baking routine.
Great for Leftovers: Day-old slices toast beautifully and turn into some of the best grilled cheese or breakfast toast you could ask for.
Smart Baker Secrets for a Better Rise
A loaf this simple really shines when you pay attention to a few small details. None of them are difficult, but they do make a real difference.
- Use active, bubbly starter, because it helps build flavor and gives the dough a lively feel from the start.
- Warm the milk slightly, not hot, just pleasantly warm, so the dough comes together smoothly and the yeast wakes up comfortably.
- Knead until the dough feels elastic and lightly tacky, because that is what helps create those soft, even slices later.
- Let the second rise go high enough that the dough crowns gently over the rim of the pan, which gives you that lovely sandwich loaf shape.
- Cool the loaf fully before slicing, even though it smells impossible to resist, because the crumb finishes setting as it cools.
The Kitchen Tools That Make It Easy
Before the dough comes together, it helps to have a few basics ready. Nothing fancy is required, but the right tools make the process smoother.
Mixing bowl: A large bowl gives you plenty of room to combine and knead without making a mess.
Stand mixer or sturdy hands: Either works well. A mixer makes kneading easier, but hand-kneading gives you a great feel for the dough.
Loaf pan: A standard 9 x 5-inch loaf pan helps shape the bread into even sandwich slices.
Measuring cups or kitchen scale: A scale is especially helpful for accuracy, which matters a lot in bread baking.
Clean kitchen towel or plastic wrap: This keeps the dough from drying out while it rises.
Cooling rack: Letting the loaf cool on a rack helps keep the crust soft instead of trapping steam underneath.
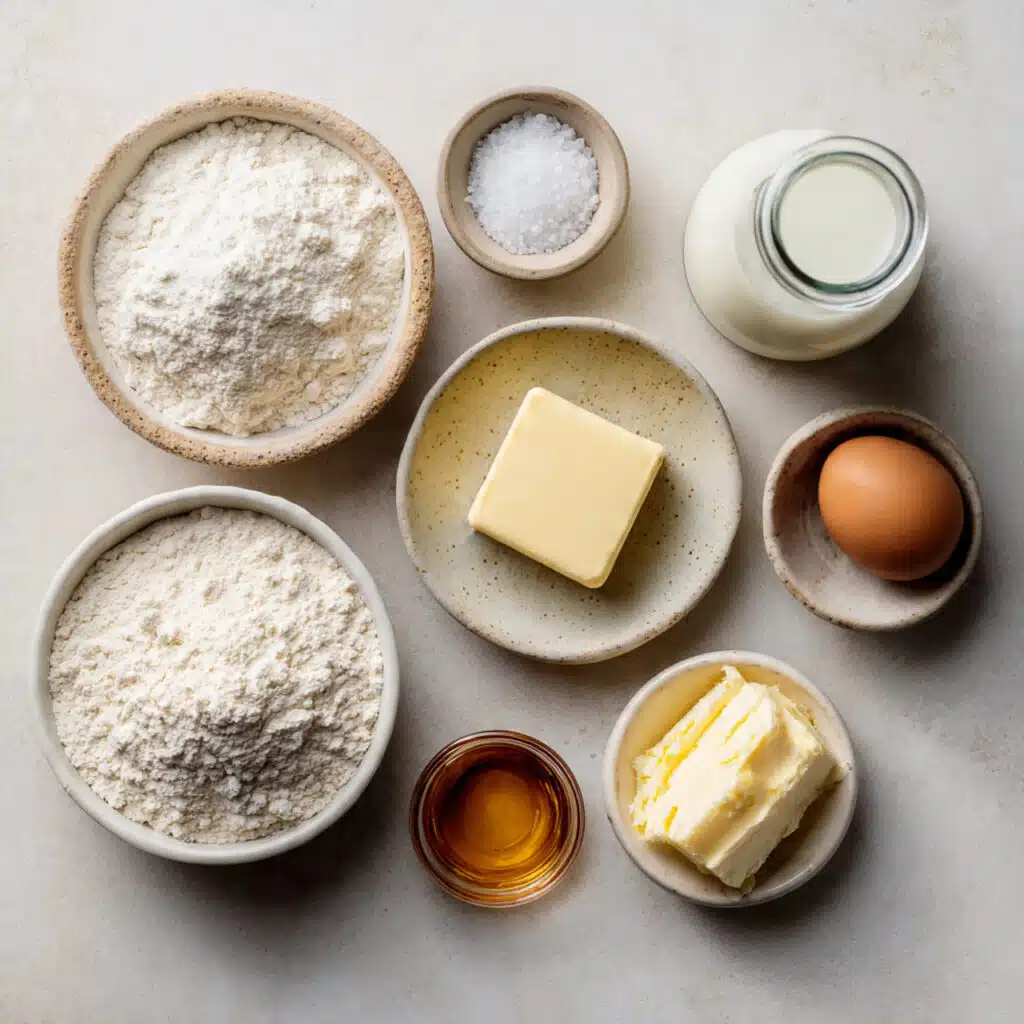
Ingredients That Build a Tender, Flavorful Loaf
Now that the stage is set, let’s talk about the ingredients that make this bread so lovable. Each one brings something important, and together they create that soft, slightly rich texture that makes every slice feel just right.
- Bread flour: 500 grams, about 4 cups, gives the loaf structure and chew while still keeping the crumb soft.
- Whole milk, lukewarm: 240 grams, 1 cup, adds richness and helps create a tender, delicate interior.
- Active sourdough starter: 120 grams, about 1/2 cup, brings gentle flavor, fermentation, and that unmistakable homemade character.
- Unsalted butter, softened: 50 grams, 3 1/2 tablespoons, makes the crumb softer and adds a mellow buttery finish.
- Honey: 35 grams, 1 1/2 tablespoons, adds a touch of sweetness and supports browning.
- Large egg: 1, adds softness, color, and a little extra richness to the dough.
- Instant yeast: 7 grams, 2 1/4 teaspoons, supports a dependable rise and keeps the loaf light and fluffy.
- Fine sea salt: 10 grams, 1 3/4 teaspoons, sharpens flavor and balances the sweetness.
Easy Swaps When You Need Them
One of the nicest things about a loaf like this is that it is flexible without losing its charm. A few thoughtful swaps can help you work with what you already have in the kitchen.
Bread flour: All-purpose flour, though the loaf may be slightly less lofty.
Whole milk: 2 percent milk, or unsweetened plain soy milk for a dairy-free adjustment.
Honey: Granulated sugar, in the same amount.
Unsalted butter: Softened neutral oil or plant-based butter.
Instant yeast: Active dry yeast, using the same amount, though it may take a little longer to rise.
Fine sea salt: Table salt, reduced slightly to about 1 1/2 teaspoons.
The Ingredients That Really Make the Difference
Some ingredients quietly do more work than others, and this loaf has two stars worth noticing.
Active sourdough starter: This is where the loaf gets its subtle depth of flavor. It is not sharply tangy here, just gently complex, which makes the bread taste fuller and more interesting.
Whole milk: Milk helps soften everything, from the crumb to the overall bite. It gives the loaf that cozy sandwich-bread quality that makes it so good for toast and everyday slices.
Let’s Bake This Beauty Step by Step
And now we get to the part where the kitchen starts smelling amazing. The process is simple and satisfying, and once the dough starts coming together, you can already tell this one is headed somewhere delicious.
- Preheat Your Equipment: Lightly grease a 9 x 5-inch loaf pan and set it aside. If your kitchen is cool, prepare a warm draft-free spot for the dough to rise.
- Combine Ingredients: In a large bowl, mix the lukewarm milk, active sourdough starter, honey, egg, and softened butter until mostly smooth. Add the bread flour, instant yeast, and salt, then mix until a shaggy dough forms.
- Prepare Your Cooking Vessel: Knead the dough for 8 to 10 minutes, either by hand or with a mixer, until it becomes smooth, elastic, and only lightly tacky. Transfer it to a lightly greased bowl, cover, and let it rise until puffy and nearly doubled, about 1 1/2 to 2 hours.
- Assemble the Dish: Turn the dough out onto a lightly floured surface and gently press it into a rectangle. Roll it up tightly into a log, pinch the seam closed, and place it seam-side down in the prepared loaf pan.
- Cook to Perfection: Cover the pan and let the dough rise again until it crowns about 1 inch above the rim, about 45 minutes to 1 hour. Bake at 375°F, 190°C, for 35 minutes, until the top is deeply golden and the loaf sounds hollow when tapped.
- Finishing Touches: Remove the loaf from the pan and, for an extra-soft crust, brush the top lightly with a little butter while it is still warm. Let it cool completely on a rack before slicing.
- Serve and Enjoy: Slice thick or thin, depending on your mood, and enjoy it with butter, jam, toasted for breakfast, or stacked into your favorite sandwich.
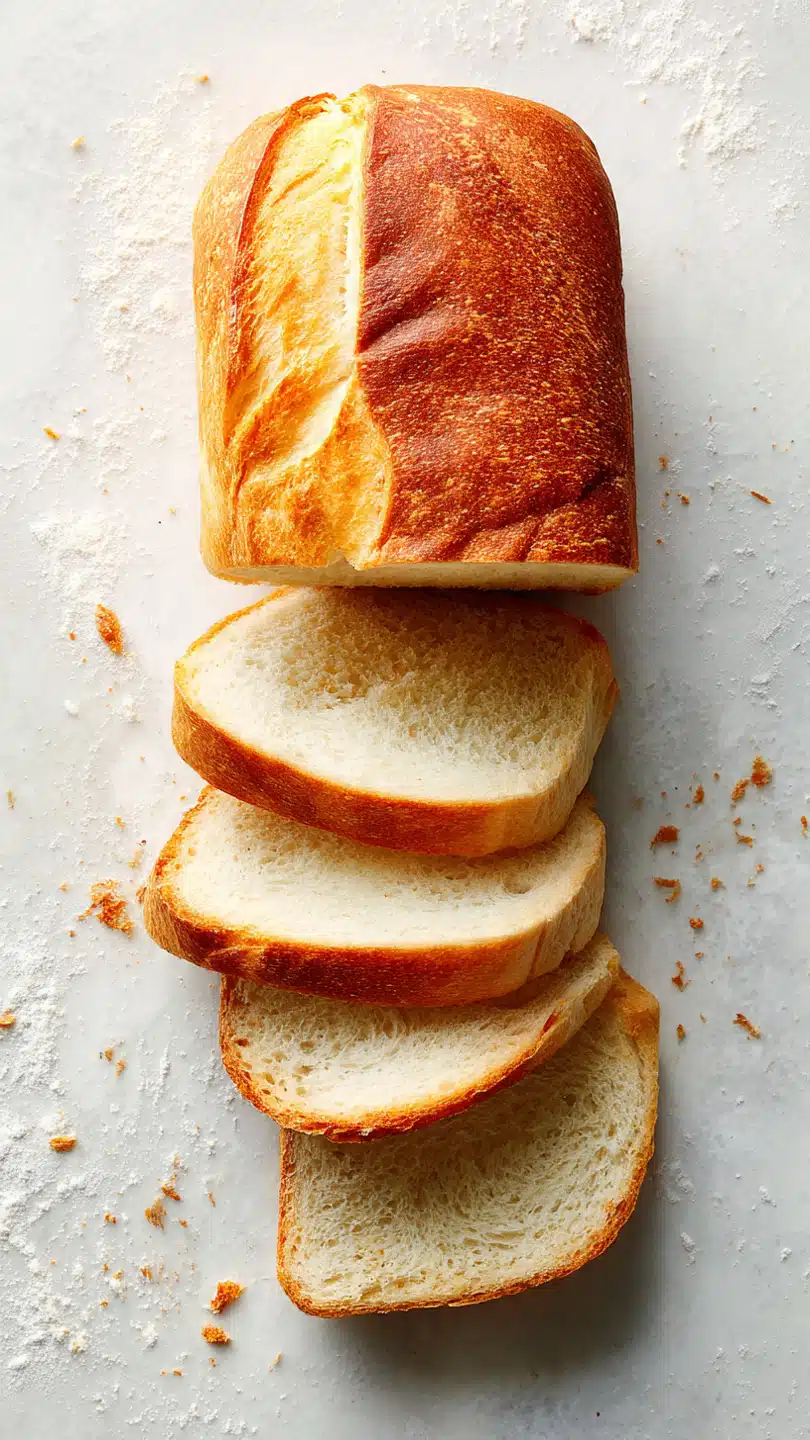
The Texture and Flavor That Make It So Good
By the time the loaf cools, the best part starts to reveal itself. The crust stays thin and tender, with just enough color to feel inviting, while the inside stays fluffy, springy, and easy to slice. It is soft without feeling bland, which is exactly what you want from a loaf built for everyday use.
Flavor-wise, the honey and milk round everything out, the butter keeps it rich, and the starter adds a subtle tang in the background. Nothing shouts, but everything works together. This one’s a total game-changer if you want a bread that feels homemade and cozy, yet still practical for daily meals.
Helpful Tricks for Your Best Loaf Yet
A few simple habits can make this bread even more rewarding to bake, especially if you are still getting comfortable with enriched doughs.
- Let your starter get active before mixing, because sleepy starter can slow down the whole loaf.
- If the dough feels too sticky at first, resist adding too much extra flour, because kneading will help it smooth out.
- Brush the top with butter after baking if you want an extra-soft crust.
- Slice with a serrated knife once fully cool for the cleanest, prettiest slices.
Mistakes to Skip for a Softer, Taller Result
Every loaf teaches something, and this one is no different. The good news is that the most common issues are easy to fix.
- Do not use hot milk, because it can weaken or kill the yeast. Warm is perfect.
- Do not under-knead the dough, because the loaf may turn out squat or uneven.
- Do not rush the second rise, because that final proof is what gives the loaf its soft, rounded top.
- Do not slice while hot, because the crumb can turn gummy and compress.
A Quick Look at the Nutrition
Before you dive into another slice, here is a simple snapshot of the nutrition. These numbers are approximate, but they give a helpful general idea for planning meals.
Servings: 12 slices
Calories per serving: 190
Note: These are approximate values.
Timing That Helps You Plan Your Bake
This bread fits nicely into a relaxed afternoon at home. Most of the time is hands-off, which makes it feel easy even though the final loaf tastes wonderfully bakery-worthy.
Prep Time: 2 hours 30 minutes
Cook Time: 35 minutes
Total Time: 3 hours 5 minutes
Make-Ahead and Storage Tips That Actually Help
Once you realize how useful this loaf is, you may want to make it part of your regular routine. Thankfully, it stores beautifully and handles make-ahead planning well.
You can mix and knead the dough, then let it do its first rise as usual. After shaping, the loaf can be refrigerated overnight in the pan, covered well, then brought closer to room temperature before baking the next day. That makes morning bread feel surprisingly realistic.
For storage, keep the cooled loaf wrapped well at room temperature for up to 3 days. For longer storage, slice it first, then freeze the slices in a sealed bag for up to 2 months. Reheat slices in the toaster, or let them thaw and warm briefly in the oven for that fresh-baked feel.
The Best Ways to Serve It
And now for the fun part, deciding how to enjoy it. This loaf is wonderfully adaptable, which means it slides right into breakfast, lunch, or a simple snack without any fuss.
Serve it toasted with butter and jam, layered with turkey and cheese for lunch, or turned into a crisp grilled sandwich with tomato soup on the side. It also makes lovely French toast, especially when the slices are a little thicker.
Smart Ideas for Turning Leftovers Into Something New
If you somehow end up with extra slices, do not worry. This bread is one of those kitchen staples that keeps giving.
Turn leftover slices into buttery croutons, cube them for a rich breakfast casserole, or use them for bread pudding with cinnamon and vanilla. Slightly older slices also make excellent grilled cheese, because they toast up beautifully while staying tender inside.
Extra Notes That Make Baking More Relaxed
Sometimes the smallest details are the ones that make baking feel easier and more enjoyable. A few extra reminders can help this loaf become a regular success in your kitchen.
Let the dough rise by appearance rather than the clock if your kitchen runs cool. Keep your loaf pan lightly greased but not heavily coated. And if you want a shinier top, brush the shaped loaf with a little milk before baking.
Simple Ways to Make It Look Bakery-Worthy
A loaf this inviting deserves a little presentation love, even if it is just heading to the breakfast table. Luckily, it does not take much.
Bake it until deeply golden, not pale, because that color makes the whole loaf look richer and more appetizing. Once cooled, slice it evenly and arrange the slices in a gentle fan on a board or plate. A tiny swipe of butter on a warm slice makes the crumb glisten in the prettiest way.
Easy Variations to Keep Things Interesting
Once you have the base loaf down, there are so many nice ways to make it your own. That is where home baking gets really fun.
Honey Oat Version: Brush the top with milk and sprinkle rolled oats over the loaf before baking for a cozy, hearty finish.
Seeded Loaf: Add 2 tablespoons mixed sesame and sunflower seeds to the dough for extra texture and a nuttier flavor.
Softer Dinner Rolls: Divide the dough into 10 to 12 pieces and bake in a buttered pan for fluffy sourdough rolls.
Light Whole Wheat Twist: Replace 100 grams of the bread flour with whole wheat flour for a deeper flavor while keeping a soft crumb.
Cinnamon Breakfast Loaf: Add a swirl of cinnamon sugar before shaping for a sweet breakfast-style variation.
FAQ’s
1. Can I make this without instant yeast?
Yes, but the rise will be slower and less predictable. If you leave out the yeast, make sure your starter is very active and be prepared for longer proofing times.
2. Does this bread taste strongly sour?
No, it is usually mild. The milk, butter, and honey keep the flavor balanced and soft.
3. Can I use all-purpose flour instead of bread flour?
Yes, you can. The loaf may be a little less tall and slightly less chewy, but it will still bake up nicely.
4. What if my dough feels sticky?
That is normal at first. Give it a good knead before adding extra flour, because enriched dough often smooths out as the gluten develops.
5. Can I bake this in a smaller loaf pan?
You can, but the loaf may rise taller and need careful monitoring. A standard 9 x 5-inch pan is the easiest choice.
6. How do I know when the loaf is fully baked?
The top should be a rich golden brown, and the loaf should sound hollow when tapped. If you use a thermometer, the center should read about 190°F to 200°F.
7. Can I freeze the whole loaf?
Yes, though slicing first is more convenient. That way you can pull out only what you need.
8. Why did my loaf not rise well?
The most common reasons are inactive starter, old yeast, or not enough proofing time. Temperature can also make a big difference.
9. Is this good for sandwiches and toast?
Absolutely. That is exactly what it is built for, soft slices, easy to cut, and sturdy enough for fillings.
10. Can I make this by hand without a mixer?
Yes, and very successfully. It takes a little patience, but hand-kneading works beautifully for this dough.
Conclusion
By the end of the bake, this loaf feels like the kind of recipe that earns a permanent place in your kitchen. It is soft, dependable, deeply comforting, and flexible enough for everything from morning toast to packed lunches.
If you have been wanting a loaf that feels homemade, practical, and just a little special, this is the one to try. Bake it once, slice into that fluffy crumb, and I have a feeling it will become one of those recipes you come back to again and again.
Print
Soft Sourdough Sandwich Bread
- Prep Time: 2 hours 30 minutes
- Cook Time: 35 minutes
- Total Time: 3 hours 5 minutes
- Yield: 1 loaf, 12 slices 1x
- Category: Bread
- Method: Baking
- Cuisine: American
- Diet: Vegetarian
Description
A soft, fluffy sourdough sandwich bread made with milk, butter, honey, and active sourdough starter for a tender crumb and gentle tang. This loaf is perfect for toast, sandwiches, and everyday slicing.
Ingredients
- 500 g bread flour (about 4 cups)
- 240 g whole milk, lukewarm (1 cup)
- 120 g active sourdough starter (about 1/2 cup)
- 50 g unsalted butter, softened (3 1/2 tablespoons)
- 35 g honey (1 1/2 tablespoons)
- 1 large egg
- 7 g instant yeast (2 1/4 teaspoons)
- 10 g fine sea salt (1 3/4 teaspoons)
Instructions
- Lightly grease a 9 x 5-inch loaf pan and set it aside.
- In a large bowl, mix the lukewarm milk, active sourdough starter, honey, egg, and softened butter until mostly smooth.
- Add the bread flour, instant yeast, and salt, then mix until a shaggy dough forms.
- Knead the dough for 8 to 10 minutes, either by hand or with a mixer, until smooth, elastic, and lightly tacky.
- Transfer the dough to a lightly greased bowl, cover, and let it rise until puffy and nearly doubled, about 1 1/2 to 2 hours.
- Turn the dough out onto a lightly floured surface and gently press it into a rectangle.
- Roll the dough up tightly into a log, pinch the seam closed, and place it seam-side down in the prepared loaf pan.
- Cover and let rise again until the dough crowns about 1 inch above the rim of the pan, about 45 minutes to 1 hour.
- Bake at 375°F (190°C) for 35 minutes, until the top is deeply golden and the loaf sounds hollow when tapped.
- Remove from the pan and brush the top lightly with butter if desired for a softer crust.
- Cool completely on a rack before slicing and serving.
Notes
- Use an active, bubbly starter for the best flavor and rise.
- If the dough feels sticky at first, keep kneading before adding extra flour.
- Brush the loaf with butter after baking for an extra-soft crust.
- Store wrapped at room temperature for up to 3 days, or freeze sliced for up to 2 months.
Nutrition
- Serving Size: 1 slice
- Calories: 190
- Sugar: 3g
- Sodium: 210mg
- Fat: 4g
- Saturated Fat: 2g
- Unsaturated Fat: 1.5g
- Trans Fat: 0g
- Carbohydrates: 32g
- Fiber: 1g
- Protein: 6g
- Cholesterol: 22mg
Keywords: soft sourdough sandwich bread, sourdough sandwich loaf, homemade sandwich bread, soft bread loaf, sourdough milk bread