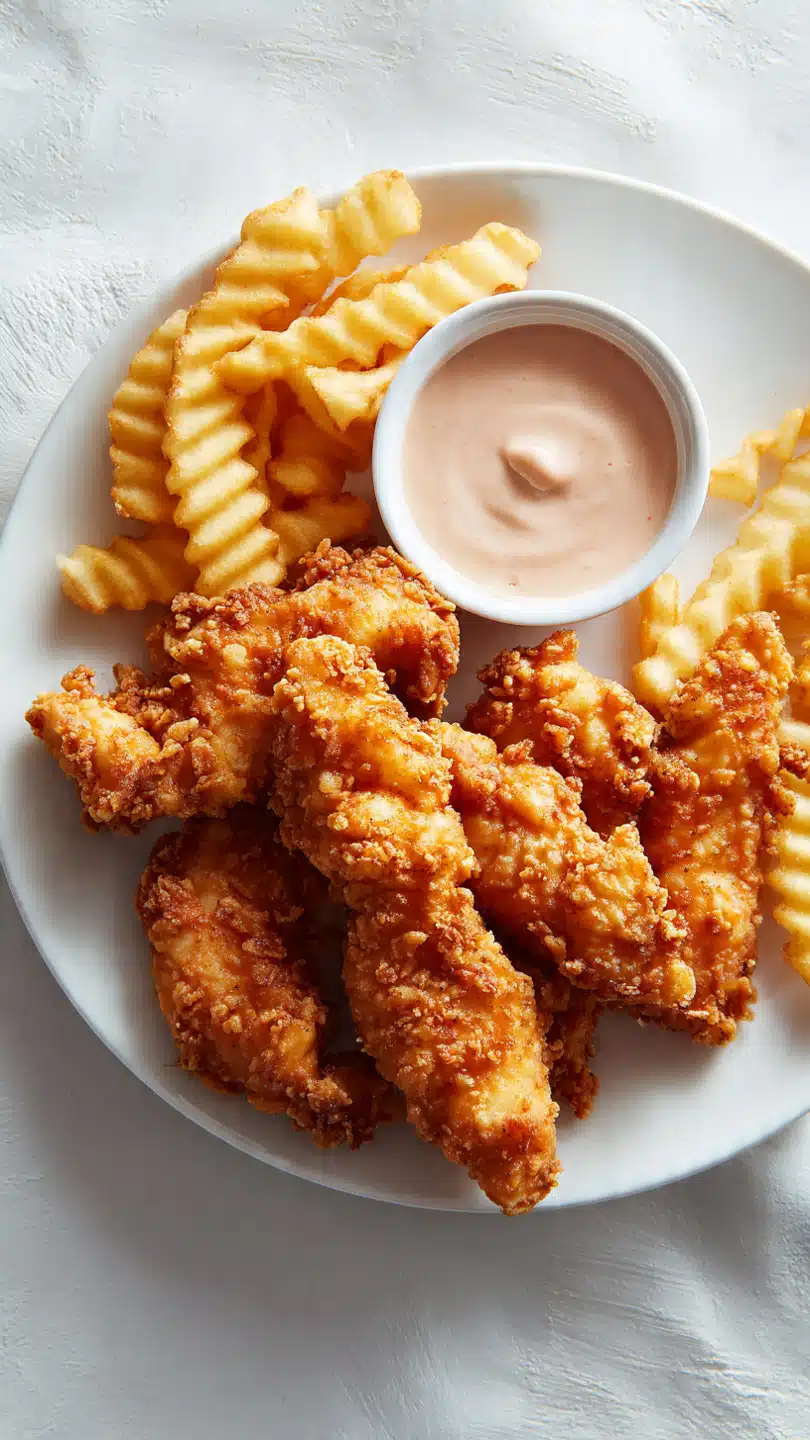
Raising Cane’s Crispy Chicken Tenders
There is something wildly comforting about a basket of hot, crunchy chicken tenders with that creamy, peppery dipping sauce on the side. The first bite is all about the crackly coating, then the juicy chicken comes through, and suddenly you understand why people keep craving this kind of meal again and again. Trust me, you’re going to love this, because it brings that fast food favorite feeling right into your own kitchen, only fresher and even more satisfying.
Why These Tenders Always Hit the Spot
Some recipes are good, and then some recipes instantly feel like a weekend tradition waiting to happen. This one lands in that second category. The coating fries up beautifully golden, the chicken stays tender from the buttermilk soak, and the dipping sauce has that signature tangy, savory kick that makes every bite feel complete.
What really makes this one special is the contrast. You get crisp edges, juicy centers, a little salt, a little pepper, and that creamy sauce tying everything together. This one’s a total game-changer when you want something fun, familiar, and worth every bite.
The Story Behind This Southern Favorite
Now that the craving is fully awake, it makes sense to talk about where this style of meal comes from. Southern fried chicken has a long history of turning humble ingredients into something deeply satisfying, and chicken tenders became one of the easiest, most crowd-friendly ways to enjoy that tradition.
The restaurant version built its reputation on a simple idea, do a few things really well. Crispy chicken, crinkle fries, toast, and a peppery sauce. That simplicity is part of the charm, and it is exactly why this homemade version works so well. It keeps the spirit of the original while giving you that fresh-from-the-pan flavor that is hard to beat.
Why This Recipe Earns a Spot in Your Kitchen
Before we get cooking, let me tell you why this one is such a keeper. It is the kind of recipe you make once, then start looking for excuses to make again.
Versatile: These tenders work for family dinners, game nights, casual parties, or even a fun weekend lunch. They also pair beautifully with fries, slaw, salad, or soft sandwich rolls.
Budget-Friendly: Chicken tenders, pantry spices, flour, and a few sauce basics turn into a meal that feels restaurant worthy without costing nearly as much as takeout.
Quick and Easy: The process is straightforward, and once your breading station is set, everything moves along nicely. The fry time is especially quick, which makes the payoff feel almost instant.
Customizable: You can adjust the seasoning, add a little heat, or swap the side dishes depending on who is at the table. The base recipe is sturdy enough to handle those little personal touches.
Crowd-Pleasing: Crispy chicken tends to disappear fast, and this version is no exception. Kids love it, adults love it, and the sauce usually has everyone reaching for just one more piece.
Make-Ahead Friendly: The sauce can be mixed ahead, and the chicken can marinate in advance, which makes dinner feel much easier when the busy part of the day kicks in.
Great for Leftovers: Leftover tenders reheat surprisingly well and can be tucked into wraps, salads, or sandwiches the next day.
Chef Secrets for Extra Crunch and Juiciness
And now let’s dive into the little tricks that make the difference between decent fried chicken and the kind that makes people stop talking for a second.
- Use a buttermilk marinade: It helps the chicken stay juicy and gives the coating something to cling to, which means more texture in every bite.
- Double-dredge the chicken: A quick dip back into the marinade before the second flour coating creates those shaggy, crispy edges that fry up beautifully.
- Watch your oil temperature: Keep it close to 350°F so the outside gets crisp without the inside overcooking.
- Let the coated chicken rest briefly: A short rest on a tray helps the coating settle, which can keep more of it on the chicken instead of in the pot.
- Grind fresh black pepper for the sauce: That peppery bite is part of what makes the dipping sauce taste so familiar and addictive.
Kitchen Tools That Make the Job Easier
Before the oil heats up, it helps to have a few reliable tools ready to go. Nothing fancy here, just the kind of basics that make frying feel smoother and less messy.
Mixing Bowls: You will need a large bowl for the marinade, another for the flour mixture, and a medium bowl for the sauce.
Whisk: This keeps the marinade smooth and helps the sauce come together evenly.
Heavy Pot or Dutch Oven: A sturdy pot holds heat better, which is exactly what you want for even frying.
Thermometer: This is the easiest way to keep the oil at a steady temperature and avoid guesswork.
Tongs: Tongs make dredging and frying much easier, especially when your hands are already busy with flour and marinade.
Wire Rack: Resting the tenders on a rack keeps them crisp instead of letting steam soften the coating.
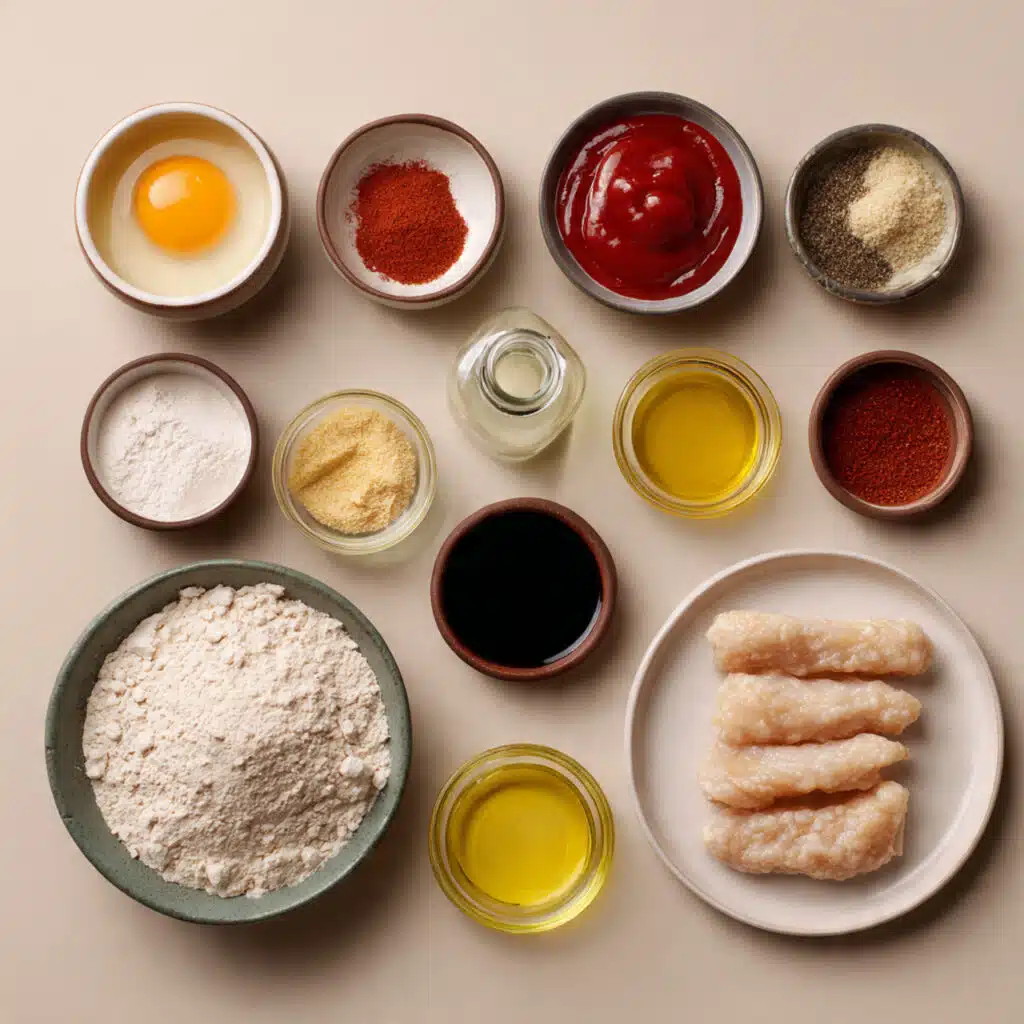
Ingredients That Build the Magic
By this point, you can already imagine the smell of frying chicken and warm spices filling the kitchen. The ingredient list is simple, but each part has a job to do, and together they create that familiar crispy, juicy, savory finish.
- Large egg: 1, helps bind the buttermilk marinade and gives the coating structure.
- Buttermilk: 1 1/2 cups, tenderizes the chicken and adds a subtle tang.
- Kosher salt: 5 teaspoons, divided, seasons both the marinade and the flour coating so the flavor reaches every layer.
- Black pepper: 1 teaspoon for the chicken, plus 3/4 teaspoon for the sauce, brings that signature peppery finish.
- Chicken tenders: 2 pounds, the star of the show, naturally quick-cooking and wonderfully juicy.
- All-purpose flour: 2 1/2 cups, creates the main body of the crispy coating.
- Cornstarch: 1/2 cup, lightens the breading and helps it fry up extra crisp.
- Paprika: 1 1/2 teaspoons, adds warm color and gentle earthy flavor.
- Garlic powder: 2 teaspoons, divided, gives both the breading and sauce a savory backbone.
- Onion powder: 1 teaspoon, divided, rounds out the seasoning with mild sweetness.
- Vegetable oil: 4 to 6 cups, for frying, keeps the flavor clean and lets the crust turn beautifully golden.
- Mayonnaise: 3/4 cup, makes the dipping sauce creamy and rich.
- Ketchup: 3 tablespoons, adds sweetness and that familiar rosy color to the sauce.
- Worcestershire sauce: 1 tablespoon, brings tangy, savory depth that gives the sauce its signature edge.
Easy Swaps When You Need Them
Once you know the core ingredients, it becomes much easier to make this recipe fit what you already have in the kitchen. That is one of the reasons I keep coming back to it.
Buttermilk: Whole milk mixed with a little lemon juice or vinegar.
Chicken tenders: Boneless skinless chicken breasts cut into strips.
Vegetable oil: Canola oil or peanut oil.
Kosher salt: Fine sea salt, just reduce the amount slightly.
Paprika: Smoked paprika for a deeper flavor.
Mayonnaise: Full-fat plain Greek yogurt mixed with a little extra mayo for a lighter sauce.
Two Ingredients Doing the Heavy Lifting
Sometimes the real personality of a recipe comes down to one or two standout ingredients, and that is definitely the case here.
Buttermilk: This is what helps the chicken stay tender and juicy while giving the breading something flavorful to cling to. It quietly does a lot of work.
Black Pepper: The sauce would not taste quite right without it. That peppery warmth is what gives the dip its bold, unmistakable character.
Let’s Fry Up Something Wonderful
And now let’s dive into the part everyone has been waiting for. The process is simple, fun, and very satisfying, especially once that first batch turns golden and crisp.
- Preheat Your Equipment: Set a wire rack over a baking sheet. Pour the vegetable oil into a heavy pot to a depth of about 2 inches, then begin heating it to 350°F.
- Combine Ingredients: In a large bowl, whisk together the egg, buttermilk, 2 teaspoons of kosher salt, and 1 teaspoon of black pepper. Add the chicken tenders, coat well, cover, and refrigerate for at least 2 hours or up to overnight. In a separate shallow bowl, whisk together the flour, cornstarch, paprika, 1 teaspoon garlic powder, 1/2 teaspoon onion powder, and the remaining 3 teaspoons kosher salt.
- Prepare Your Cooking Vessel: Once the oil reaches 350°F, keep the heat steady. In a medium bowl, stir together the mayonnaise, ketchup, Worcestershire sauce, the remaining 1 teaspoon garlic powder, the remaining 1/2 teaspoon onion powder, and 3/4 teaspoon black pepper until smooth.
- Assemble the Dish: Remove one piece of chicken from the marinade and let the excess drip off. Coat it in the flour mixture, dip it lightly back into the marinade, then coat it in the flour mixture again. Repeat with the remaining pieces and place them on a tray.
- Cook to Perfection: Fry the chicken in batches for 3 to 4 minutes, turning as needed, until the coating is deep golden and the chicken reaches 165°F inside. Transfer each batch to the wire rack.
- Finishing Touches: Let the tenders rest for a few minutes so the crust stays crisp. Give the sauce one final stir and spoon it into a small serving bowl.
- Serve and Enjoy: Pile the hot tenders onto a platter and serve them right away with the dipping sauce. Let me tell you, it’s worth every bite.
The Crunch, the Juiciness, and That Peppery Finish
The best part of this recipe is how every layer adds something different. The crust is craggy and crisp, with those little ridges that catch extra seasoning and turn deeply golden in the oil. Underneath that, the chicken stays juicy and tender, which keeps the whole bite from feeling heavy.
Then comes the sauce, smooth, creamy, slightly tangy, and full of peppery flavor. It cools the heat of the fryer just enough while making the coating taste even more savory. Together, it is that perfect mix of crunchy, juicy, creamy, and bold.
Little Tricks That Make a Big Difference
Once you have made these once, they get easier every time. A few small habits can make the whole process feel more relaxed and more reliable.
- Let the marinated chicken drip briefly before coating so the breading does not turn gummy.
- Fry in batches so the oil temperature stays steady and the tenders crisp properly.
- Rest the fried pieces on a rack, not paper towels, to keep the coating from softening.
- Make the sauce a little ahead if you can, because the flavor gets even better after some time in the fridge.
Common Mistakes and How to Skip Them
Even a simple recipe like this has a few spots where things can go off track, but the fixes are easy once you know what to watch for.
- Do not overcrowd the pot, because the oil temperature will drop and the coating can turn greasy instead of crisp.
- Do not skip the second dredge, because that extra layer is what helps create the thick, crunchy crust.
- Do not fry straight from very cold oil that has not reached temperature, or the breading may absorb too much oil.
- Do not leave the tenders in the oil too long, because they cook quickly and can dry out if overfried.
A Quick Look at the Nutrition
Before serving up a big plate, it helps to know roughly what to expect. These numbers are approximate, but they give a helpful snapshot for planning.
Servings: 6
Calories per serving: 720
Note: These are approximate values.
Timing Your Cooking Session
One of the nicest things about this recipe is that the active cooking time is not overwhelming. Most of the waiting happens during the marinade, which means the hands-on work stays very manageable.
Prep Time: 20 minutes
Cook Time: 25 minutes
Total Time: 2 hours 45 minutes
Make-Ahead and Storage Tips
If you like getting ahead, this recipe gives you a few easy ways to do that. The sauce can be mixed earlier in the day, or even the day before, and the chicken can sit in the marinade until you are ready to fry. That makes dinner feel a lot less hectic.
Leftover tenders should be stored in an airtight container in the fridge for up to 3 days. Reheat them in a hot oven or air fryer so the coating crisps back up nicely. You can also freeze cooked tenders for up to 2 months, then reheat from thawed until hot and crisp.
The Best Ways to Serve Them
Once everything is hot and ready, the fun really begins. These tenders are fantastic served simply with the peppery sauce, but they also play well with all kinds of sides.
Try them with crinkle fries, coleslaw, pickles, buttered toast, or a crisp green salad if you want some balance on the plate. They also make a fun platter for casual gatherings, especially when you add extra sauce for dipping.
Leftovers Deserve a Second Life Too
And if you somehow end up with leftovers, do not let them sit there without a plan. These crisp strips can turn into a whole new meal with very little effort.
Slice them into wraps with lettuce and extra sauce, tuck them into toasted sandwich rolls, or chop them over a salad for a crunchy lunch. They are also great in a grain bowl with slaw and a little drizzle of sauce on top.
A Few More Helpful Notes From My Kitchen
Sometimes the best kitchen advice is the sort that feels small until you try it. Then suddenly the whole recipe runs more smoothly.
Use one hand for the wet ingredients and one for the dry coating if you want to keep the mess under control. Taste the sauce after mixing and add a little extra pepper if you love that signature kick. And always let the tenders rest for a moment before serving, because that tiny pause helps the crust stay exactly how you want it.
Make the Plate Look Extra Special
The beauty of this meal is in its golden color and casual comfort, so let it shine. Pile the tenders on a platter with the sauce in a small bowl right in the middle or off to the side. That simple setup already looks inviting.
For a more polished finish, stack the tenders slightly so all those crisp edges show. Add crinkle fries on the side and keep the serving dishes clean and simple so the color of the chicken really stands out.
Fun Variations to Try Next Time
Once you nail the classic version, there is plenty of room to play. This recipe has a solid base, so it welcomes little twists.
Spicy Version: Add cayenne to the flour mixture and a dash of hot sauce to the marinade for more heat.
Air Fryer Version: Spray the coated chicken lightly with oil and cook in the air fryer until golden and cooked through.
Sandwich Style: Serve the tenders inside soft buns with shredded lettuce and extra sauce.
Smoky Twist: Use smoked paprika in place of regular paprika for a deeper flavor.
Parmesan Finish: Add a light sprinkle of finely grated Parmesan right after frying for a savory extra layer.
FAQ’s
Q1: Can I use chicken breast instead of tenders?
Yes. Slice boneless skinless chicken into even strips so they cook at the same speed.
Q2: How long should I marinate the chicken?
At least 2 hours is ideal, but overnight works beautifully if you want even more flavor and tenderness.
Q3: Why do I need cornstarch in the breading?
Cornstarch helps the coating fry up lighter and crispier, which is a big part of the texture here.
Q4: Can I make the sauce ahead of time?
Absolutely. In fact, it tastes even better after it sits in the fridge for a few hours.
Q5: What oil is best for frying?
Vegetable oil, canola oil, or peanut oil all work well because they have a neutral flavor and good frying performance.
Q6: How do I know when the chicken is done?
The outside should be deep golden, and the inside should reach 165°F.
Q7: Can I freeze the cooked tenders?
Yes. Cool them completely, freeze in a sealed container, and reheat in the oven or air fryer.
Q8: Why is my breading falling off?
This usually happens when the oil is not hot enough or the coating did not get a moment to settle before frying.
Q9: Can I bake these instead of frying?
Yes, though the texture will be different. They can still turn out tasty, just a little less craggy and crisp.
Q10: What should I serve with them?
Crinkle fries, slaw, toast, pickles, or a fresh salad all make great companions.
Conclusion
There is a reason this meal has such a loyal following. It is crispy, juicy, peppery, comforting, and just plain fun to eat. When that first hot tender gets dipped into the sauce, it all makes sense. Trust me, you’re going to love this one, and once you make it at home, it is going to earn a regular place in your dinner rotation.
Print
Raising Cane’s Crispy Chicken Tenders
- Prep Time: 20 minutes
- Cook Time: 25 minutes
- Total Time: 2 hours 45 minutes
- Yield: 6 servings 1x
- Category: Main Course
- Method: Deep Frying
- Cuisine: American
- Diet: Low Lactose
Description
Crispy, golden chicken tenders marinated in buttermilk, double-dredged for extra crunch, then fried until juicy and served with a creamy peppery dipping sauce.
Ingredients
- 1 large egg
- 1 1/2 cups buttermilk
- 5 teaspoons kosher salt, divided
- 1 teaspoon black pepper, for the chicken
- 2 pounds chicken tenders
- 2 1/2 cups all-purpose flour
- 1/2 cup cornstarch
- 1 1/2 teaspoons paprika
- 2 teaspoons garlic powder, divided
- 1 teaspoon onion powder, divided
- 4 to 6 cups vegetable oil, for frying
- 3/4 cup mayonnaise
- 3 tablespoons ketchup
- 1 tablespoon Worcestershire sauce
- 3/4 teaspoon black pepper, for the sauce
Instructions
- In a large bowl, whisk together the egg, buttermilk, 2 teaspoons kosher salt, and 1 teaspoon black pepper. Add the chicken tenders, coat well, cover, and refrigerate for at least 2 hours or up to overnight.
- In a shallow bowl, whisk together the flour, cornstarch, paprika, 1 teaspoon garlic powder, 1/2 teaspoon onion powder, and the remaining 3 teaspoons kosher salt.
- Heat the vegetable oil in a heavy pot to 350°F. Set a wire rack over a baking sheet.
- In a medium bowl, stir together the mayonnaise, ketchup, Worcestershire sauce, the remaining 1 teaspoon garlic powder, the remaining 1/2 teaspoon onion powder, and 3/4 teaspoon black pepper until smooth.
- Remove one piece of chicken from the marinade and let the excess drip off. Coat it in the flour mixture, dip it lightly back into the marinade, then coat it in the flour mixture again. Repeat with the remaining chicken.
- Fry the chicken in batches for 3 to 4 minutes, turning as needed, until deep golden and cooked through to 165°F internally. Transfer to the wire rack.
- Let the chicken rest for a few minutes, then serve hot with the dipping sauce.
Notes
- Make the sauce ahead of time for even better flavor.
- Do not overcrowd the pot, or the coating may turn greasy instead of crisp.
- Use a thermometer to keep the oil close to 350°F for the best texture.
- Reheat leftovers in the oven or air fryer to bring back the crunch.
Nutrition
- Serving Size: 1/6 of recipe
- Calories: 720
- Sugar: 3g
- Sodium: 980mg
- Fat: 38g
- Saturated Fat: 7g
- Unsaturated Fat: 27g
- Trans Fat: 0g
- Carbohydrates: 42g
- Fiber: 2g
- Protein: 48g
- Cholesterol: 135mg
Keywords: crispy chicken tenders, copycat chicken fingers, fried chicken strips, peppery dipping sauce, buttermilk chicken