Rainbow Cheesecake Bars Recipe
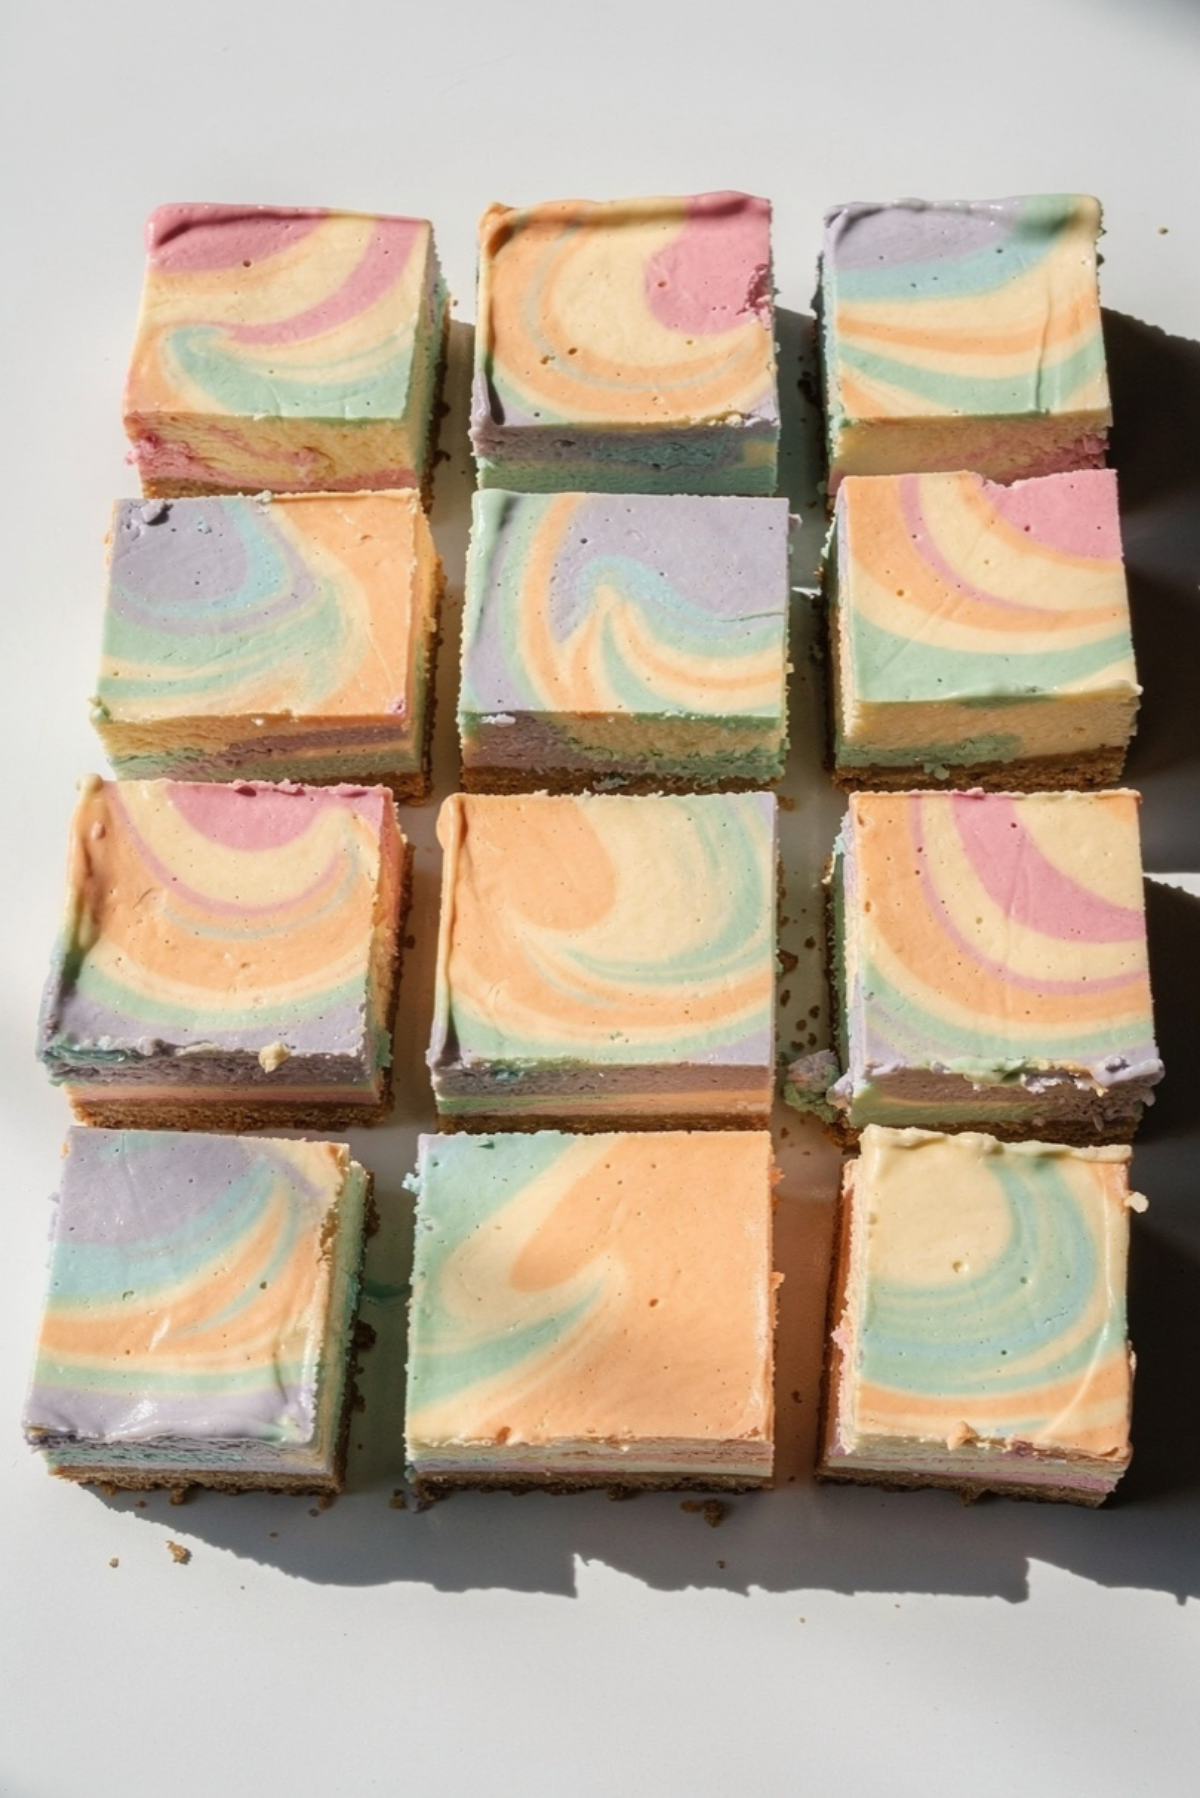
There’s something almost magical about slicing into a pan of rainbow cheesecake bars and seeing those bright, swirled colors peek through the creamy filling. It instantly feels cheerful, nostalgic, and honestly a little celebratory, even if you’re just making dessert for a regular weekday evening. The buttery graham cracker crust, the silky cheesecake layer, and those playful rainbow ribbons come together into something that feels bakery-worthy without being complicated. Trust me, you’re going to love this.
And now that you’re probably already imagining that first creamy bite, let’s dive into what makes these bars such a favorite for birthdays, parties, and colorful dessert tables everywhere.
Why Everyone Falls in Love With These Colorful Cheesecake Bars
Rainbow cheesecake bars have a way of stealing attention before anyone even takes a bite. The bright swirls instantly make people smile, and once they taste the rich cheesecake filling paired with the crisp buttery crust, they usually come back for seconds.
What makes these especially fun is how they balance visual excitement with classic cheesecake flavor. You still get that smooth, tangy richness you expect from cheesecake, but with a playful twist that makes the whole dessert feel extra special.
They also slice beautifully, which means they look incredible on dessert platters, party tables, and holiday spreads. Let me tell you, it’s worth every bite.
The Sweet Story Behind Rainbow Inspired Desserts
Brightly colored desserts became especially popular during the mid twentieth century when home bakers started experimenting with vibrant food coloring in cakes, frostings, and candies. Rainbow desserts quickly became associated with birthdays, celebrations, and joyful gatherings because of their playful appearance.
Cheesecake bars themselves became popular because they offered all the creamy goodness of classic cheesecake in a more casual and portable form. Combining the two ideas created a dessert that feels both nostalgic and modern at the same time.
And honestly, that’s part of their charm. They feel fun and comforting all at once.
Why This Dessert Always Works Beautifully
Before we start baking, let’s talk about why this recipe is such a reliable winner in the kitchen.
Versatile: These bars fit almost any occasion, from birthday parties to casual weekend desserts. You can even customize the colors for holidays or themed events.
Budget-Friendly: Most of the ingredients are pantry staples or easy-to-find grocery items, which keeps this dessert affordable without sacrificing flavor.
Quick and Easy: While cheesecake sounds fancy, these bars come together surprisingly fast with very simple techniques.
Customizable: You can adjust the swirl patterns, crust type, or even add toppings to make the dessert your own.
Crowd-Pleasing: Kids love the bright colors, adults love the creamy cheesecake texture, and everyone ends up asking for another piece.
Make-Ahead Friendly: These bars actually taste even better after chilling, making them ideal for preparing ahead of time.
Great for Leftovers: The flavor and texture hold beautifully in the refrigerator for several days.
Smart Baking Secrets for Perfect Cheesecake Bars
A few simple tricks can make the difference between good cheesecake bars and truly irresistible ones.
- Use Room Temperature Ingredients: Soft cream cheese blends much more smoothly, which helps prevent lumps in the filling.
- Avoid Overmixing: Once the eggs are added, mix gently to keep the cheesecake texture creamy instead of dense.
- Swirl Carefully: Use a toothpick or skewer lightly so the rainbow colors stay vibrant and distinct instead of blending together.
- Cool Gradually: Letting the bars cool slowly helps reduce cracks and keeps the texture silky.
- Chill Completely: Cheesecake firms up beautifully after several hours in the refrigerator.
Kitchen Tools That Make Everything Easier
Before the mixing begins, it helps to have a few simple tools ready to go.
Mixing Bowls: You’ll need several bowls for coloring the cheesecake batter separately.
Hand Mixer or Stand Mixer: This helps create that smooth, creamy cheesecake texture.
8×8 Baking Pan: The perfect size for thick, rich bars.
Parchment Paper: Makes lifting and slicing the bars much easier.
Spatula: Useful for smoothing layers and scraping every bit of batter.
Toothpick or Skewer: Essential for creating those beautiful rainbow swirls.
Everything You’ll Need for These Creamy Rainbow Bars
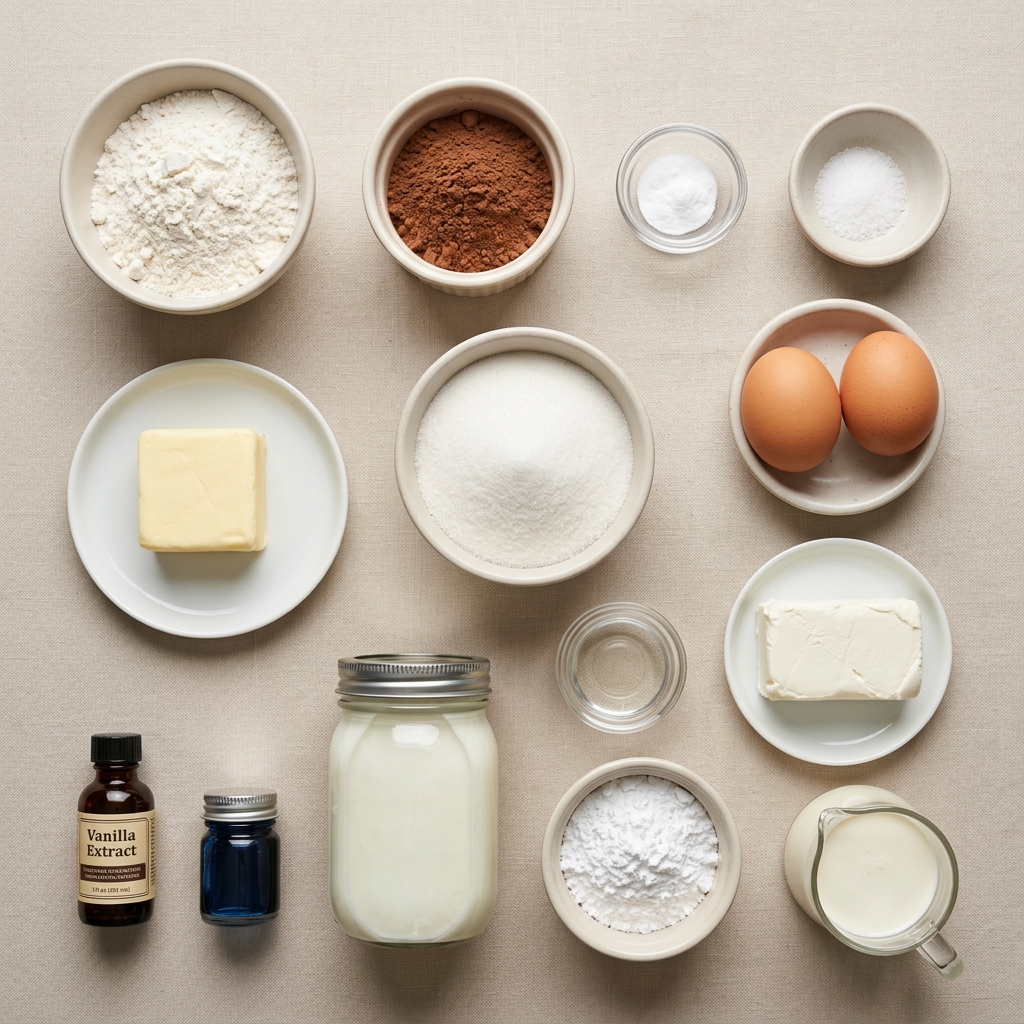
The ingredient list is wonderfully simple, but each component plays an important role in creating the perfect texture and flavor balance.
- Graham Cracker Crumbs: 2 cups, these create the buttery crunchy base that supports the creamy filling beautifully.
- Granulated Sugar: 1 cup, divided, adds sweetness to both the crust and cheesecake filling.
- Unsalted Butter: 1/2 cup melted, helps bind the crust together while adding rich flavor.
- Cream Cheese: 24 ounces softened, forms the smooth and tangy heart of the cheesecake layer.
- Sour Cream: 1/2 cup, gives the filling extra creaminess and a slight tang.
- Vanilla Extract: 2 teaspoons, adds warmth and depth to the cheesecake flavor.
- Large Eggs: 3, help create the silky cheesecake texture.
- Food Coloring: Red, orange, yellow, green, blue, and purple gel food coloring create the signature rainbow effect.
- Whipped Cream: Optional for serving, adds a light creamy finish.
Easy Ingredient Swaps You Can Try
Sometimes you need flexibility, and luckily this dessert adapts beautifully.
Graham Cracker Crumbs: Crushed vanilla cookies or digestive biscuits work wonderfully.
Sour Cream: Plain Greek yogurt makes an excellent substitute.
Granulated Sugar: Fine cane sugar can be used instead.
Vanilla Extract: Almond extract creates a slightly different but delicious flavor profile.
The Ingredients That Truly Make This Dessert Shine
A couple of ingredients really deserve extra attention here because they transform the entire dessert.
Cream Cheese: This is the soul of the recipe. Full-fat cream cheese creates the richest and smoothest texture, which makes every bite feel luxurious.
Gel Food Coloring: Gel coloring produces vibrant rainbow shades without thinning the cheesecake batter, which helps maintain the creamy consistency.
Let’s Bake These Gorgeous Rainbow Cheesecake Bars
Now comes the fun part, bringing all those colorful layers together into one dreamy dessert.
- Preheat Your Equipment: Preheat your oven to 325 degrees Fahrenheit and line an 8×8 baking pan with parchment paper.
- Combine Ingredients: Mix the graham cracker crumbs, 1/4 cup sugar, and melted butter until evenly combined. Press firmly into the prepared pan.
- Prepare Your Cooking Vessel: Bake the crust for 10 minutes, then allow it to cool slightly while preparing the filling.
- Assemble the Dish: Beat the cream cheese and remaining sugar until smooth. Add sour cream and vanilla extract, then mix in the eggs one at a time. Divide the batter evenly into six bowls and tint each with a different food coloring. Drop spoonfuls of each color randomly over the crust and gently swirl with a toothpick.
- Cook to Perfection: Bake for 35 to 40 minutes until the center is just slightly jiggly.
- Finishing Touches: Allow the bars to cool at room temperature before chilling in the refrigerator for at least 4 hours.
- Serve and Enjoy: Slice into squares and serve chilled with optional whipped cream.
The Texture and Flavor Magic Happening in Every Bite
One of the best things about these bars is the contrast between textures. The crust stays buttery and slightly crisp, while the cheesecake layer becomes rich, silky, and almost melt-in-your-mouth smooth after chilling.
The flavor develops beautifully as the bars rest in the refrigerator. The vanilla becomes more pronounced, the tanginess softens slightly, and the creamy filling turns even more luxurious.
And those colorful swirls somehow make the whole dessert taste even more fun.
Helpful Tricks for Bakery Style Results
Once you’ve made these once, you’ll probably start experimenting with your own little twists.
- Use gel food coloring instead of liquid coloring for brighter swirls.
- Chill the bars overnight for the cleanest slices.
- Wipe the knife clean between cuts for sharp edges.
- Add rainbow sprinkles on top for extra celebration vibes.
Common Cheesecake Mistakes and How to Avoid Them
Cheesecake can feel intimidating, but these simple fixes make a huge difference.
- Avoid overbaking because the bars continue setting while cooling.
- Don’t skip room temperature ingredients or the batter may turn lumpy.
- Avoid aggressive swirling or the rainbow colors can become muddy.
- Never slice the bars before fully chilling because the texture needs time to firm up.
Nutrition Information You’ll Want to Know
Servings: 12 bars
Calories per serving: Approximately 340 calories
Note: These are approximate values.
Timing Your Baking Session Perfectly
Planning ahead makes cheesecake baking feel stress-free.
Prep Time: 25 minutes
Cook Time: 40 minutes
Total Time: 5 hours 5 minutes including chilling time
Make Ahead and Storage Tips That Actually Work
One of my favorite things about cheesecake bars is how well they store. In fact, they usually taste even better the next day.
Store the bars in an airtight container in the refrigerator for up to 5 days. For longer storage, wrap individual bars tightly and freeze for up to 2 months.
To serve after freezing, thaw overnight in the refrigerator for the best texture.
Fun Ways to Serve These Rainbow Bars
These bars already look impressive, but a few serving ideas make them feel even more special.
Serve them with whipped cream, fresh berries, or colorful sprinkles for extra flair. They also pair beautifully with coffee, iced lattes, or cold milk.
For parties, arrange the bars on a white platter to really make the rainbow colors pop.
Creative Ideas for Leftover Cheesecake Bars
If you somehow end up with leftovers, there are plenty of delicious ways to repurpose them.
Try crumbling the bars over vanilla ice cream for a colorful sundae topping. You can also layer pieces into parfait glasses with whipped cream and fruit.
Some people even freeze small squares for a cheesecake-style frozen treat.
Extra Little Details That Make a Big Difference
Small details often create the most memorable desserts.
Use parchment paper with overhanging edges for easy removal. Let the bars chill completely before slicing, and always use a sharp knife for clean presentation.
A tiny sprinkle of flaky salt on top can also make the sweetness feel more balanced.
Turn These Cheesecake Bars Into a Total Showstopper
Presentation takes this dessert from fun to unforgettable.
Arrange the slices neatly with the rainbow swirls facing outward so every color is visible. Add whipped cream swirls or pastel sprinkles for extra celebration energy.
Natural lighting makes the colors look even more vibrant if you’re serving these at a gathering or photographing them for social media.
Delicious Variations Worth Trying
Once you master the base recipe, there are endless ways to customize it.
- Chocolate Rainbow Bars: Add melted white chocolate into the cheesecake batter for extra richness.
- Birthday Cake Style: Mix rainbow sprinkles directly into the filling.
- Citrus Twist: Add lemon zest for a brighter flavor profile.
- Cookie Crust Version: Swap graham crackers for crushed vanilla sandwich cookies.
- Mini Cheesecake Cups: Use cupcake liners for individually portioned treats.
FAQ’s
1. Can I use liquid food coloring instead of gel?
Yes, but gel coloring creates more vibrant colors without thinning the batter.
2. How do I know when the cheesecake bars are done?
The edges should look set while the center still has a slight jiggle.
3. Can I freeze these bars?
Absolutely. Wrap them tightly and freeze for up to 2 months.
4. Why did my cheesecake crack?
Overmixing or sudden temperature changes can cause cracking.
5. Can I make these gluten free?
Yes, simply use gluten free graham crackers for the crust.
6. Do I need a water bath?
No, these bars bake beautifully without one.
7. Can I use low fat cream cheese?
You can, but full-fat cream cheese gives the creamiest texture.
8. How long should the bars chill?
At least 4 hours, though overnight is even better.
9. Can I make these in advance for parties?
Definitely. They’re perfect for preparing a day ahead.
10. What’s the best way to cut clean slices?
Use a sharp knife and wipe it clean between each cut.
Conclusion
Rainbow cheesecake bars bring together creamy texture, buttery crunch, and playful color in the most irresistible way. They feel festive, comforting, and surprisingly easy all at once. Whether you’re making them for a birthday, holiday, or simply because you want something cheerful and sweet, these bars always manage to make people smile. Trust me, once you make them, they’ll quickly become one of those desserts everyone requests again and again.
Print
Rainbow Cheesecake Bars Recipe
- Prep Time: 25 minutes
- Cook Time: 40 minutes
- Total Time: 5 hours 5 minutes
- Yield: 12 bars 1x
- Category: Dessert
- Method: Baking
- Cuisine: American
- Diet: Vegetarian
Description
Creamy rainbow cheesecake bars with a buttery graham cracker crust and vibrant swirls of color. These chilled dessert bars are smooth, rich, playful, and perfect for birthdays, parties, or whenever you want a cheerful homemade treat.
Ingredients
- 2 cups graham cracker crumbs
- 1 cup granulated sugar, divided
- 1/2 cup unsalted butter, melted
- 24 ounces cream cheese, softened
- 1/2 cup sour cream
- 2 teaspoons vanilla extract
- 3 large eggs
- Red gel food coloring
- Orange gel food coloring
- Yellow gel food coloring
- Green gel food coloring
- Blue gel food coloring
- Purple gel food coloring
- Whipped cream for serving, optional
Instructions
- Preheat oven to 325 degrees Fahrenheit and line an 8×8 baking pan with parchment paper.
- Combine graham cracker crumbs, 1/4 cup granulated sugar, and melted butter in a bowl until evenly mixed.
- Press the crust mixture firmly into the prepared baking pan.
- Bake the crust for 10 minutes, then allow it to cool slightly.
- Beat softened cream cheese with the remaining sugar until smooth and creamy.
- Mix in sour cream and vanilla extract.
- Add eggs one at a time, mixing gently after each addition.
- Divide the cheesecake batter evenly into six separate bowls.
- Color each bowl with a different gel food coloring.
- Drop spoonfuls of each colored batter randomly over the crust.
- Use a toothpick or skewer to gently swirl the colors together.
- Bake for 35 to 40 minutes until the edges are set and the center is slightly jiggly.
- Cool completely at room temperature.
- Refrigerate for at least 4 hours before slicing into bars.
- Serve chilled with whipped cream if desired.
Notes
- Use room temperature cream cheese for the smoothest texture.
- Gel food coloring creates brighter colors without thinning the batter.
- Chill overnight for the cleanest slices.
- Wipe the knife clean between cuts for neat presentation.
Nutrition
- Serving Size: 1 bar
- Calories: 340
- Sugar: 24g
- Sodium: 240mg
- Fat: 23g
- Saturated Fat: 13g
- Unsaturated Fat: 8g
- Trans Fat: 0g
- Carbohydrates: 30g
- Fiber: 1g
- Protein: 5g
- Cholesterol: 92mg
Keywords: rainbow cheesecake bars, colorful cheesecake dessert, cheesecake bars recipe, rainbow dessert bars, baked cheesecake squares, party cheesecake bars, creamy cheesecake dessert