Blue Velvet Cake Recipe
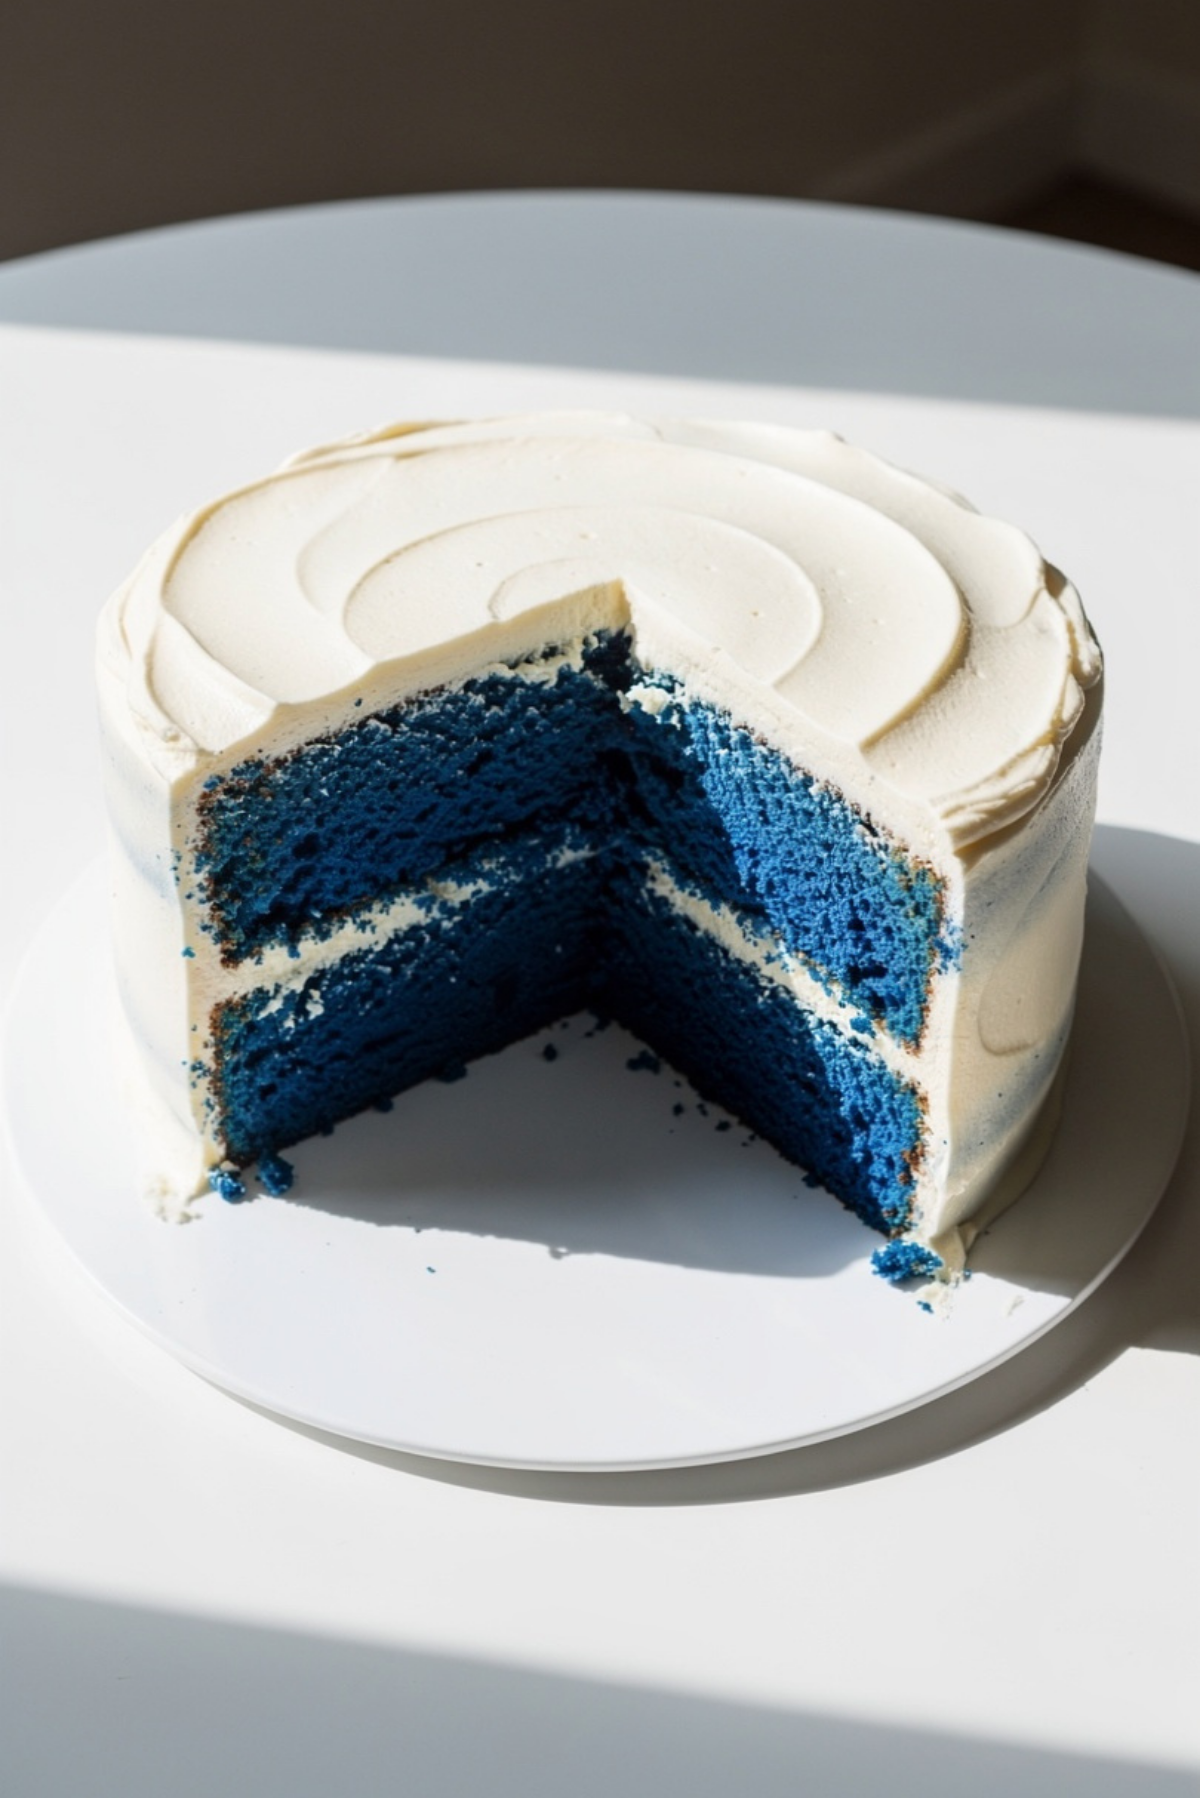
There is something undeniably magical about slicing into a cake and revealing those bold, vibrant blue layers tucked beneath silky cream cheese frosting. This blue velvet cake feels playful and elegant at the same time, and honestly, it turns any ordinary gathering into something worth remembering. The crumb is soft and velvety, the frosting is smooth and tangy, and every bite feels rich without being too heavy. Trust me, you’re going to love this one because it has that perfect balance of beauty and flavor that keeps everyone reaching for another slice.
Why This Stunning Cake Always Steals the Spotlight
Blue velvet cake has a way of making people stop and stare before they even take the first bite. The dramatic color instantly grabs attention, but what keeps everyone hooked is the incredibly tender texture and buttery vanilla cocoa flavor hiding inside each layer.
This one’s a total game-changer for birthdays, baby showers, holiday tables, or even those moments when you just want to bake something that feels extra special. The cream cheese frosting wraps around the cake like a silky cloud, adding a slight tang that perfectly balances the sweetness.
And now that your sweet tooth is fully awake, let’s dive into the story behind this gorgeous dessert.
The Sweet Story Behind This Colorful Velvet Cake
Velvet cakes have been around for decades, originally becoming popular because of their incredibly smooth and delicate crumb. Traditional red velvet became famous in the United States during the early twentieth century, especially in Southern baking culture.
Blue velvet cake is a playful modern twist on that classic favorite. Bakers began experimenting with vibrant food coloring to create eye-catching versions for themed celebrations, gender reveals, and festive events. The flavor profile stayed wonderfully familiar, rich vanilla with just a touch of cocoa, while the bold color gave it a fresh personality.
What makes this version special is that it keeps all the comforting qualities of classic velvet cake while adding a fun, elegant visual surprise.
Reasons Bakers Keep Coming Back to This Recipe
This cake is more than just pretty layers. It’s reliable, approachable, and surprisingly easy to master.
Versatile: Perfect for birthdays, weddings, holiday parties, or casual weekend baking. You can decorate it simply or turn it into a dramatic centerpiece.
Budget-Friendly: Most ingredients are pantry staples, which means you can create a bakery-style dessert without overspending.
Quick and Easy: The batter comes together smoothly with simple mixing steps that even beginner bakers can handle confidently.
Customizable: You can switch frosting styles, add fillings, or decorate with berries, sprinkles, or white chocolate curls.
Crowd-Pleasing: The soft texture and balanced sweetness appeal to both kids and adults.
Make-Ahead Friendly: The cake layers can be baked ahead and frosted later, which makes entertaining so much easier.
Great for Leftovers: The flavor actually deepens after a day in the fridge, making every leftover slice even better.
Smart Baking Secrets for a Perfect Velvet Texture
A few small tricks can take your cake from good to unforgettable.
- Use Room Temperature Ingredients: Cold eggs and butter can create uneven batter and affect the final texture.
- Do Not Overmix: Once the flour goes in, mix gently to keep the crumb soft and tender.
- Measure Flour Properly: Spoon flour into the measuring cup instead of scooping directly from the bag.
- Use Gel Food Coloring: Gel coloring creates a deeper blue shade without thinning the batter.
- Chill Before Frosting: Slightly chilled cake layers are easier to frost cleanly.
Kitchen Tools That Make the Process Easier
Before getting started, gathering the right tools makes everything smoother and more enjoyable.
Mixing Bowls: Essential for separating wet and dry ingredients cleanly.
Electric Mixer: Helps create a light and fluffy batter with minimal effort.
Cake Pans: Two 9 inch round pans work perfectly for even layers.
Cooling Rack: Prevents trapped steam from making the cake soggy.
Offset Spatula: Makes frosting easier and gives the cake a polished finish.
Measuring Cups and Spoons: Accurate measurements are key for velvet cake success.
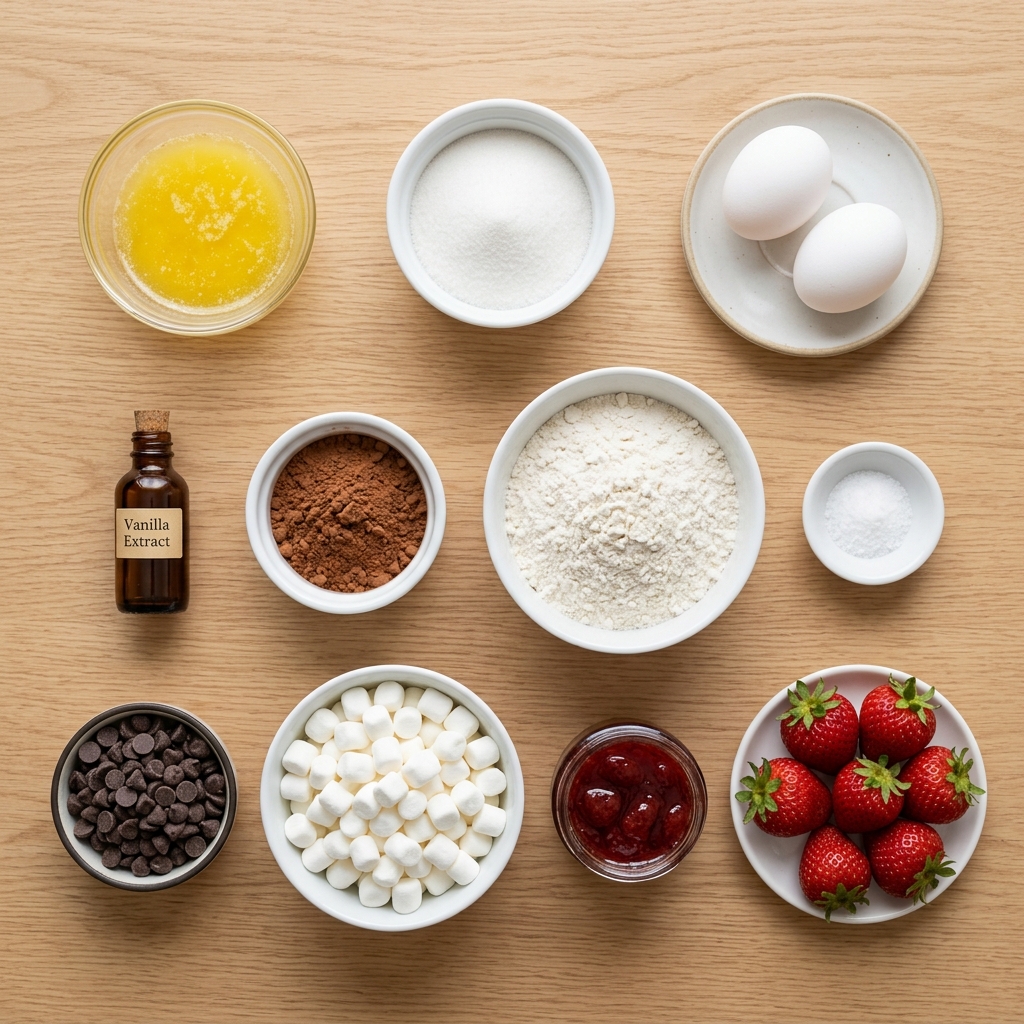
Ingredients That Build the Perfect Blue Velvet Cake
The beauty of this dessert comes from the way each ingredient works together to create flavor, moisture, and that signature velvet texture.
- All-Purpose Flour: 2 ½ cups, creates the structure while still keeping the crumb soft.
- Unsweetened Cocoa Powder: 2 tablespoons, adds subtle depth without overpowering the vanilla flavor.
- Baking Soda: 1 teaspoon, helps the cake rise beautifully.
- Salt: ½ teaspoon, balances sweetness and enhances flavor.
- Unsalted Butter: ½ cup softened, gives richness and tenderness.
- Granulated Sugar: 1 ½ cups, sweetens the cake while helping create a fluffy texture.
- Large Eggs: 2 room temperature eggs, provide structure and moisture.
- Vanilla Extract: 2 teaspoons, brings warm bakery-style flavor.
- Blue Gel Food Coloring: 1 tablespoon, creates the vibrant signature color.
- Buttermilk: 1 cup, keeps the crumb moist and tender.
- White Vinegar: 1 teaspoon, reacts with the baking soda for extra softness.
- Cream Cheese: 16 ounces softened, forms the creamy tangy frosting base.
- Powdered Sugar: 4 cups, sweetens and thickens the frosting.
- Heavy Cream: 2 tablespoons, smooths out the frosting texture.
Easy Ingredient Swaps for Flexible Baking
Sometimes you need a quick substitution, and thankfully this cake adapts beautifully.
Buttermilk: Mix regular milk with a tablespoon of lemon juice or vinegar.
Unsalted Butter: Substitute with neutral vegetable oil for extra moisture.
Cream Cheese: Mascarpone can create a slightly milder frosting flavor.
Heavy Cream: Whole milk works in smaller amounts if needed.
All-Purpose Flour: Cake flour creates an even softer crumb.
The Ingredients That Truly Make This Cake Shine
A couple of ingredients deserve extra attention because they completely transform the final result.
Buttermilk: This ingredient gives the cake its signature tender texture and slight tanginess that balances the sweetness beautifully.
Cream Cheese: The frosting would not feel complete without that creamy tang that melts perfectly against the soft cake layers.
Let’s Bake This Gorgeous Cake Together
Now comes the fun part, and honestly this recipe feels incredibly satisfying from the very first mix of batter to the final frosting swirl.
- Preheat Your Equipment: Preheat the oven to 350°F and grease two 9 inch cake pans. Line the bottoms with parchment paper for easy release.
- Combine Ingredients: In one bowl whisk together flour, cocoa powder, baking soda, and salt. In another large bowl beat butter and sugar until light and fluffy. Add eggs one at a time, then mix in vanilla and blue food coloring. Alternate adding the dry ingredients and buttermilk until smooth. Stir in vinegar gently at the end.
- Prepare Your Cooking Vessel: Divide the batter evenly between the prepared cake pans and smooth the tops gently.
- Assemble the Dish: Tap the pans lightly on the counter to remove air bubbles and ensure even baking.
- Cook to Perfection: Bake for 28 to 32 minutes or until a toothpick inserted in the center comes out clean.
- Finishing Touches: Cool the cake layers completely before frosting. Beat cream cheese, powdered sugar, and heavy cream until smooth and fluffy. Frost the layers generously.
- Serve and Enjoy: Slice and serve chilled or at room temperature for the best texture and flavor.
The Texture and Flavor That Make Every Bite Memorable
The first thing you notice is how soft the crumb feels against the fork. It’s delicate, moist, and incredibly velvety without being dense. Then comes the flavor, buttery vanilla notes mixed with subtle cocoa richness and balanced by the creamy tang of the frosting.
The frosting itself feels smooth and airy, almost melting into the cake layers. Together they create that perfect contrast between sweet, creamy, and slightly tangy flavors that makes velvet cakes so irresistible.
Helpful Tricks for an Even Better Cake
A few little details can make a huge difference once you start baking regularly.
- Let the cake chill before slicing for cleaner layers.
- Use a serrated knife for neat slices without crushing the crumb.
- Add white chocolate curls for an elegant finish.
- Store the cake covered so the frosting stays silky and fresh.
Common Mistakes and How to Avoid Them
Even simple cakes can run into trouble if a few details get overlooked.
- Overmixing the batter can create a dense cake instead of a soft velvet texture.
- Using cold cream cheese can leave lumps in the frosting.
- Adding too much food coloring may slightly affect flavor and texture.
- Frosting warm cake layers can cause sliding and melting.
Nutrition Information Worth Knowing
Servings: 12
Calories per serving: 540
Note: These are approximate values.
Timing Breakdown for Stress-Free Baking
Prep Time: 30 minutes
Cook Time: 30 minutes
Total Time: 1 hour
Make-Ahead and Storage Tips That Actually Work
One of the best things about this cake is how beautifully it stores. You can bake the layers a day ahead and wrap them tightly before frosting. In fact, the flavor gets even better after resting overnight.
Store leftover slices in an airtight container in the refrigerator for up to 5 days. For longer storage, freeze individual slices tightly wrapped for up to 2 months. Let frozen cake thaw overnight in the fridge before serving.
Delicious Ways to Serve This Beautiful Dessert
This cake looks incredible on its own, but pairing it with a few extras makes it even more memorable.
Serve slices with fresh berries, vanilla ice cream, or hot coffee for a cozy dessert experience. For celebrations, decorate the top with white chocolate shavings or elegant buttercream swirls.
Creative Ideas for Transforming Leftovers
Leftover cake can turn into some seriously fun desserts.
- Crumble slices into parfaits with whipped cream.
- Turn leftovers into cake pops dipped in white chocolate.
- Layer pieces into trifles with pudding and berries.
- Freeze slices for quick sweet cravings later.
Extra Tips for the Best Baking Experience
Sometimes the smallest details make the biggest difference.
- Use parchment paper for easy layer removal.
- Chill frosting slightly if your kitchen is warm.
- Level cake layers before frosting for a cleaner look.
- Wipe the knife between slices for bakery-style presentation.
Simple Tricks to Make It Look Bakery-Worthy
Presentation takes this cake from homemade to absolutely stunning.
Use a rotating cake stand while frosting for smoother edges. Add piped frosting swirls around the top edge and sprinkle a few white chocolate curls for elegant contrast against the vibrant blue layers.
Let me tell you, it’s worth every bite once you see everyone’s reaction at the table.
Fun Variations You Can Try Next Time
This cake is incredibly adaptable once you feel comfortable with the base recipe.
- Berry Velvet Cake: Add fresh blueberries between the layers for fruity freshness.
- White Chocolate Version: Fold white chocolate chips into the batter for extra richness.
- Lemon Blue Velvet: Add lemon zest to the frosting for a bright citrus twist.
- Cupcake Style: Turn the batter into cupcakes for parties and gatherings.
- Cookies and Cream Twist: Add crushed sandwich cookies between frosting layers.
FAQ’s
1. Can I make this cake without gel food coloring?
Yes, but gel coloring creates the boldest blue shade without thinning the batter.
2. Can I use regular milk instead of buttermilk?
Yes, although buttermilk gives the softest texture and best flavor balance.
3. How do I keep the cake moist?
Avoid overbaking and store the cake covered in the refrigerator.
4. Can I freeze the cake layers?
Absolutely. Wrap them tightly and freeze for up to two months.
5. What frosting works best besides cream cheese frosting?
Vanilla buttercream also pairs beautifully with this cake.
6. Can I make this recipe into cupcakes?
Yes, bake cupcakes for about 18 to 20 minutes.
7. Why is my cake dense instead of soft?
Overmixing the batter is usually the main reason.
8. How much food coloring should I use?
About one tablespoon of gel coloring creates a vibrant shade.
9. Can I prepare the frosting ahead of time?
Yes, refrigerate it for up to three days before using.
10. Does blue velvet taste different from red velvet?
The flavor is very similar, mostly vanilla with subtle cocoa notes.
Conclusion
Blue velvet cake brings together everything people love about classic velvet desserts, soft texture, rich flavor, creamy frosting, and a dramatic look that instantly turns heads. It feels festive, comforting, and just a little bit magical all at once. Whether you’re baking for a birthday, celebration, or simply because you want something beautiful on the table, this recipe delivers every single time. Trust me, once you slice into those vibrant layers and taste that silky frosting, you’ll understand exactly why this cake becomes everyone’s new favorite.
Print
Blue Velvet Cake Recipe
- Prep Time: 30 minutes
- Cook Time: 30 minutes
- Total Time: 1 hour
- Yield: 12 servings 1x
- Category: Dessert
- Method: Baking
- Cuisine: American
- Diet: Vegetarian
Description
This blue velvet cake is soft, moist, and beautifully vibrant with rich vanilla cocoa flavor layered between silky cream cheese frosting. Perfect for birthdays, celebrations, or whenever you want a stunning dessert that tastes just as incredible as it looks.
Ingredients
- 2 ½ cups all-purpose flour
- 2 tablespoons unsweetened cocoa powder
- 1 teaspoon baking soda
- ½ teaspoon salt
- ½ cup unsalted butter, softened
- 1 ½ cups granulated sugar
- 2 large eggs, room temperature
- 2 teaspoons vanilla extract
- 1 tablespoon blue gel food coloring
- 1 cup buttermilk
- 1 teaspoon white vinegar
- 16 ounces cream cheese, softened
- 4 cups powdered sugar
- 2 tablespoons heavy cream
Instructions
- Preheat the oven to 350°F and grease two 9 inch cake pans. Line the bottoms with parchment paper.
- In a medium bowl whisk together the flour, cocoa powder, baking soda, and salt.
- In a large bowl beat the butter and granulated sugar until light and fluffy.
- Add the eggs one at a time, mixing well after each addition.
- Mix in the vanilla extract and blue gel food coloring.
- Alternate adding the dry ingredients and buttermilk until the batter becomes smooth.
- Stir in the white vinegar gently.
- Divide the batter evenly between the prepared cake pans.
- Bake for 28 to 32 minutes or until a toothpick inserted in the center comes out clean.
- Allow the cake layers to cool completely.
- Beat the cream cheese, powdered sugar, and heavy cream until smooth and fluffy.
- Frost the cooled cake layers generously and serve.
Notes
- Use gel food coloring for the richest blue color.
- Do not overmix the batter once the flour is added.
- Chill the cake slightly before frosting for cleaner layers.
- Store leftovers covered in the refrigerator for up to 5 days.
Nutrition
- Serving Size: 1 slice
- Calories: 540
- Sugar: 43g
- Sodium: 310mg
- Fat: 28g
- Saturated Fat: 16g
- Unsaturated Fat: 10g
- Trans Fat: 0g
- Carbohydrates: 66g
- Fiber: 1g
- Protein: 6g
- Cholesterol: 92mg
Keywords: blue velvet cake, velvet cake, cream cheese frosting cake, celebration cake, homemade cake recipe, colorful cake recipe, birthday cake