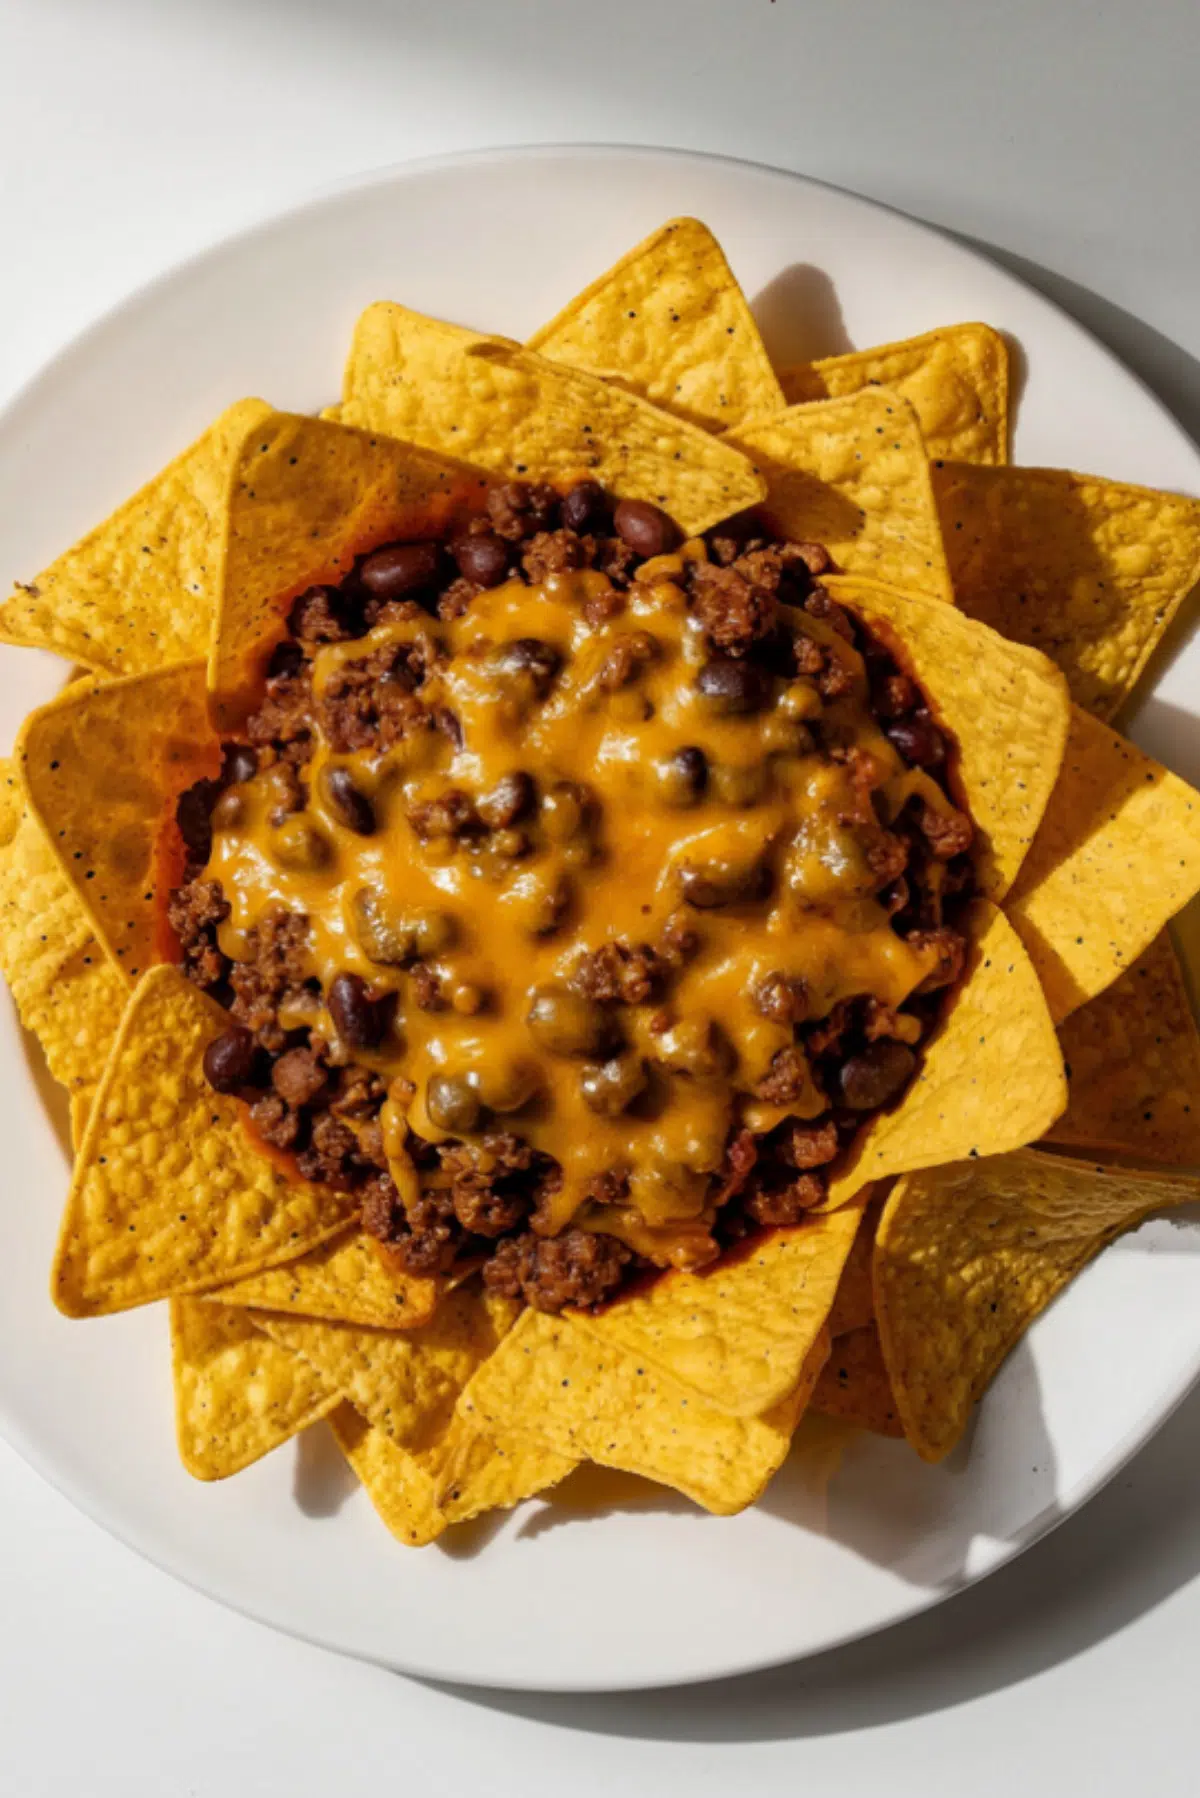
Chili Cheese Nachos
There is something about a big plate of nachos that instantly makes everything feel more fun. The crunch of the chips, the rich warmth of the chili, and that gooey melted cheese pulling with every bite, it is pure comfort. Whether it is game night, a casual dinner, or just one of those cravings you cannot ignore, this dish always delivers. Trust me, you are going to love this.
Why These Nachos Always Steal the Show
It all starts with layers, and not just any layers. We are talking crispy chips that stay crunchy, a hearty chili that brings depth, and cheese that melts into every corner. Each bite feels balanced and satisfying, with just enough spice and creaminess to keep you going back for more. This one is a total game changer when you want something quick but still packed with flavor.
A Little Story Behind This Classic Favorite
Nachos have roots that trace back to northern Mexico, where they were first created as a simple snack. Over time, they evolved into something bigger, especially in places like Texas where chili became a natural addition. Chili cheese nachos are now a staple at gatherings, sports events, and casual meals, bringing people together around one irresistible plate.
Why This Recipe Works Every Single Time
Before we dive into the kitchen, let me show you why this one never disappoints.
Versatile: You can serve it as a snack, appetizer, or even a full meal, depending on your mood and portion size.
Budget-Friendly: Simple ingredients like chips, cheese, and chili make this easy on your wallet without sacrificing flavor.
Quick and Easy: From start to finish, it comes together fast, perfect for busy days or last minute cravings.
Customizable: You can adjust spice levels, toppings, or even swap ingredients to match your taste.
Crowd-Pleasing: Everyone loves nachos, and this version is always the first to disappear.
Make-Ahead Friendly: You can prepare the chili in advance and assemble when ready.
Great for Leftovers: Any extra can be repurposed into wraps, bowls, or even loaded baked potatoes.
Chef Secrets That Make All the Difference
Let me share a few insider tips that take these nachos from good to unforgettable.
- Use sturdy tortilla chips so they hold up under the toppings.
- Warm the chili before assembling so everything melts together beautifully.
- Layer the chips and toppings instead of piling everything on top.
- Use freshly shredded cheese for better melting and texture.
Tools You Will Need in Your Kitchen
Before we start, gather these essentials so everything flows smoothly.
Baking Sheet: Helps spread the nachos evenly for consistent heating.
Saucepan: Perfect for warming the chili gently.
Oven: Needed to melt the cheese to perfection.
Spatula: Useful for serving without breaking the layers too much.
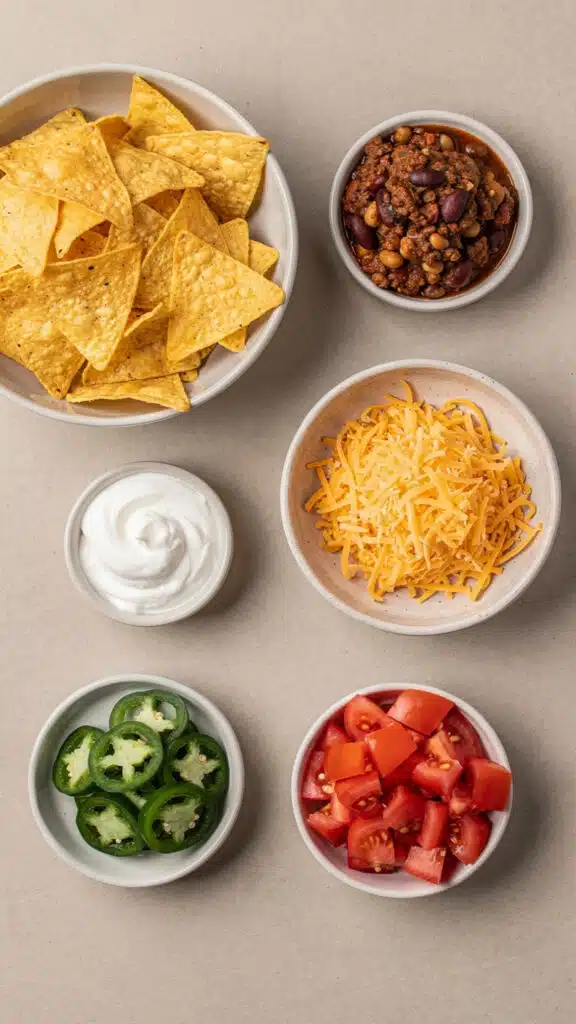
Ingredients That Bring It All Together
Every ingredient plays its part, creating that perfect bite.
- Tortilla Chips: 200 grams, they provide the crunchy base that holds everything together.
- Chili with Beans: 2 cups, rich and hearty, it adds depth and warmth.
- Cheddar Cheese: 2 cups shredded, melts into a creamy, savory layer.
- Sour Cream: 1 cup, adds a cool and creamy contrast.
- Jalapenos: 1/2 cup sliced, brings a fresh kick of heat.
- Diced Tomatoes: 1 cup, adds brightness and a juicy texture.
Easy Swaps If You Want to Mix Things Up
Cooking should always feel flexible, so here are some simple alternatives.
Cheddar Cheese: Use Monterey Jack or a cheese blend.
Chili with Beans: Swap with vegetarian chili if preferred.
Sour Cream: Greek yogurt works as a lighter option.
Jalapenos: Use mild peppers if you want less heat.
Spotlight on Key Ingredients
Let us take a closer look at what really makes this dish shine.
Chili with Beans: This is where the heartiness comes from, rich, slightly spicy, and deeply satisfying.
Cheddar Cheese: The melt factor is everything here, giving that irresistible stretch and flavor.
Let’s Build These Nachos Step by Step
And now let’s dive into the fun part, bringing everything together.
- Preheat Your Equipment: Set your oven to 180°C so it is ready for melting the cheese evenly.
- Combine Ingredients: Warm the chili in a saucepan until hot and slightly bubbling.
- Prepare Your Cooking Vessel: Line a baking sheet with parchment paper for easy cleanup.
- Assemble the Dish: Spread a layer of chips, add chili and cheese, then repeat the layers for even coverage.
- Cook to Perfection: Place in the oven for about 10 minutes until the cheese is fully melted.
- Finishing Touches: Add sour cream, jalapenos, and diced tomatoes on top.
- Serve and Enjoy: Serve immediately while everything is warm and gooey.
The Perfect Balance of Crunch and Creaminess
What makes this dish special is the contrast. You get crispy chips on the edges, soft ones soaked in chili, and creamy cheese tying it all together. The heat from the jalapenos and the coolness of the sour cream create a balance that keeps every bite exciting.
Helpful Tips for the Best Results
A few small adjustments can make a big difference.
- Use a large baking sheet to avoid overcrowding.
- Serve immediately to keep the chips crisp.
- Add toppings after baking to keep them fresh.
Common Mistakes to Avoid
Even simple recipes have their pitfalls, so here is what to watch out for.
- Overloading the chips, which can make them soggy
- Using pre-shredded cheese that does not melt smoothly
- Skipping layers, which leads to uneven flavor
Nutrition Snapshot
Servings: 4
Calories per serving: 520
Note: These are approximate values.
Time Breakdown
Prep Time: 10 minutes
Cook Time: 10 minutes
Total Time: 20 minutes
Make-Ahead and Storage Tips
You can prepare the chili ahead of time and store it in the fridge for up to three days. When ready, simply reheat and assemble fresh. Leftovers can be stored in an airtight container, though the chips may soften. Reheat in the oven to bring back some texture.
Serving Ideas That Elevate the Experience
Serve these nachos with fresh lime wedges or a side of guacamole for extra flavor. They also pair beautifully with a simple green salad to balance the richness.
Turn Leftovers Into Something New
If you have leftovers, do not worry. You can turn them into a nacho bowl, stuff them into wraps, or even use them as a topping for baked potatoes.
Extra Tips for Maximum Flavor
Add a sprinkle of fresh herbs like cilantro for brightness. A squeeze of lime right before serving can also lift the flavors beautifully.
Make It Look as Good as It Tastes
Serve on a large platter so the layers are visible. Add toppings right before serving so everything looks fresh and vibrant.
Fun Variations to Try
- Add black olives for a salty twist
- Use spicy chili for extra heat
- Mix in corn for a sweet contrast
- Try a cheese blend for deeper flavor
FAQ’s
1. Can I make this without an oven?
Yes, you can melt the cheese in a covered pan on the stove.
2. How do I keep chips from getting soggy?
Layer carefully and avoid too much liquid.
3. Can I make it vegetarian?
Absolutely, just use vegetarian chili.
4. What cheese melts best?
Cheddar and Monterey Jack both melt beautifully.
5. Can I prepare it ahead?
You can prep ingredients, but assemble just before baking.
6. How spicy is it?
It depends on the chili and jalapenos used.
7. Can I freeze it?
It is not recommended as chips lose texture.
8. What can I serve with it?
Guacamole, salsa, or a fresh salad.
9. Can I use store bought chili?
Yes, it works perfectly.
10. How do I reheat leftovers?
Use the oven for best results.
Conclusion
There you have it, a simple yet incredibly satisfying dish that brings comfort and flavor together in every bite. It is easy, fun, and perfect for sharing, or not, depending on how hungry you are. Let me tell you, it is worth every bite. Try it once, and it might just become your go to favorite.
Print
Chili Cheese Nachos
- Prep Time: 10 minutes
- Cook Time: 10 minutes
- Total Time: 20 minutes
- Yield: 4 servings 1x
- Category: Appetizer
- Method: Baking
- Cuisine: Mexican
- Diet: Low Lactose
Description
Crispy tortilla chips layered with rich chili, melted cheddar cheese, and fresh toppings for a warm, comforting, and crowd-pleasing dish.
Ingredients
- 200 grams tortilla chips
- 2 cups chili with beans
- 2 cups shredded cheddar cheese
- 1 cup sour cream
- 1/2 cup sliced jalapenos
- 1 cup diced tomatoes
Instructions
- Preheat your oven to 180°C.
- Warm the chili with beans in a saucepan until hot and slightly bubbling.
- Line a baking sheet with parchment paper.
- Spread a layer of tortilla chips, then add chili and shredded cheddar cheese. Repeat layers for even coverage.
- Place in the oven and bake for 10 minutes until the cheese is fully melted.
- Remove from oven and add sour cream, sliced jalapenos, and diced tomatoes on top.
- Serve immediately while warm and enjoy.
Notes
- Use sturdy tortilla chips to prevent sogginess.
- Freshly shredded cheese melts better than pre-shredded.
- Add toppings after baking to keep them fresh and vibrant.
Nutrition
- Serving Size: 1 portion
- Calories: 520
- Sugar: 6g
- Sodium: 780mg
- Fat: 28g
- Saturated Fat: 12g
- Unsaturated Fat: 14g
- Trans Fat: 0g
- Carbohydrates: 45g
- Fiber: 6g
- Protein: 20g
- Cholesterol: 45mg
Keywords: chili cheese nachos, loaded nachos, easy nachos recipe, cheesy nachos, party snack