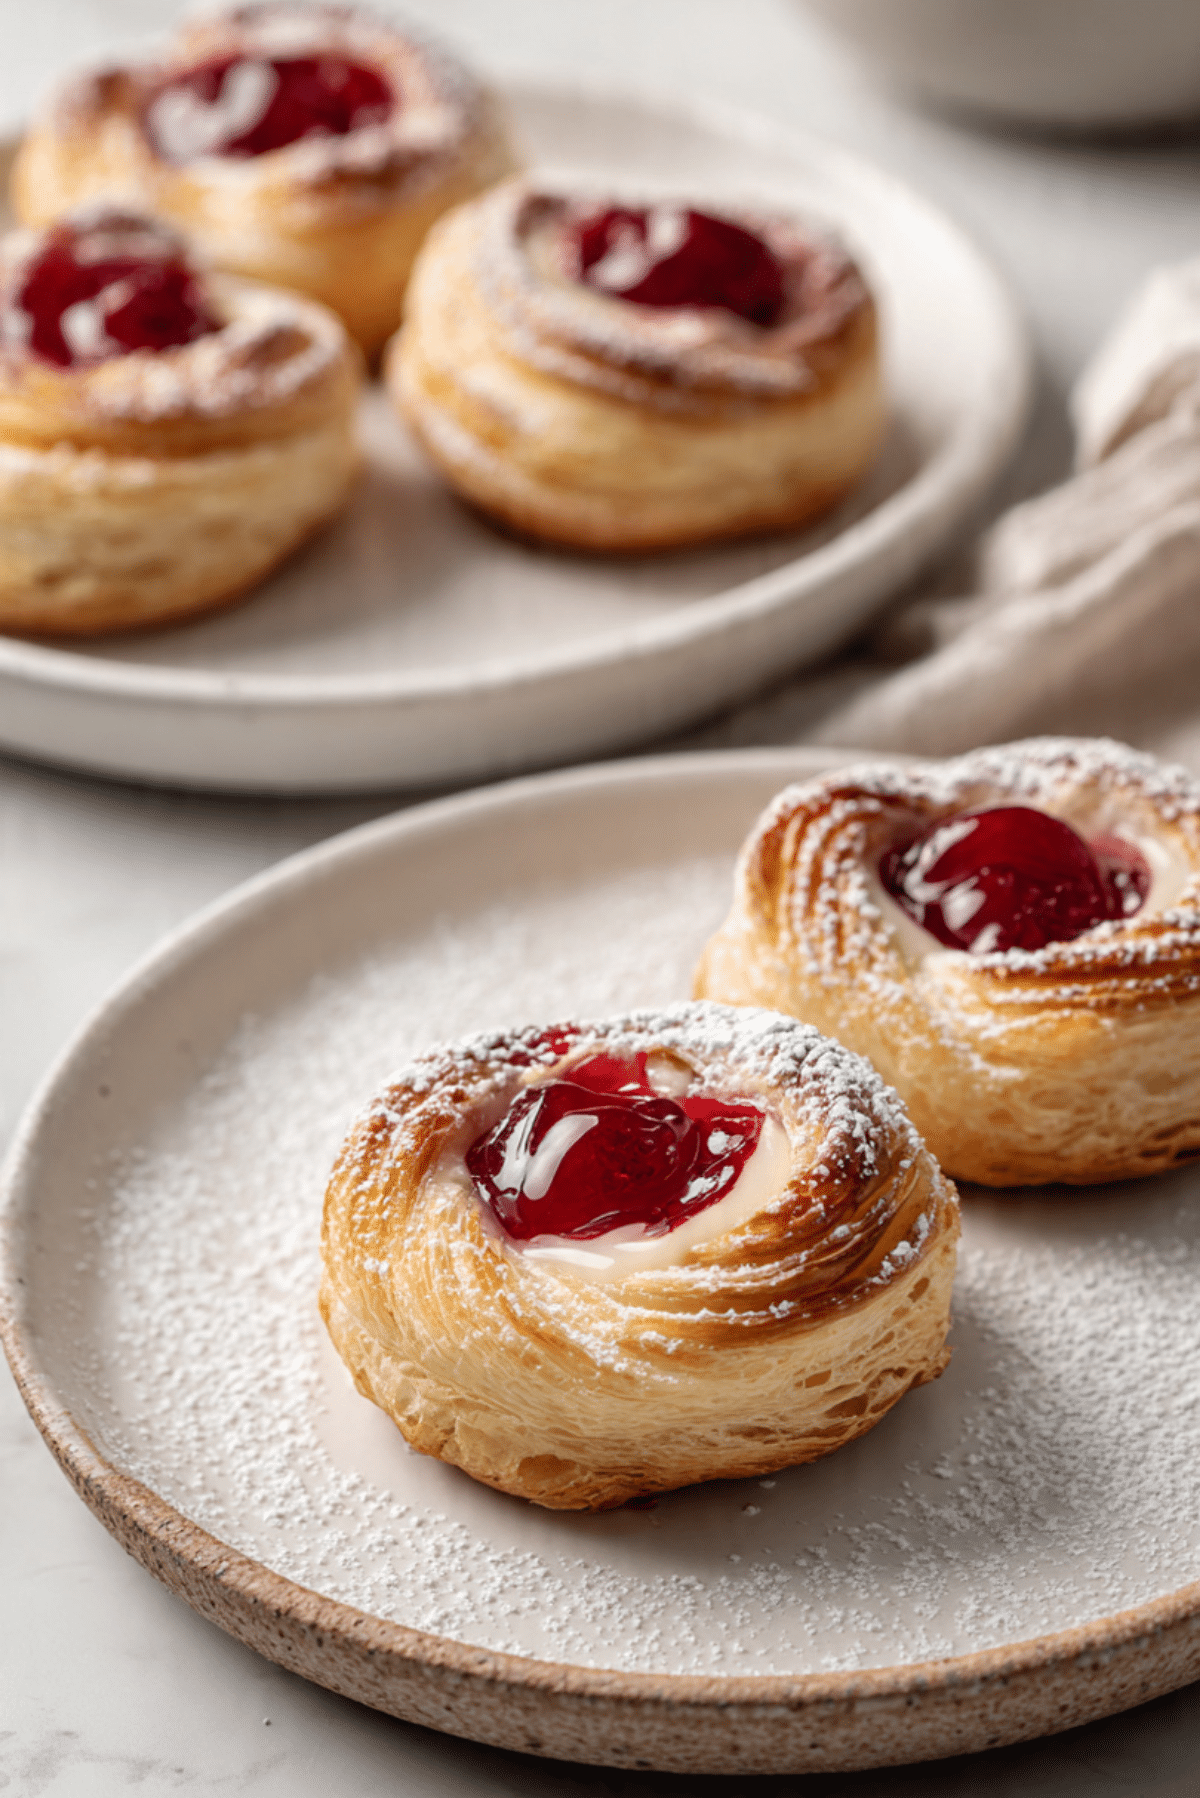
Cherry Cheesecake Danish
There is something magical about the moment a tray of freshly baked pastries comes out of the oven. The warm scent of buttery pastry fills the kitchen, and the glossy red cherries glisten like little jewels in the center. That first bite, crisp edges giving way to creamy cheesecake filling and sweet cherry topping, is pure comfort. Trust me, you are going to love this.
This pastry brings together the richness of cheesecake and the flaky charm of a classic Danish. It feels special enough for a weekend brunch, yet simple enough that you can bake it on a quiet afternoon just because you are craving something sweet. And now that we are imagining those buttery layers and creamy centers, let us dive deeper into why this treat deserves a spot in your baking routine.
A Sweet Pastry That Feels Like Bakery Magic
Some pastries feel complicated or intimidating, but this one has a surprisingly approachable charm. The golden pastry bakes up beautifully crisp on the outside while the cheesecake filling becomes soft, creamy, and slightly tangy. The cherries add brightness, sweetness, and a pop of color that makes the whole pastry feel like a little celebration.
Each bite has a balance that keeps you coming back for another. The flaky pastry crackles slightly as you bite into it, the cheesecake filling melts gently on the tongue, and the cherries bring that juicy finish that makes the flavor feel complete.
This is the kind of pastry that looks impressive on a serving plate but feels comforting and familiar at the same time. Let me tell you, it is worth every bite.
A Little Story Behind This Classic European-Inspired Pastry
Danish pastries have a fascinating history that blends European baking traditions. The laminated dough technique originally traveled from Austria to Denmark in the nineteenth century, where local bakers refined the process and created the buttery layered pastries we know today.
Over time, bakers began filling these pastries with fruit preserves, custards, and creamy cheeses. The combination of fruit and soft cheese became especially popular because it creates a wonderful contrast between sweet and slightly tangy flavors.
The cherry and cream cheese pairing feels especially timeless. It brings together the elegance of European pastry baking with the comforting flavor of classic cheesecake.
Why This Recipe Works Every Single Time
Before we start baking, it helps to understand why this pastry turns out so beautifully. Every element works together in a way that makes the recipe reliable and enjoyable.
Versatile: These pastries work for breakfast, brunch, dessert, or even a sweet afternoon snack with coffee.
Budget-Friendly: Most ingredients are pantry staples or easy grocery finds, which makes this recipe accessible for everyday baking.
Quick and Easy: Using ready made puff pastry saves time while still delivering flaky layers that taste bakery quality.
Customizable: You can easily switch the fruit topping or adjust the sweetness to suit your taste.
Crowd-Pleasing: The creamy filling and bright cherry topping make these pastries appealing to both kids and adults.
Make-Ahead Friendly: You can prepare the pastries in advance and bake them fresh when you need them.
Great for Leftovers: These pastries store well and can be gently reheated for another delicious serving later.
Insider Tips for Bakery Quality Results
A few small tricks can make your pastries look and taste even better. Bakers often rely on these simple techniques to create that perfect texture and flavor.
- Keep the pastry cold: Puff pastry layers bake best when they start cold, which helps them rise and become flaky.
- Do not overfill: A moderate amount of cheesecake filling ensures the pastries bake evenly without spilling.
- Use an egg wash: Brushing the pastry edges with egg gives them a beautiful golden finish.
- Bake until deeply golden: Proper browning adds both flavor and crisp texture.
Essential Kitchen Tools for Smooth Baking
Before we start mixing and assembling, let us take a quick look at the tools that make the process easier.
Baking Sheet: This holds the pastries and allows them to bake evenly.
Parchment Paper: Prevents sticking and keeps the pastry bottoms crisp.
Mixing Bowl: Used to blend the cheesecake filling smoothly.
Whisk or Hand Mixer: Helps create a creamy filling without lumps.
Knife or Pastry Cutter: Useful for cutting the puff pastry into neat shapes.
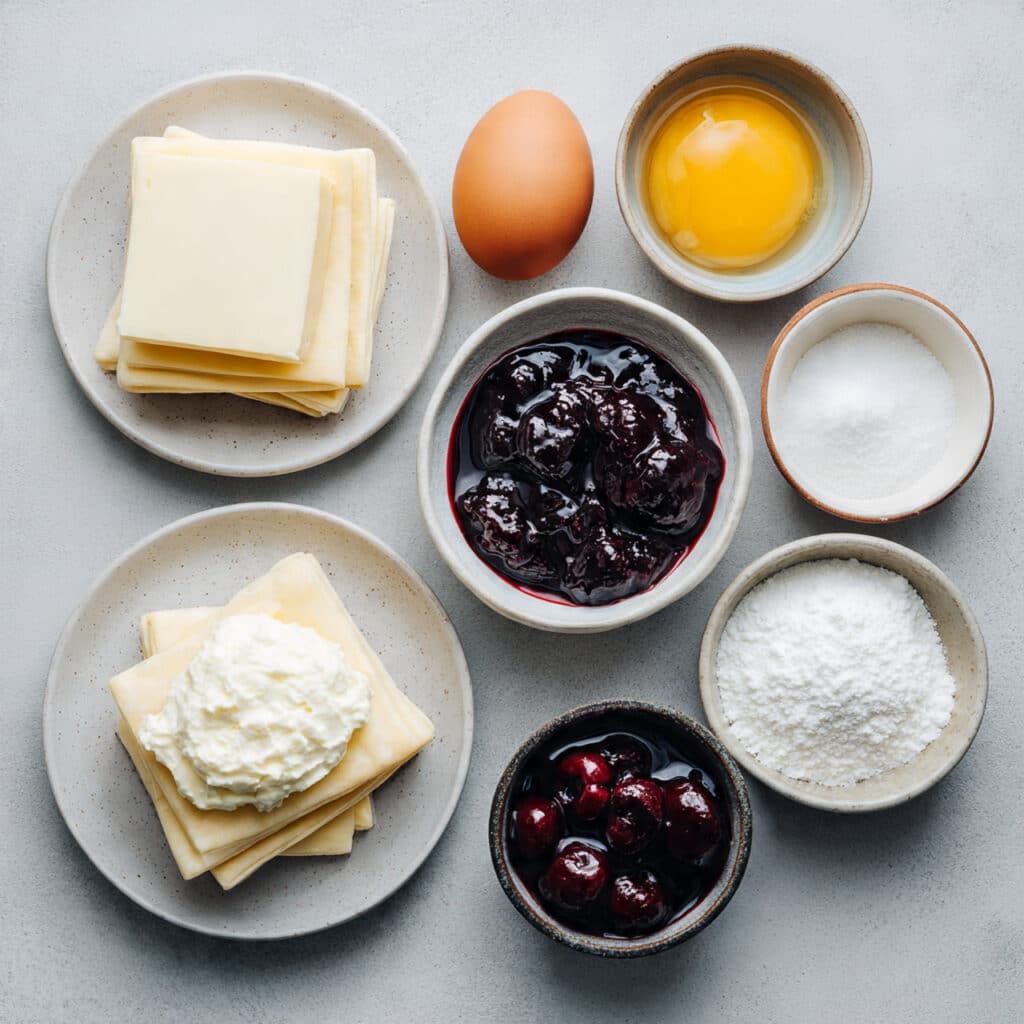
Ingredients You Will Need For This Recipe
The beauty of this pastry lies in how a handful of ingredients transform into something elegant and indulgent.
- Puff Pastry Sheets: 2 sheets, thawed. These create the flaky buttery layers that form the pastry base.
- Cream Cheese: 8 ounces, softened. This forms the creamy cheesecake filling with a slight tang.
- Granulated Sugar: 1/3 cup. Adds sweetness and balances the tangy cream cheese.
- Vanilla Extract: 1 teaspoon. Enhances the flavor of the cheesecake filling.
- Egg: 1 large egg. Used for brushing the pastry to achieve a golden finish.
- Cherry Pie Filling: 1 cup. Brings sweet, fruity brightness and that beautiful glossy topping.
- Powdered Sugar: 2 tablespoons. Lightly dusted on top for a delicate finishing touch.
Ingredient Swaps If You Need Them
Sometimes the pantry looks a little different than expected, and that is perfectly fine.
Cream Cheese: Mascarpone cheese can create an even richer filling.
Cherry Filling: Blueberry or raspberry filling works beautifully as an alternative.
Granulated Sugar: Coconut sugar can add a slightly deeper sweetness.
Vanilla Extract: Almond extract can add a subtle nutty aroma.
Star Ingredients That Make the Magic Happen
A couple of ingredients truly define the personality of this pastry.
Cream Cheese: The creamy center brings that classic cheesecake flavor that balances sweetness and richness.
Cherry Filling: The vibrant cherries provide color, juiciness, and a sweet contrast to the creamy filling.
Let’s Bake These Delicious Pastries Together
Now that everything is ready, it is time to turn these simple ingredients into something truly delightful.
- Preheat Your Equipment: Preheat the oven to 375°F and line a baking sheet with parchment paper.
- Combine Ingredients: In a bowl, mix cream cheese, granulated sugar, and vanilla extract until smooth and creamy.
- Prepare Your Cooking Vessel: Place parchment paper on the baking sheet so the pastries do not stick.
- Assemble the Dish: Cut puff pastry into squares. Add a spoonful of cheesecake filling in the center of each piece, then top with cherry filling.
- Cook to Perfection: Brush pastry edges with beaten egg and bake for about 18 minutes until golden and puffed.
- Finishing Touches: Allow the pastries to cool slightly, then dust lightly with powdered sugar.
- Serve and Enjoy: Serve warm or at room temperature and enjoy the creamy, flaky layers.
The Texture and Flavor Experience
The magic of this pastry lies in the contrast of textures. The outer pastry becomes crisp and delicate, while the inside stays soft and creamy. When you bite through the layers, the cream cheese filling offers a gentle tang that balances the sweetness of the cherries.
The cherries add a juicy burst of flavor that brightens every bite. Together, the components create a pastry that feels rich yet balanced.
Helpful Baking Tips for Success
Sometimes a few extra tips can make the baking experience smoother and more enjoyable.
- Chill the assembled pastries briefly before baking for extra flaky layers.
- Use parchment paper to prevent sticking and ensure easy cleanup.
- Let the pastries cool slightly before dusting with powdered sugar.
Common Mistakes and How to Avoid Them
Even simple pastries have a few pitfalls, but they are easy to avoid.
- Overfilling the center: Too much filling can cause the pastry to spill during baking.
- Warm pastry dough: Soft dough may not puff properly, so keep it cool before baking.
- Underbaking: Pale pastries lack flavor, so bake until golden brown.
Nutritional Snapshot
Servings: 8
Calories per serving: 280
Note: These values are approximate.
Time Breakdown
Prep Time: 15 minutes
Cook Time: 18 minutes
Total Time: 33 minutes
Make Ahead and Storage Guide
If you want to prepare ahead, assemble the pastries and store them in the refrigerator for several hours before baking. This works especially well for brunch gatherings.
Once baked, store leftovers in an airtight container in the refrigerator for up to three days. Reheat gently in the oven to restore crispness.
For longer storage, freeze the baked pastries and warm them in the oven when ready to enjoy.
Serving Ideas to Make It Special
These pastries shine on a brunch table alongside fresh fruit and hot coffee. They also pair beautifully with tea for a cozy afternoon treat.
You can even add a small scoop of vanilla yogurt or whipped cream for a dessert style presentation.
Creative Ways to Use Leftovers
If you have extras, there are some fun ways to transform them.
Cut pastries into smaller bites and serve as a sweet breakfast snack.
Warm them slightly and top with a scoop of vanilla ice cream.
Slice them into pieces and add to a dessert platter.
Extra Tips for Even Better Flavor
Try using high quality cherry filling for the brightest fruit flavor.
A tiny pinch of salt in the cheesecake filling enhances sweetness.
Always let the pastries cool slightly so the filling sets properly.
Make It Look Bakery Worthy
Presentation adds excitement before the first bite. Arrange the pastries on a serving plate and dust lightly with powdered sugar. A few fresh cherries placed nearby can add color and charm.
Fun Variations to Try
Cherry is wonderful, but you can easily experiment with other flavors.
Blueberry Cheesecake Danish: Use blueberry pie filling for a slightly tart twist.
Strawberry Cream Danish: Replace cherries with sweet strawberry filling.
Lemon Cream Danish: Add lemon zest to the cheesecake filling for brightness.
Chocolate Cherry Danish: Sprinkle mini chocolate chips into the filling.
FAQ’s
1. Can I make these pastries ahead of time?
Yes, you can assemble them and refrigerate before baking.
2. Can I freeze them?
Yes, baked pastries freeze well for up to two months.
3. Can I use homemade cherry filling?
Absolutely, homemade filling adds wonderful flavor.
4. Can I use phyllo dough instead?
Puff pastry works best because it creates thicker flaky layers.
5. How do I keep the filling from spreading?
Do not overfill the center and keep the pastry chilled before baking.
6. Can I reduce the sugar?
Yes, you can reduce it slightly depending on your taste.
7. Can I add lemon to the filling?
Yes, lemon zest adds brightness to the cheesecake mixture.
8. What if I do not have powdered sugar?
You can skip it or drizzle a light glaze instead.
9. Can I use frozen cherries?
Yes, but cook them slightly with sugar to create a thick filling.
10. Are these best served warm?
They are delicious warm but also taste great at room temperature.
Conclusion
This pastry combines flaky layers, creamy filling, and sweet cherries in a way that feels both elegant and comforting. It is the kind of treat that makes an ordinary morning feel special.
Whether you bake them for brunch, dessert, or simply because you are craving something sweet, this recipe delivers beautiful flavor and texture every time. Trust me, once you make them, they might just become a new favorite in your kitchen.
Print
Cherry Cheesecake Danish
- Prep Time: 15 minutes
- Cook Time: 18 minutes
- Total Time: 33 minutes
- Yield: 8 servings 1x
- Category: Dessert
- Method: Baking
- Cuisine: European
- Diet: Vegetarian
Description
Flaky puff pastry filled with creamy sweetened cream cheese and topped with glossy cherry filling, baked until golden and finished with a light dusting of powdered sugar. A simple bakery style pastry that is perfect for breakfast, brunch, or a sweet snack.
Ingredients
- 2 sheets puff pastry, thawed
- 8 ounces cream cheese, softened
- 1/3 cup granulated sugar
- 1 teaspoon vanilla extract
- 1 large egg
- 1 cup cherry pie filling
- 2 tablespoons powdered sugar
Instructions
- Preheat oven to 375°F and line a baking sheet with parchment paper.
- In a mixing bowl, combine cream cheese, granulated sugar, and vanilla extract. Mix until smooth and creamy.
- Cut the puff pastry sheets into even squares and place them on the prepared baking sheet.
- Spoon a small amount of the cream cheese mixture into the center of each pastry square.
- Add a spoonful of cherry pie filling on top of the cream cheese mixture.
- Beat the egg and brush the edges of the pastry with the egg wash.
- Bake for about 18 minutes or until the pastry is puffed and golden brown.
- Allow pastries to cool slightly, then lightly dust with powdered sugar before serving.
Notes
- Keep puff pastry chilled until ready to use so the layers bake up flaky.
- Avoid overfilling the pastries to prevent spilling during baking.
- Serve slightly warm for the best creamy texture and flavor.
Nutrition
- Serving Size: 1 pastry
- Calories: 280
- Sugar: 14 g
- Sodium: 210 mg
- Fat: 16 g
- Saturated Fat: 9 g
- Unsaturated Fat: 6 g
- Trans Fat: 0 g
- Carbohydrates: 29 g
- Fiber: 1 g
- Protein: 4 g
- Cholesterol: 45 mg
Keywords: cherry cheesecake danish, cream cheese danish pastry, cherry danish pastry, easy danish pastry recipe, puff pastry dessert