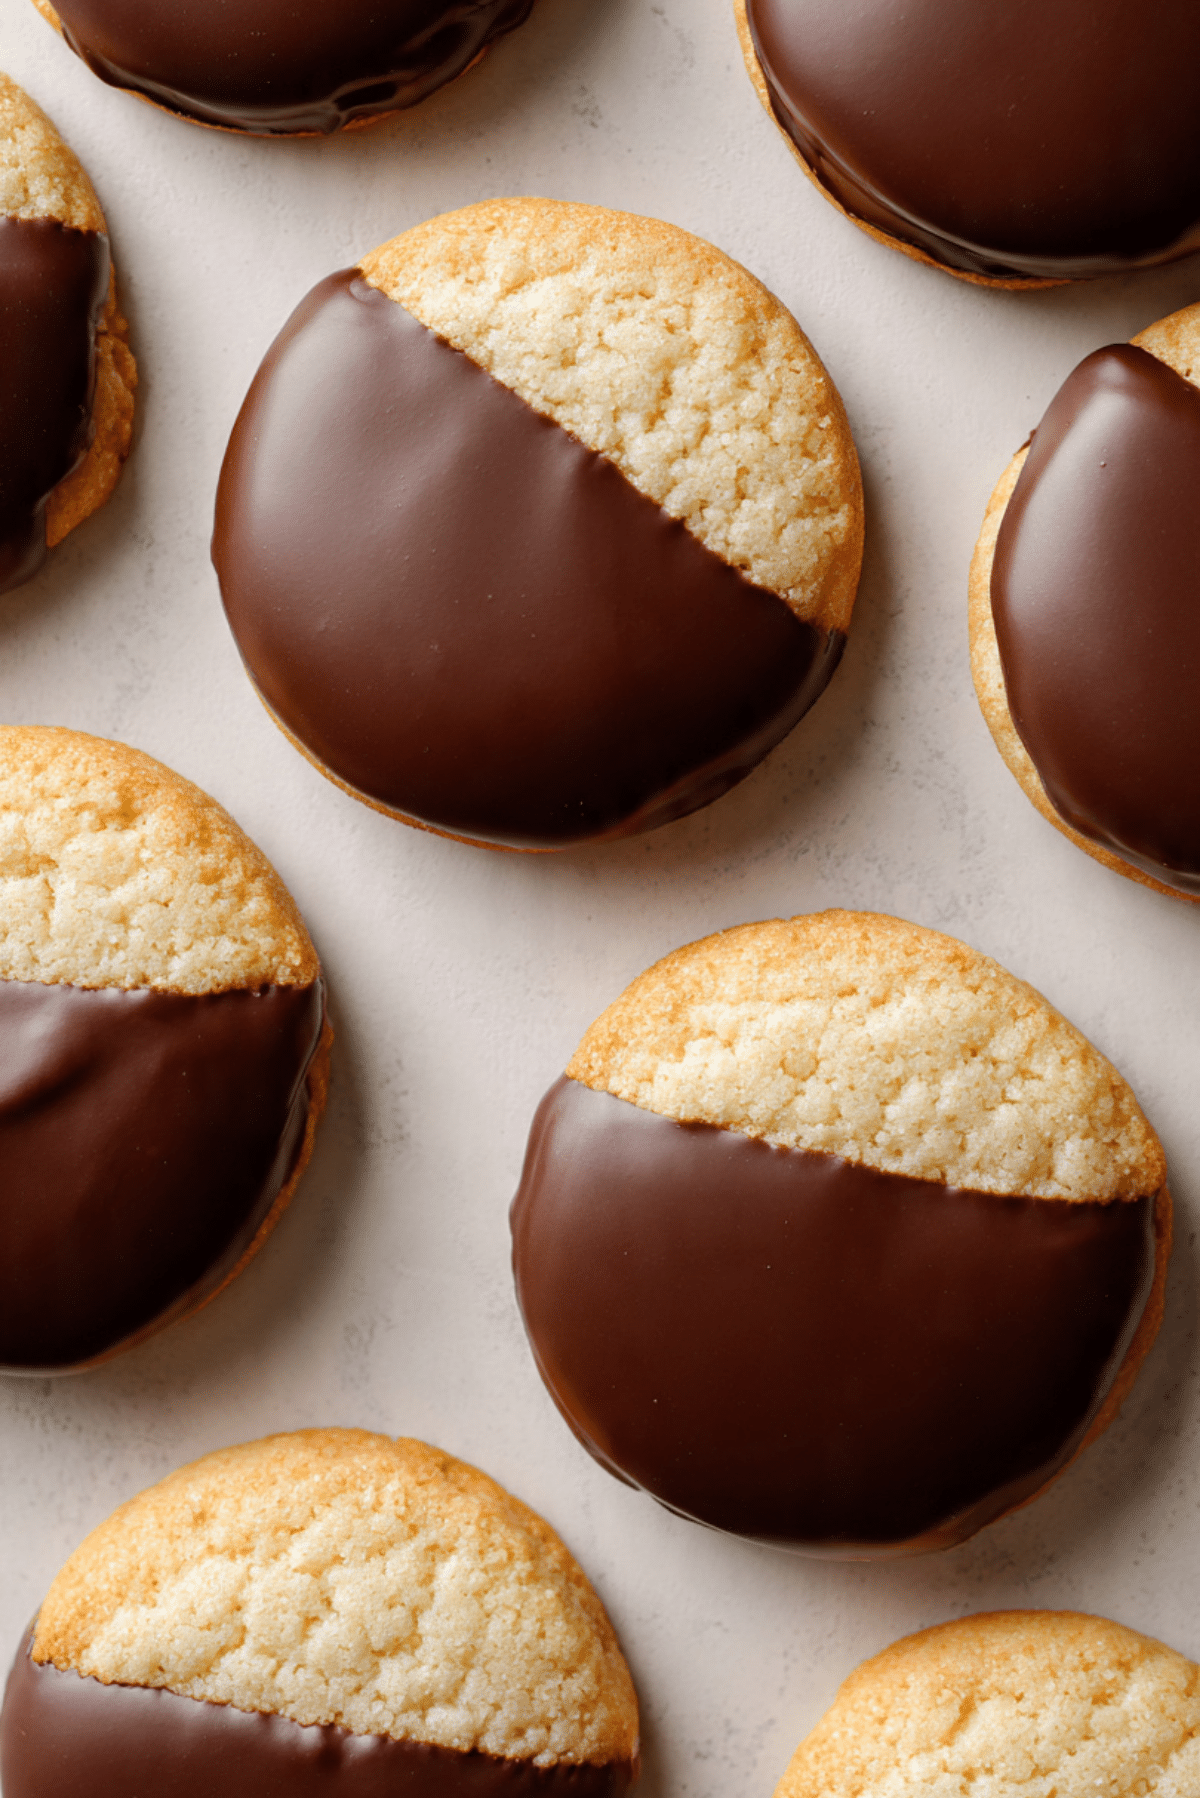
Milk Chocolate Dipped Sugar Cookies
The first time I made these milk chocolate dipped sugar cookies, the kitchen smelled like warm vanilla and sweet chocolate melting together. It is one of those cozy baking moments that makes you slow down and enjoy the process. The cookies come out soft in the center, lightly crisp at the edges, and that smooth layer of milk chocolate adds the perfect sweet finish.
Trust me, you are going to love this. They look elegant enough for a dessert tray, but they are also simple enough to bake on a quiet afternoon. And now that we are here together, let me walk you through every delicious step.
Why These Cookies Always Disappear First
There is something special about the balance of buttery cookie and creamy chocolate. The sweetness is comforting without being overwhelming, and every bite has that perfect mix of soft crumb and smooth chocolate coating.
They are great for holidays, bake sales, family gatherings, or honestly just when you feel like baking something sweet. Let me tell you, once people try them, they tend to reach for a second one right away.
A Little Sweet Story Behind These Chocolate Dipped Treats
Sugar cookies have been around for centuries, and they are believed to have roots in early European baking traditions. Over time, they became popular in American kitchens because they are simple, reliable, and incredibly versatile.
Adding chocolate dipping became popular later as home bakers started experimenting with ways to elevate classic cookies. The result is what we have today, a familiar cookie with a luxurious twist that feels both nostalgic and a little indulgent.
What Makes This Recipe So Dependable
Before we move into the baking process, it helps to understand why this recipe works so beautifully every time.
Versatile:
You can shape them thicker or thinner, dip them halfway in chocolate, or drizzle chocolate over the top for a different look.
Budget-Friendly:
Most of the ingredients are pantry staples like flour, sugar, butter, and eggs.
Quick and Easy:
The dough comes together quickly and the baking time is short.
Customizable:
You can add sprinkles, crushed nuts, or even a little orange zest to the dough.
Crowd-Pleasing:
These cookies are loved by both kids and adults. They have that classic flavor everyone enjoys.
Make-Ahead Friendly:
You can bake the cookies in advance and dip them in chocolate later.
Great for Leftovers:
If there are any left, they store beautifully and taste just as good the next day.
Insider Tips for the Best Results
A few small details can take these cookies from good to absolutely fantastic.
- Chill the dough briefly if your kitchen is warm. This helps the cookies keep their shape.
- Use good quality milk chocolate for dipping because it melts smoother and tastes richer.
- Let the cookies cool completely before dipping them in chocolate.
- Place dipped cookies on parchment paper so the chocolate sets neatly.
Essential Kitchen Tools for Smooth Baking
Before starting, gather your tools so the process flows easily.
Mixing Bowl:
Used to combine the butter, sugar, and other ingredients.
Hand Mixer or Stand Mixer:
Helps cream the butter and sugar until light and fluffy.
Baking Sheet:
Provides even baking for the cookies.
Parchment Paper:
Prevents sticking and helps the chocolate set cleanly.
Cooling Rack:
Allows cookies to cool evenly before dipping.
Microwave Safe Bowl:
Used to melt the milk chocolate smoothly.
Ingredients You Will Need for These Chocolate Dipped Cookies
The beauty of this recipe comes from simple ingredients working together in perfect harmony.
- All Purpose Flour: 2 cups. Provides the structure that gives the cookies their soft yet sturdy texture.
- Granulated Sugar: ¾ cup. Sweetens the dough and helps create lightly crisp edges.
- Unsalted Butter: ¾ cup, softened. Adds rich flavor and creates a tender crumb.
- Eggs: 2 large eggs. Bind the dough and add moisture.
- Vanilla Extract: 1 teaspoon. Enhances the overall sweetness and aroma.
- Baking Powder: 1 teaspoon. Helps the cookies rise slightly and stay soft.
- Salt: ¼ teaspoon. Balances the sweetness and enhances flavor.
- Milk Chocolate: 1 ½ cups, chopped or chips. Melted and used for dipping the cookies.
Easy Ingredient Substitutions
Sometimes you need a small swap, and that is completely fine.
Butter: Coconut oil or plant based butter can work if needed.
Milk Chocolate: Dark chocolate or semi sweet chocolate can be used instead.
Vanilla Extract: Almond extract adds a slightly different but delicious flavor.
All Purpose Flour: A gluten free flour blend can be used if necessary.
Spotlight on the Stars of the Recipe
Some ingredients truly shine in this recipe.
Unsalted Butter:
Butter creates the rich flavor and tender texture that makes these cookies so satisfying.
Milk Chocolate:
The smooth chocolate coating adds sweetness and a silky finish that contrasts beautifully with the cookie.

Let’s Bake These Sweet Treats Together
Now the fun part begins. Follow these steps and you will have a tray of irresistible cookies in no time.
-
Preheat Your Equipment:
Preheat the oven to 350°F and line a baking sheet with parchment paper. -
Combine Ingredients:
In a mixing bowl, cream the butter and sugar until light and fluffy. Add eggs and vanilla extract, then mix until smooth. In another bowl, combine flour, baking powder, and salt. Gradually mix the dry ingredients into the wet mixture. -
Prepare Your Cooking Vessel:
Scoop tablespoon sized portions of dough and roll them into balls. Place them evenly on the prepared baking sheet. -
Assemble the Dish:
Gently flatten each dough ball slightly so they bake evenly. -
Cook to Perfection:
Bake the cookies for about 10 to 12 minutes until the edges are lightly golden. -
Finishing Touches:
Let cookies cool completely. Melt the milk chocolate in a microwave safe bowl in short intervals, stirring until smooth. Dip half of each cookie into the melted chocolate. -
Serve and Enjoy:
Place dipped cookies on parchment paper and allow the chocolate to set before serving.
The Texture and Flavor Magic
When you bite into one of these cookies, the first thing you notice is the soft crumb that almost melts in your mouth. Then comes the smooth milk chocolate, which adds a creamy sweetness that balances the buttery cookie perfectly.
The contrast between the slightly crisp edge and the silky chocolate coating makes every bite feel indulgent.
Helpful Baking Tips for Perfect Cookies
A few extra tips can make baking even smoother.
- Chill dough if it feels sticky while shaping.
- Rotate the baking sheet halfway through baking for even color.
- Use a fork to drizzle extra chocolate for a decorative finish.
Common Mistakes to Avoid
Even simple cookies can have a few tricky moments.
- Overbaking: Remove cookies once the edges turn golden. They will continue setting as they cool.
- Dipping Warm Cookies: Chocolate will slide off if the cookies are not fully cooled.
- Overheating Chocolate: Melt slowly to prevent it from becoming grainy.
Nutrition Snapshot
Servings: 18 cookies
Calories per serving: 180
Note: These are approximate values.
Timing Overview
Prep Time: 15 minutes
Cook Time: 12 minutes
Total Time: 27 minutes
Make Ahead and Storage Tips
You can prepare the dough up to two days in advance and keep it refrigerated. This actually helps deepen the flavor.
Once baked, store the cookies in an airtight container at room temperature for up to four days. If you want to freeze them, place the cookies in a freezer safe container and they will keep for up to two months. Allow them to thaw at room temperature before serving.
Serving Ideas to Make Them Shine
These cookies look beautiful on a dessert platter alongside fruit, brownies, or mini cupcakes. They also pair wonderfully with coffee, hot chocolate, or a glass of cold milk.
For special occasions, try adding colorful sprinkles to the chocolate coating before it sets.
Creative Ways to Use Leftover Cookies
If you happen to have extras, here are a few fun ideas.
Crush the cookies and sprinkle them over ice cream.
Use them as layers in a dessert parfait.
Serve them with whipped cream and fresh berries for a quick dessert.
Extra Helpful Baking Advice
A little planning goes a long way in baking.
Keep butter at room temperature so it creams smoothly with sugar.
Measure flour properly by spooning it into the measuring cup instead of scooping.
Let the chocolate set completely before stacking cookies.
Making Your Cookies Look Bakery Worthy
Presentation makes a big difference. Arrange the cookies neatly on a platter and alternate the direction of the chocolate dipped sides for a professional look.
You can also drizzle a little extra melted chocolate across the top for a decorative finish.
Fun Variations to Try
Once you master the basic version, you can experiment with different flavors.
Add lemon zest to the dough for a bright citrus twist.
Sprinkle crushed almonds onto the chocolate coating.
Use white chocolate for dipping instead of milk chocolate.
Add a pinch of cinnamon to the dough for warmth.
Drizzle dark chocolate over the milk chocolate coating for a layered effect.
FAQ’s
1. Can I make the dough ahead of time?
Yes, you can prepare the dough up to two days in advance and store it in the refrigerator.
2. Why did my cookies spread too much?
This usually happens if the butter is too soft or the dough is too warm.
3. Can I freeze these cookies?
Yes, baked cookies freeze well for up to two months.
4. Can I use dark chocolate instead of milk chocolate?
Absolutely. Dark chocolate gives a deeper and slightly less sweet flavor.
5. How do I melt chocolate smoothly?
Heat it in short microwave intervals and stir frequently.
6. Do I need to chill the dough?
Not always, but chilling can help maintain cookie shape.
7. Can I add sprinkles?
Yes, add them right after dipping while the chocolate is still wet.
8. How do I prevent cookies from sticking?
Always line your baking sheet with parchment paper.
9. Can I double the recipe?
Yes, the recipe doubles easily for larger batches.
10. How do I store dipped cookies?
Store them in an airtight container once the chocolate has fully set.
Conclusion
Baking these milk chocolate dipped sugar cookies is one of those little kitchen joys that feels both comforting and rewarding. The buttery cookie base combined with smooth chocolate makes every bite irresistible.
Trust me, once you make a batch, they will quickly become one of your go to treats. And honestly, this one is a total game changer when you want something simple that still feels special.
Print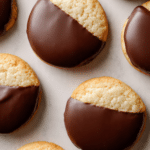
Milk Chocolate Dipped Sugar Cookies
- Prep Time: 15 minutes
- Cook Time: 12 minutes
- Total Time: 27 minutes
- Yield: 18 cookies 1x
- Category: Dessert
- Method: Baking
- Cuisine: American
- Diet: Vegetarian
Description
Soft, buttery sugar cookies dipped in smooth milk chocolate. These cookies bake up lightly golden with tender centers and crisp edges, then get a glossy chocolate finish that makes every bite rich and irresistible.
Ingredients
- 2 cups all purpose flour
- ¾ cup granulated sugar
- ¾ cup unsalted butter, softened
- 2 large eggs
- 1 teaspoon vanilla extract
- 1 teaspoon baking powder
- ¼ teaspoon salt
- 1 ½ cups milk chocolate, chopped or chips
Instructions
- Preheat Your Equipment: Preheat the oven to 350°F and line a baking sheet with parchment paper.
- Combine Ingredients: In a mixing bowl, cream the butter and sugar until light and fluffy. Add eggs and vanilla extract and mix until smooth. In another bowl combine flour, baking powder, and salt, then gradually mix the dry ingredients into the wet mixture.
- Prepare Your Cooking Vessel: Scoop tablespoon sized portions of dough and roll them into balls. Place them evenly on the prepared baking sheet.
- Assemble the Dish: Gently flatten each dough ball slightly so they bake evenly.
- Cook to Perfection: Bake for 10 to 12 minutes until the edges are lightly golden.
- Finishing Touches: Allow cookies to cool completely. Melt the milk chocolate in a microwave safe bowl in short intervals, stirring until smooth. Dip half of each cookie into the melted chocolate.
- Serve and Enjoy: Place dipped cookies on parchment paper and allow the chocolate to set completely before serving.
Notes
- Let cookies cool fully before dipping to keep the chocolate coating smooth.
- Use good quality milk chocolate for the best flavor and texture.
- If the dough becomes sticky, chill it in the refrigerator for about 15 minutes.
- Store finished cookies in an airtight container at room temperature for up to four days.
Nutrition
- Serving Size: 1 cookie
- Calories: 180
- Sugar: 14g
- Sodium: 80mg
- Fat: 9g
- Saturated Fat: 5g
- Unsaturated Fat: 3g
- Trans Fat: 0g
- Carbohydrates: 23g
- Fiber: 1g
- Protein: 2g
- Cholesterol: 30mg
Keywords: milk chocolate dipped sugar cookies, chocolate dipped cookies, homemade sugar cookies, easy cookie recipe