Manteconchas
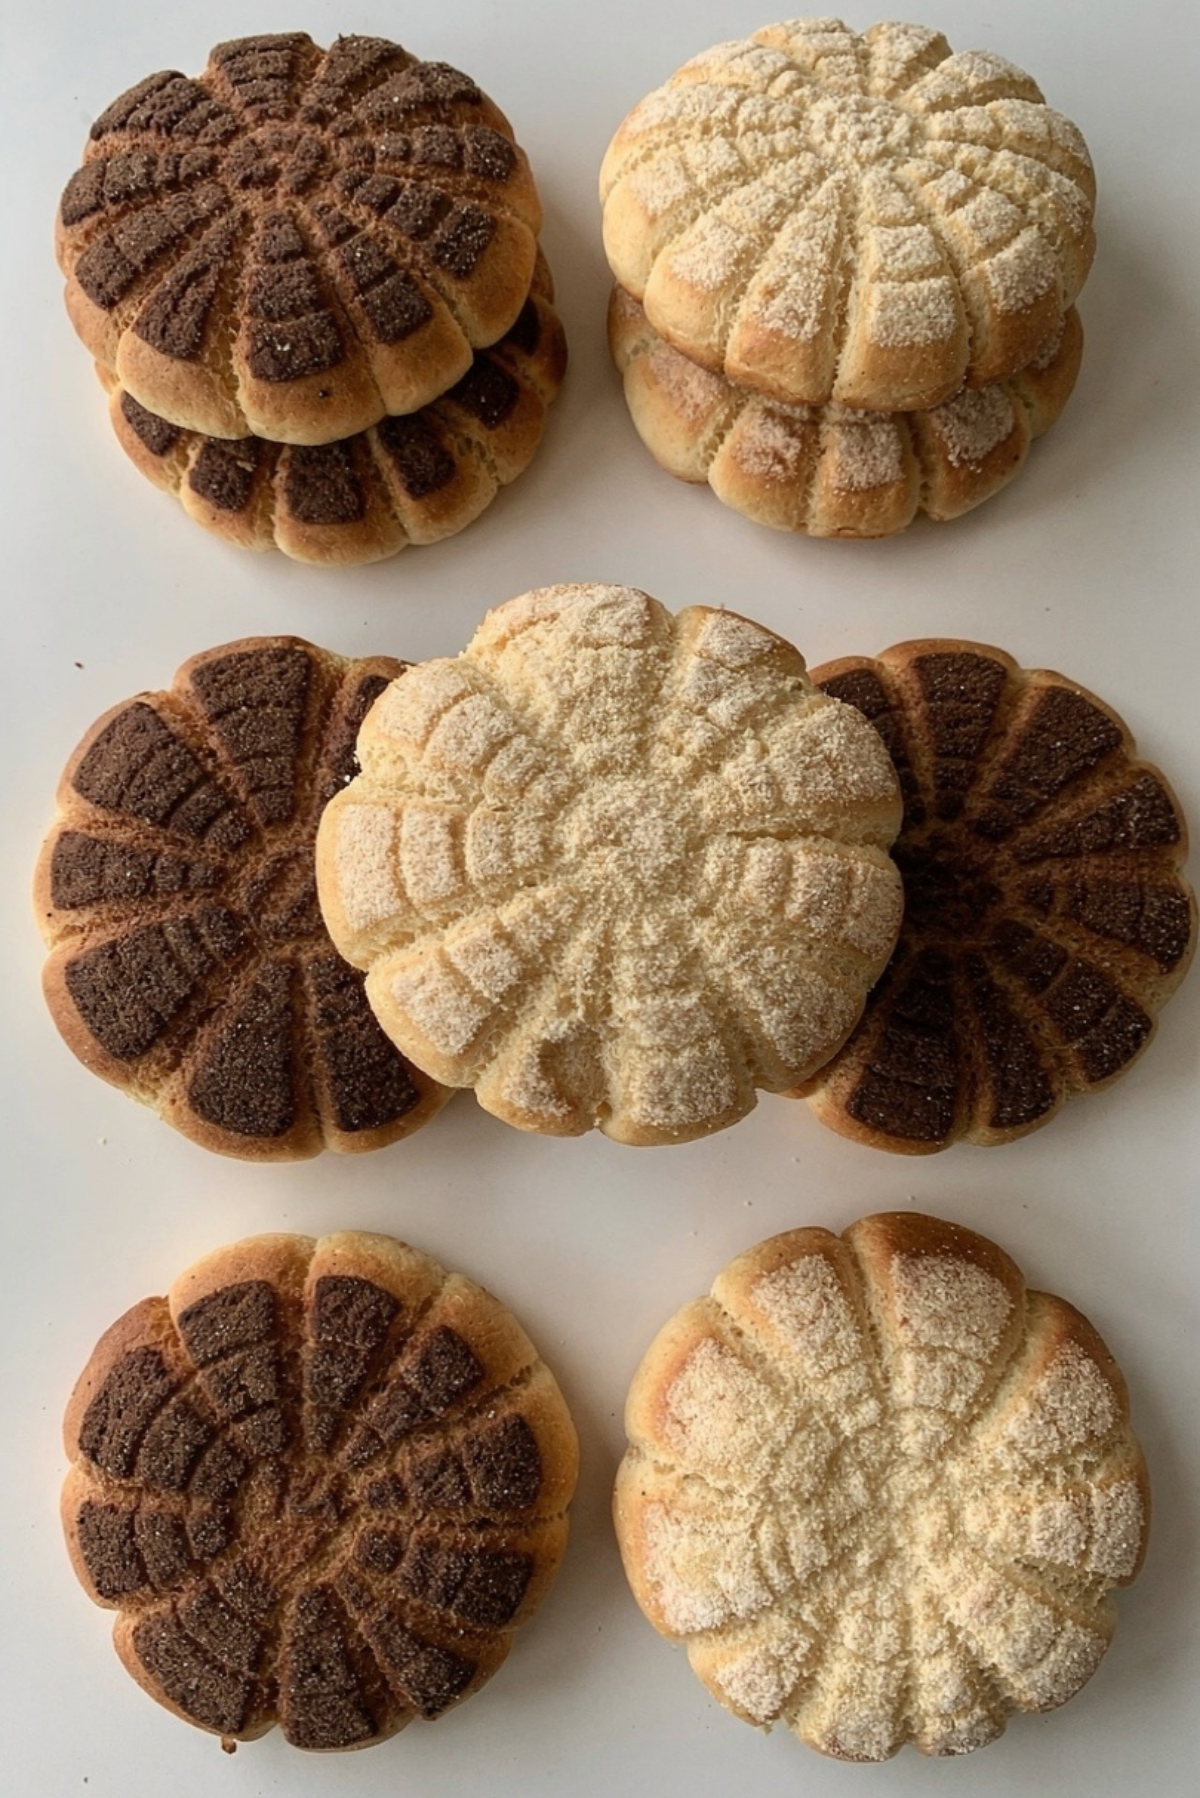
There’s something almost magical about pulling a tray of warm manteconchas out of the oven. The buttery aroma fills the kitchen first, then comes the sight of those golden crackled tops resting over soft, fluffy bread. Trust me, you’re going to love this. Every bite feels like a mix between a rich cookie and pillowy sweet bread, which honestly makes them impossible to resist while they’re still warm.
And now that you’re probably craving one already, let’s dive into what makes this bakery favorite so special and worth making at home.
Why Everyone Falls in Love With These Sweet Buttery Pastries
Manteconchas are one of those treats that instantly grab attention the second they hit the table. They combine the soft texture of traditional Mexican pan dulce with a rich buttery topping that melts slightly into the bread as it bakes. The contrast between the fluffy interior and delicate sugary shell is what makes this one a total game-changer.
What makes them even better is how comforting they feel. They pair perfectly with coffee in the morning, hot chocolate in the evening, or honestly just as a little reward in the middle of the day. The slightly crisp topping gives way to a tender center that practically pulls apart in your hands.
And now that you know why they’re so irresistible, let’s talk a little about where these beauties came from.
The Sweet Story Behind This Bakery Favorite
Manteconchas are inspired by the beloved Mexican concha, which is one of the most iconic sweet breads found in panaderías across Mexico. Traditional conchas are known for their fluffy yeast dough and decorative sugar topping that resembles a seashell pattern.
The “mante” twist comes from mantequilla, which means butter in Spanish. Bakers began enriching the dough and topping with extra butter to create a softer, richer pastry with an almost melt-in-your-mouth finish. The result became a bakery sensation that combines nostalgia with pure indulgence.
And honestly, once you taste one fresh from the oven, it’s easy to understand why people line up for them.
Reasons These Bakery Treats Always Turn Out Amazing
Before we start baking, let me tell you why this recipe works so beautifully every single time.
Versatile: These pastries work for breakfast, dessert, afternoon coffee breaks, or even late-night sweet cravings.
Budget-Friendly: Most of the ingredients are pantry staples, which means you can create bakery-quality treats without spending a fortune.
Quick and Easy: While the dough needs rising time, the actual steps are simple and beginner-friendly.
Customizable: You can make vanilla, chocolate, cinnamon, or even coffee-flavored toppings depending on your mood.
Crowd-Pleasing: Put a tray of these on the table and watch them disappear within minutes.
Make-Ahead Friendly: The dough can be prepared ahead of time and baked fresh the next day.
Great for Leftovers: They stay soft for days and taste incredible reheated for a few seconds.
And now that you know why these are worth every bit of effort, let’s move into some helpful baker secrets.
Smart Bakery Secrets for the Softest Results
Making bakery-style sweet bread at home feels much easier once you know a few insider tricks.
- Always use room temperature ingredients because they blend more smoothly into the dough.
- Knead the dough until it feels soft and elastic. This helps create that fluffy bakery texture.
- Do not over-flour the dough. A slightly sticky dough produces softer bread.
- Let the pastries rise fully before baking. Patience makes a huge difference here.
- Press the topping gently onto the dough so it sticks without flattening the bread.
And now that you’ve got those little bakery secrets tucked away, let’s gather the tools that make the process easier.
Helpful Kitchen Tools That Make Baking Easier
Having the right tools nearby keeps the process smooth and enjoyable from start to finish.
Large Mixing Bowl: Gives the dough plenty of space to rise comfortably.
Stand Mixer: Makes kneading easier, though hand-kneading works beautifully too.
Rolling Pin: Helps flatten the topping evenly.
Baking Sheet: Keeps the pastries evenly spaced while baking.
Parchment Paper: Prevents sticking and makes cleanup easier.
Sharp Knife or Dough Cutter: Useful for creating the classic shell pattern on top.
And now comes one of the most exciting parts, the ingredients that bring all these incredible textures together.
Everything You’ll Need to Create These Soft Sweet Pastries
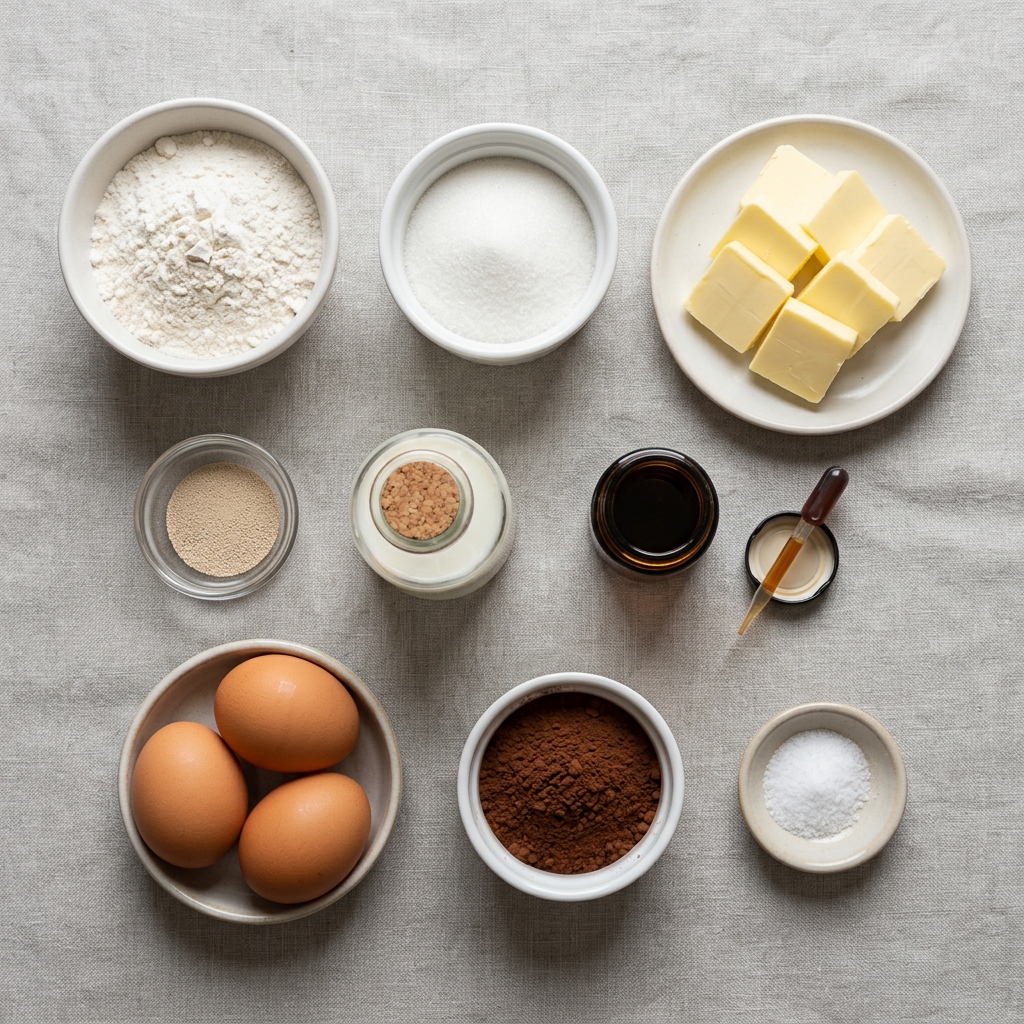
The beauty of this recipe comes from how simple ingredients work together to create something bakery-worthy.
- All-Purpose Flour: 4 cups, forms the structure of the dough while keeping the texture soft and tender.
- Granulated Sugar: 3/4 cup, sweetens the dough and helps create a golden crust.
- Unsalted Butter: 1 cup, softened, adds richness and that signature buttery flavor.
- Whole Eggs: 3 large eggs, help create a soft, fluffy texture.
- Whole Milk: 1 cup, warm, keeps the dough tender and moist.
- Active Dry Yeast: 2 1/4 teaspoons, gives the bread its airy rise.
- Vanilla Extract: 2 teaspoons, adds warm bakery-style flavor.
- Cocoa Powder: 2 tablespoons, creates the chocolate topping variation.
- Salt: 1 teaspoon, balances the sweetness and enhances flavor.
And once those ingredients come together, the kitchen starts smelling absolutely incredible.
Easy Ingredient Swaps That Still Taste Amazing
Sometimes you need flexibility in the kitchen, and thankfully this recipe adapts beautifully.
Whole Milk: Almond milk or oat milk work well for a dairy-free option.
Unsalted Butter: Plant-based butter can replace regular butter if needed.
Vanilla Extract: Almond extract gives a slightly nuttier bakery flavor.
Cocoa Powder: Cinnamon can be used for a warm spiced topping.
Granulated Sugar: Light brown sugar creates a deeper caramel-like sweetness.
And now let’s spotlight the ingredients that truly make these pastries unforgettable.
The Ingredients That Give These Pastries Their Signature Flavor
Some ingredients do more than just support the recipe. They completely define it.
Unsalted Butter: This is the heart of the recipe. It gives the bread richness while helping the topping stay soft and delicate instead of crunchy.
Active Dry Yeast: This ingredient transforms the dough into fluffy bakery-style bread with airy pockets and tender texture.
And now that the ingredients are ready, it’s time for the fun part, bringing everything together.
Let’s Bake These Beautiful Bakery Treats Together
The process is honestly relaxing once you get started, and the smell alone makes it worth it.
- Preheat Your Equipment: Preheat the oven to 350°F and line a baking sheet with parchment paper.
- Combine Ingredients: Mix warm milk, yeast, and a spoonful of sugar in a bowl. Let it sit for 5 to 10 minutes until foamy. Add flour, remaining sugar, eggs, butter, vanilla, and salt. Knead until smooth and elastic.
- Prepare Your Cooking Vessel: Transfer the dough to a lightly greased bowl, cover it, and let it rise until doubled in size.
- Assemble the Dish: Divide the dough into equal portions and shape into balls. Mix butter, sugar, flour, and cocoa powder separately for the topping. Flatten small portions of topping and place them over each dough ball. Score gently with a knife to create the shell pattern.
- Cook to Perfection: Bake for 18 to 22 minutes until lightly golden and fluffy.
- Finishing Touches: Let the pastries cool slightly so the topping sets while staying soft.
- Serve and Enjoy: Serve warm with coffee, hot chocolate, or cold milk for the ultimate bakery experience.
And once you tear into one, you’ll immediately notice how the textures work together so perfectly.
The Irresistible Texture and Flavor Combination
The first thing you notice is the contrast. The topping has a delicate sugary crispness while the inside stays unbelievably soft and fluffy. The buttery richness melts into every bite, and the vanilla aroma makes the entire pastry feel warm and comforting.
The chocolate topping adds just enough cocoa flavor without overpowering the sweet bread beneath it. Let me tell you, it’s worth every bite.
And if you want to make them even better, here are a few extra baking tricks.
Helpful Tricks for Bakery-Level Results
A few tiny adjustments can make a huge difference in the final texture and flavor.
- Let the dough rise in a warm spot for the fluffiest bread.
- Brush the dough lightly with milk before adding the topping for better adhesion.
- Rotate the baking tray halfway through baking for even color.
- Enjoy them slightly warm for the softest texture.
Common Baking Mistakes and How to Avoid Them
Even experienced bakers run into little issues sometimes, so here are a few things to watch for.
- Avoid using hot milk because it can kill the yeast.
- Do not add too much flour or the bread may turn dense.
- Avoid overbaking because the pastries can dry out quickly.
- Let the dough rise fully or the texture may become heavy.
Nutritional Snapshot You Should Know
These pastries are definitely indulgent, but that’s part of the charm.
Servings: 10 pastries
Calories per serving: Approximately 390 calories
Note: These are approximate values.
Timing Breakdown for Smooth Baking
Planning ahead makes homemade baking feel much easier.
Prep Time: 30 minutes
Cook Time: 22 minutes
Total Time: 2 hours 15 minutes
How to Prep and Store Them Like a Bakery
One of the best things about these pastries is how well they keep.
You can prepare the dough the night before and let it rise slowly in the refrigerator overnight. Once baked, store them in an airtight container at room temperature for up to 3 days.
For longer storage, freeze them individually wrapped. Reheat in the microwave for about 15 seconds or warm gently in the oven until soft again.
And now let’s talk about the best ways to serve them.
Delicious Ways to Enjoy These Soft Sweet Pastries
These pastries shine all on their own, but pairing them with drinks and sides makes them even better.
Serve them with café de olla, creamy hot chocolate, iced coffee, or a cinnamon latte. They also pair beautifully with fresh fruit or vanilla yogurt for breakfast.
For dessert, warm one slightly and serve with a scoop of vanilla ice cream. Trust me, you’re going to love this combination.
Fun Ideas for Turning Leftovers Into Something New
If you somehow have leftovers, there are plenty of delicious ways to reinvent them.
Slice them in half and toast lightly with butter for breakfast. Turn them into sweet bread pudding with cinnamon custard. You can even use them as the base for ice cream sandwiches.
And honestly, even leftover crumbs taste incredible.
Extra Little Details That Make a Big Difference
Sometimes the smallest adjustments create the best results.
Use high-quality butter for richer flavor. Allow the pastries to cool slightly before eating so the topping sets properly. If you want extra softness, cover the warm pastries loosely with a towel after baking.
These little details really elevate the final result.
Simple Presentation Tricks That Make Them Bakery-Worthy
Presentation makes homemade pastries feel extra special.
Arrange them on a rustic wooden tray or simple white platter. Dust lightly with powdered sugar if you want an elegant touch. Serve them stacked casually with coffee mugs nearby for that cozy bakery atmosphere.
The golden tops and shell patterns already look stunning straight from the oven.
Creative Flavor Variations Worth Trying
Once you master the classic version, there are so many fun ways to change things up.
- Add cinnamon to the topping for a warm spiced version.
- Mix espresso powder into the chocolate topping for mocha flavor.
- Fill the dough with cream cheese for extra richness.
- Add orange zest to the dough for a bright citrus twist.
- Sprinkle mini chocolate chips inside the dough before shaping.
FAQ’s
1. Can I make the dough ahead of time?
Yes, the dough can rest overnight in the refrigerator before shaping and baking.
2. Why didn’t my dough rise properly?
Usually this happens if the yeast was expired or the milk was too hot.
3. Can I freeze them after baking?
Absolutely. Wrap them tightly and freeze for up to 2 months.
4. Do I need a stand mixer?
Not at all. Hand-kneading works perfectly, it just takes a little extra time.
5. Can I use instant yeast instead?
Yes, instant yeast works well and can be added directly to the flour.
6. Why is my topping cracking too much?
The topping may be too dry. Add a tiny bit more butter to soften it.
7. Can I make them smaller?
Definitely. Just reduce the baking time slightly.
8. How do I keep them soft longer?
Store them in an airtight container while still slightly warm.
9. Can I make them dairy-free?
Yes, substitute dairy-free butter and plant-based milk.
10. What drink pairs best with them?
Coffee and hot chocolate are classic choices that complement the buttery sweetness perfectly.
Conclusion
Fresh homemade manteconchas have a way of making the whole kitchen feel warm and inviting. Between the fluffy bread, buttery topping, and comforting bakery aroma, these pastries bring pure joy with every bite. Whether you’re baking them for family, friends, or simply for yourself, this recipe delivers soft, rich pastries that feel truly special. Let me tell you, once you make them from scratch, you’ll want to bake them again and again.
Print
Manteconchas
- Prep Time: 30 minutes
- Cook Time: 22 minutes
- Total Time: 2 hours 15 minutes
- Yield: 10 pastries 1x
- Category: Dessert
- Method: Baking
- Cuisine: Mexican
- Diet: Vegetarian
Description
Soft and fluffy manteconchas with rich buttery flavor and sweet crackled toppings in vanilla and chocolate variations. These bakery-style pastries are tender inside with a delicate sugary shell that pairs perfectly with coffee or hot chocolate.
Ingredients
- 4 cups all-purpose flour
- 3/4 cup granulated sugar
- 1 cup unsalted butter, softened
- 3 large eggs
- 1 cup whole milk, warm
- 2 1/4 teaspoons active dry yeast
- 2 teaspoons vanilla extract
- 2 tablespoons cocoa powder
- 1 teaspoon salt
Instructions
- Preheat oven to 350°F and line a baking sheet with parchment paper.
- Mix warm milk, yeast, and a spoonful of sugar in a bowl. Let sit for 5 to 10 minutes until foamy.
- Add flour, remaining sugar, eggs, butter, vanilla extract, and salt. Knead until smooth and elastic.
- Transfer dough to a lightly greased bowl, cover, and let rise until doubled in size.
- Divide dough into equal portions and shape into balls.
- Prepare the topping by mixing butter, sugar, flour, and cocoa powder until smooth.
- Flatten portions of topping and place over each dough ball.
- Score gently with a knife to create the classic shell pattern.
- Bake for 18 to 22 minutes until lightly golden and fluffy.
- Cool slightly before serving warm.
Notes
- Use room temperature ingredients for the softest dough texture.
- Do not over-flour the dough or the pastries may become dense.
- Store leftovers in an airtight container for up to 3 days.
- Warm slightly before serving for the best texture and flavor.
Nutrition
- Serving Size: 1 pastry
- Calories: 390
- Sugar: 18g
- Sodium: 190mg
- Fat: 16g
- Saturated Fat: 9g
- Unsaturated Fat: 5g
- Trans Fat: 0g
- Carbohydrates: 54g
- Fiber: 2g
- Protein: 8g
- Cholesterol: 78mg
Keywords: manteconchas, mexican sweet bread, pan dulce, buttery pastries, bakery style bread, fluffy sweet bread, homemade conchas