Healthy Easter Dirt Cake Casserole Recipe
There’s something about layered desserts that instantly feels festive, comforting, and just plain fun. This healthy Easter dirt cake casserole brings all of those cozy dessert vibes together in one creamy, chocolatey dish that somehow manages to feel light at the same time. Every spoonful gives you fluffy cream filling, rich chocolate crumbs, and little pops of crunchy candy-coated chocolates that make it impossible not to smile. Trust me, you’re going to love this.
And now that you’re already imagining that first creamy bite, let’s dive into what makes this dessert such a standout during spring gatherings and Easter celebrations.
Why This Easter Dessert Always Disappears First
This one’s a total game-changer for holiday desserts because it combines nostalgic flavors with a lighter twist that still feels indulgent. The creamy filling tastes rich without being heavy, and the chocolate layers create that classic dirt cake flavor everyone remembers from childhood parties.
The pastel toppings make it look cheerful and festive, while the casserole-style presentation keeps things easy and relaxed. No complicated decorating, no stressful baking techniques, just layers of deliciousness coming together beautifully.
And honestly, one of the best parts is how easy it is to make ahead. The flavors actually get even better after chilling, which means less stress on busy holiday mornings.
The Sweet Story Behind Dirt Cake Desserts
Dirt cake desserts became popular in American kitchens during the 1980s and quickly turned into a party favorite because of their playful look and rich chocolate flavor. Traditionally made with crushed chocolate cookies and creamy pudding layers, they were especially popular at birthdays, school events, and holiday celebrations.
Over time, creative variations started appearing for different holidays, including colorful spring-inspired Easter versions topped with candy eggs and pastel decorations. This healthier casserole version keeps the fun spirit of the original while using lighter ingredients that still create that creamy, dreamy texture everyone expects.
And now let me tell you, it’s worth every bite because you get all the nostalgia without the heavy feeling afterward.
Why Families Keep Making This Recipe Every Spring
This dessert has a way of becoming part of family traditions almost instantly. Every layer brings something comforting, fun, and satisfying to the table.
Versatile: You can serve it at Easter brunch, spring parties, potlucks, or even as a make-ahead weekend dessert. It fits almost anywhere.
Budget-Friendly: Most ingredients are simple pantry staples and affordable dairy products, which makes this dessert surprisingly economical.
Quick and Easy: No complicated baking techniques are involved. The layering process is simple and beginner-friendly.
Customizable: You can swap toppings, adjust sweetness, or even change the pudding flavor depending on your preferences.
Crowd-Pleasing: Kids love the colorful candy topping, while adults appreciate the creamy chocolate layers and lighter texture.
Make-Ahead Friendly: This casserole actually tastes even better after a few hours in the fridge.
Great for Leftovers: The texture stays creamy and delicious for days, making it perfect for snacking later.
Smart Tips That Make This Dessert Taste Even Better
A few small tricks can take this casserole from good to absolutely irresistible.
- Use full-fat Greek yogurt if you want an extra creamy texture without adding heavy cream.
- Chill the pudding mixture before layering to help create cleaner layers.
- Crush the cookies finely for a more authentic dirt cake texture.
- Add the candy topping just before serving to keep the colors bright and crunchy.
- Let the casserole chill at least 4 hours before slicing for the best consistency.
Kitchen Tools That Make Everything Easier
Before you start layering all that creamy goodness together, having the right tools nearby makes the process smooth and stress-free.
Mixing Bowls: You’ll need a few medium bowls for preparing the pudding and cream filling separately.
Electric Mixer: Helps create a fluffy, smooth filling without lumps.
9×13 Baking Dish: Perfect for layering and serving this casserole beautifully.
Rubber Spatula: Makes spreading the layers much easier and cleaner.
Food Processor or Rolling Pin: Useful for crushing the chocolate cookies evenly.
Everything You’ll Need For This Creamy Chocolate Creation
The beauty of this dessert comes from simple ingredients working together perfectly. Every layer adds texture, flavor, and richness while still keeping things lighter than a traditional dirt cake.
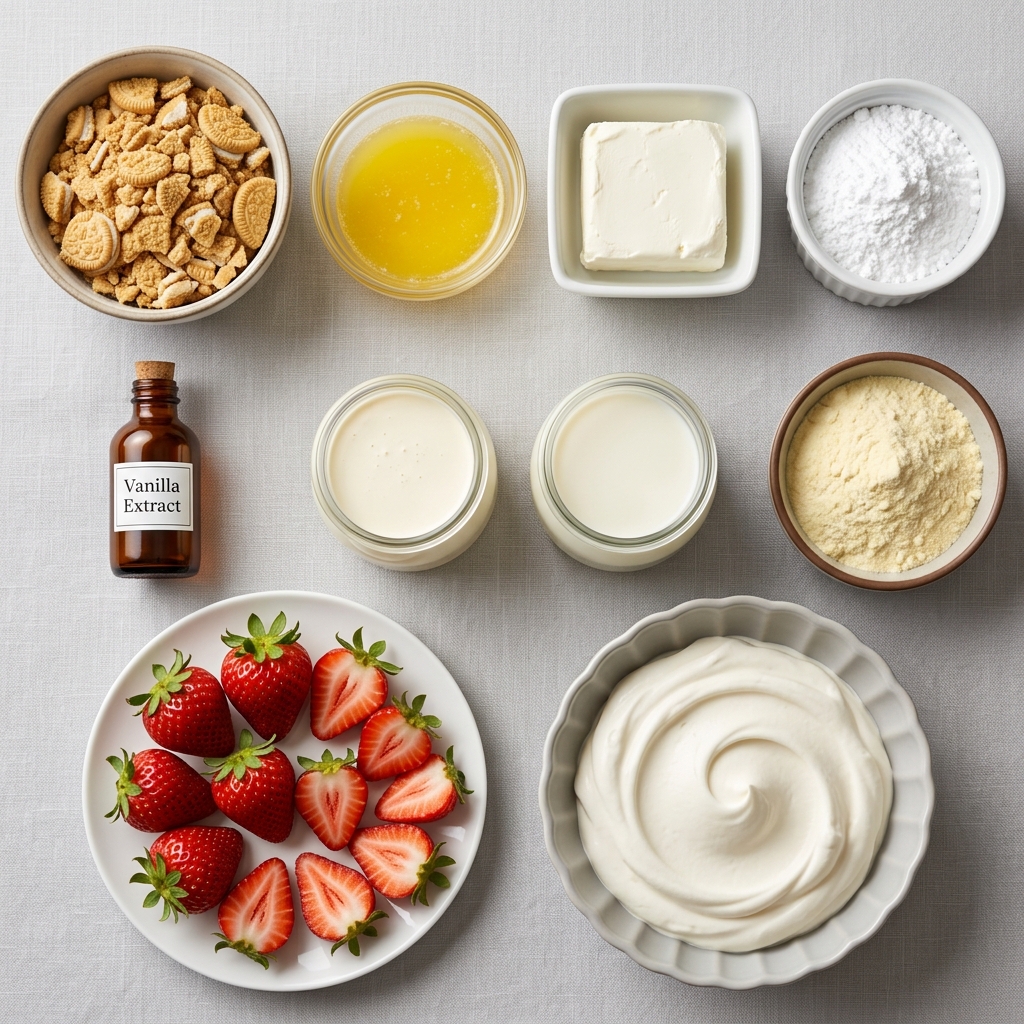
- Chocolate Sandwich Cookies: 24 cookies, crushed finely, these create the classic dirt-like chocolate layers.
- Instant Sugar-Free Chocolate Pudding Mix: 2 packages (3.4 ounces each), gives the casserole its creamy chocolate base.
- Cold Skim Milk: 3 cups, helps the pudding set smoothly.
- Plain Greek Yogurt: 2 cups, adds creaminess and protein while keeping the filling lighter.
- Reduced-Fat Cream Cheese: 8 ounces, softened, creates a rich cheesecake-like texture.
- Honey: 1/4 cup, naturally sweetens the filling.
- Vanilla Extract: 1 teaspoon, enhances the creamy flavor beautifully.
- Light Whipped Topping: 2 cups, folded in for an airy texture.
- Pastel Candy-Coated Chocolates: 1 cup, adds festive Easter color and crunch.
Easy Ingredient Swaps You Can Try
Sometimes you want to personalize a recipe a little, and thankfully this dessert is flexible.
Greek Yogurt: Vanilla Greek yogurt works well for extra sweetness.
Honey: Maple syrup can be used for a slightly deeper flavor.
Chocolate Sandwich Cookies: Gluten-free chocolate cookies work nicely if needed.
Light Whipped Topping: Homemade whipped cream can be substituted.
Candy-Coated Chocolates: Fresh berries make a lighter topping option.
The Ingredients That Truly Make This Dessert Shine
Some ingredients completely transform this casserole from ordinary to unforgettable.
Greek Yogurt: This adds tanginess and creaminess while keeping the filling lighter and more balanced.
Chocolate Sandwich Cookies: They create the nostalgic dirt cake flavor and provide that irresistible soft crunch after chilling.
Let’s Build This Dreamy Easter Dessert Together
This recipe comes together in layers, and honestly, that’s part of the fun. Watching everything stack into creamy chocolate perfection feels incredibly satisfying.
1. Preheat Your Equipment:
No baking is required, but place your serving dish in the refrigerator beforehand so the casserole stays cold while assembling.
2. Combine Ingredients:
In a large bowl, whisk together the pudding mix and cold skim milk until smooth. Let it sit for 5 minutes to thicken slightly.
In another bowl, beat the softened cream cheese, Greek yogurt, honey, and vanilla extract until creamy and fluffy.
Fold the whipped topping gently into the cream cheese mixture.
3. Prepare Your Cooking Vessel:
Lightly grease a 9×13 baking dish or casserole dish to help with easier serving later.
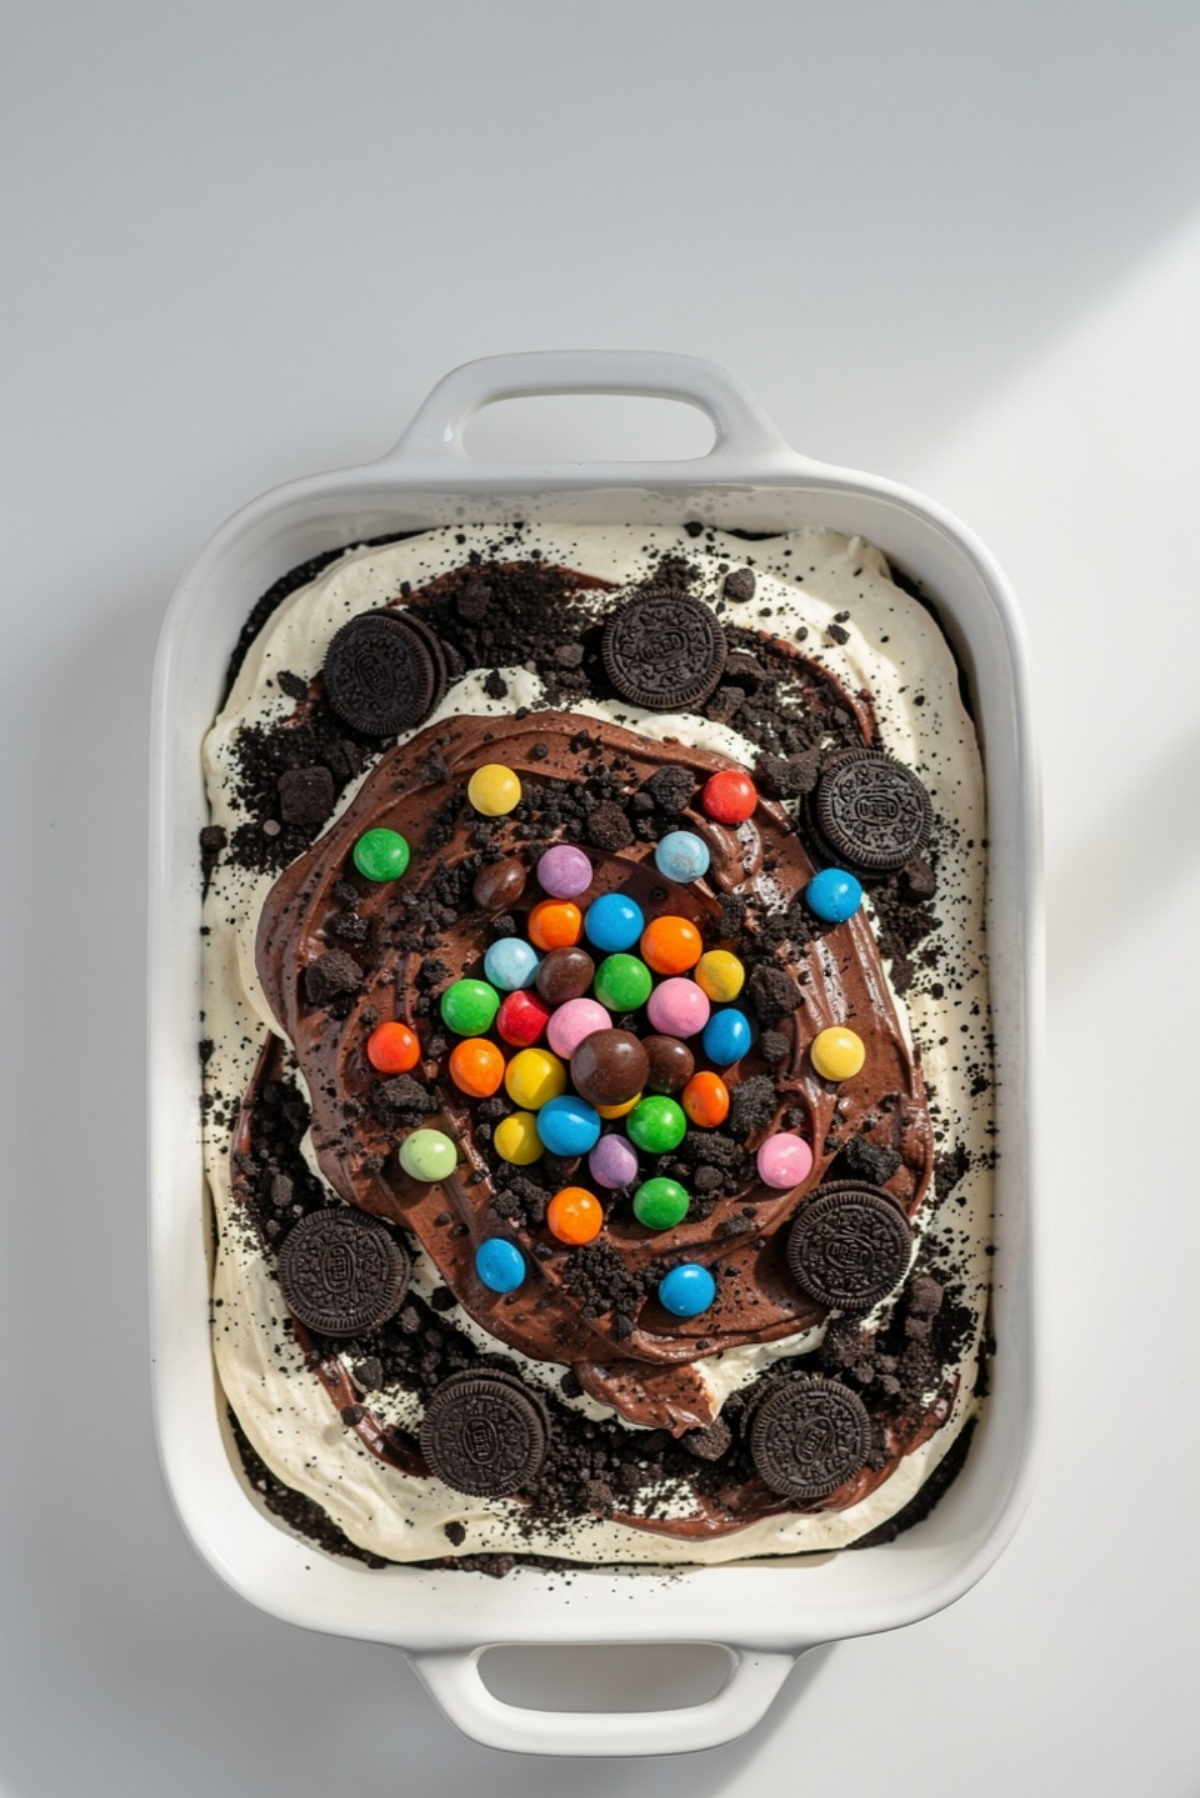
4. Assemble the Dish:
Spread half of the crushed chocolate cookies across the bottom of the dish.
Layer half of the pudding mixture over the cookies.
Spread the cream cheese filling evenly on top.
Add the remaining pudding mixture, then finish with the rest of the crushed cookies.
5. Cook to Perfection:
Cover the casserole and refrigerate for at least 4 hours, or overnight for the best texture.
6. Finishing Touches:
Right before serving, sprinkle pastel candy-coated chocolates across the top.
7. Serve and Enjoy:
Serve chilled with a large spoon, making sure every scoop gets all those creamy chocolate layers.
The Texture and Flavor Are What Make This Dessert So Addictive
The first thing you notice is the contrast between fluffy cream filling and soft chocolate cookie crumbs. Then comes the rich chocolate pudding layer that melts smoothly into everything else.
As the casserole chills, the cookies soften slightly and absorb some of the creamy filling, creating that classic dirt cake texture people love so much. Meanwhile, the candy-coated chocolates stay crisp and colorful on top, adding little bursts of crunch.
It’s creamy, cool, chocolatey, and just sweet enough without feeling heavy.
Helpful Tricks For the Best Results Every Time
A few extra little details can really elevate this dessert.
- Chill your mixing bowl before whipping the filling for extra fluffiness.
- Use softened cream cheese to avoid lumps in the filling.
- Let the casserole rest overnight for deeper flavor development.
- Add extra crushed cookies on top right before serving for more texture.
Mistakes You’ll Want to Avoid
Even simple desserts can benefit from a few helpful reminders.
- Avoid overmixing the whipped topping because it can flatten the filling.
- Don’t skip chilling time, the layers need time to firm up properly.
- Avoid adding candy toppings too early or they may lose crunch.
- Don’t use warm pudding mixture because it can soften the layers too much.
A Lighter Dessert That Still Feels Indulgent
Servings: 12
Calories per serving: 265
Note: These are approximate values.
Timing That Fits Busy Holiday Schedules
Prep Time: 25 minutes
Cook Time: 0 minutes
Total Time: 4 hours 25 minutes
Easy Storage and Make-Ahead Tips
One of the best things about this dessert is how well it fits into busy schedules. You can fully assemble it the night before and let it chill overnight.
Store leftovers covered in the refrigerator for up to 4 days. The texture stays creamy and delicious the whole time.
If you want to freeze it, leave off the candy topping until serving day. Thaw overnight in the refrigerator before enjoying again.
Fun Ways to Serve This Festive Dessert
This casserole looks beautiful served straight from the dish with colorful Easter decorations around it.
You can pair it with fresh strawberries, hot coffee, or even a fruit platter for a balanced dessert spread.
For parties, serve it in small glass cups for individual portions that look extra elegant.
Creative Ideas For Leftover Portions
If you somehow have leftovers, there are plenty of fun ways to reuse them.
Turn leftovers into frozen dessert cups for a cool spring treat.
Layer spoonfuls into parfait glasses with fresh berries.
Use leftover filling as a dip for graham crackers or sliced bananas.
Extra Little Details That Make a Big Difference
Adding a tiny pinch of sea salt to the chocolate pudding mixture deepens the flavor beautifully.
Fresh mint leaves can add a pretty spring touch for serving.
Using chilled ingredients helps the casserole set faster and creates cleaner layers.
How to Make This Dessert Look Absolutely Stunning
Presentation really matters with colorful spring desserts like this one.
Scatter pastel chocolates evenly for balanced color.
Use a glass baking dish if possible so the layers stay visible from the sides.
Add a few crushed cookie crumbs right before serving for a freshly made look.
Delicious Variations Worth Trying
You can easily make this dessert feel brand new every time.
Berry Chocolate Version
Add sliced strawberries between the layers for a fruity spring flavor.
Peanut Butter Twist
Mix a few tablespoons of peanut butter into the cream cheese filling.
Mint Chocolate Style
Use mint chocolate sandwich cookies for a refreshing variation.
Cookies and Cream Version
Swap chocolate pudding for vanilla pudding and add extra crushed cookies.
Extra Protein Version
Use high-protein pudding mix and extra Greek yogurt for a more filling dessert.
FAQ’s
1. Can I make this dessert the day before?
Yes, and honestly it tastes even better after chilling overnight.
2. Can I use homemade whipped cream?
Absolutely. Fresh whipped cream works beautifully here.
3. Is this dessert very sweet?
It’s balanced and lighter than traditional dirt cake recipes.
4. Can I freeze leftovers?
Yes, just freeze without the candy topping for best texture.
5. What type of Greek yogurt works best?
Plain full-fat or reduced-fat Greek yogurt gives the creamiest result.
6. Can kids help make this recipe?
Definitely. Kids usually love layering the cookies and toppings.
7. Do I need to bake anything?
No baking is required at all.
8. Can I use regular pudding mix?
Yes, regular chocolate pudding mix works too.
9. How long does it last in the fridge?
It stays fresh for about 4 days.
10. Can I make it gluten free?
Yes, simply use gluten-free chocolate sandwich cookies.
Conclusion
This healthy Easter dirt cake casserole brings together everything people love about spring desserts, creamy layers, rich chocolate flavor, colorful toppings, and easy preparation. It feels nostalgic and playful while still being light enough to enjoy after a big holiday meal. Every spoonful is cool, fluffy, chocolatey, and completely satisfying. Trust me, once you serve this at your Easter table, people will ask for it again next year.
Print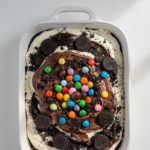
Healthy Easter Dirt Cake Casserole Recipe
- Prep Time: 25 minutes
- Cook Time: 0 minutes
- Total Time: 4 hours 25 minutes
- Yield: 12 servings 1x
- Category: Dessert
- Method: No-Bake
- Cuisine: American
- Diet: Low Calorie
Description
A lighter twist on classic dirt cake made with creamy Greek yogurt filling, sugar-free chocolate pudding, crushed chocolate cookies, and festive pastel candy-coated chocolates.
Ingredients
- 24 chocolate sandwich cookies, crushed finely
- 2 packages (3.4 ounces each) instant sugar-free chocolate pudding mix
- 3 cups cold skim milk
- 2 cups plain Greek yogurt
- 8 ounces reduced-fat cream cheese, softened
- 1/4 cup honey
- 1 teaspoon vanilla extract
- 2 cups light whipped topping
- 1 cup pastel candy-coated chocolates
Instructions
- Whisk together the chocolate pudding mix and cold skim milk in a large bowl until smooth. Let sit for 5 minutes.
- In another bowl, beat the cream cheese, Greek yogurt, honey, and vanilla extract until creamy.
- Fold the light whipped topping into the cream cheese mixture.
- Lightly grease a 9×13 casserole dish.
- Spread half of the crushed chocolate cookies into the bottom of the dish.
- Layer half of the pudding mixture over the cookies.
- Spread the cream cheese filling evenly on top.
- Add the remaining pudding mixture.
- Top with the remaining crushed cookies.
- Cover and refrigerate for at least 4 hours or overnight.
- Before serving, sprinkle pastel candy-coated chocolates on top.
- Serve chilled.
Notes
- Chill overnight for the best flavor and texture.
- Add toppings right before serving for extra crunch.
- Use full-fat Greek yogurt for a creamier filling.
- Store leftovers covered in the refrigerator for up to 4 days.
Nutrition
- Serving Size: 1 slice
- Calories: 265
- Sugar: 18g
- Sodium: 320mg
- Fat: 10g
- Saturated Fat: 4g
- Unsaturated Fat: 5g
- Trans Fat: 0g
- Carbohydrates: 34g
- Fiber: 2g
- Protein: 9g
- Cholesterol: 18mg
Keywords: healthy Easter dessert, dirt cake casserole, no bake Easter dessert, chocolate pudding casserole, Greek yogurt dessert, spring dessert recipe