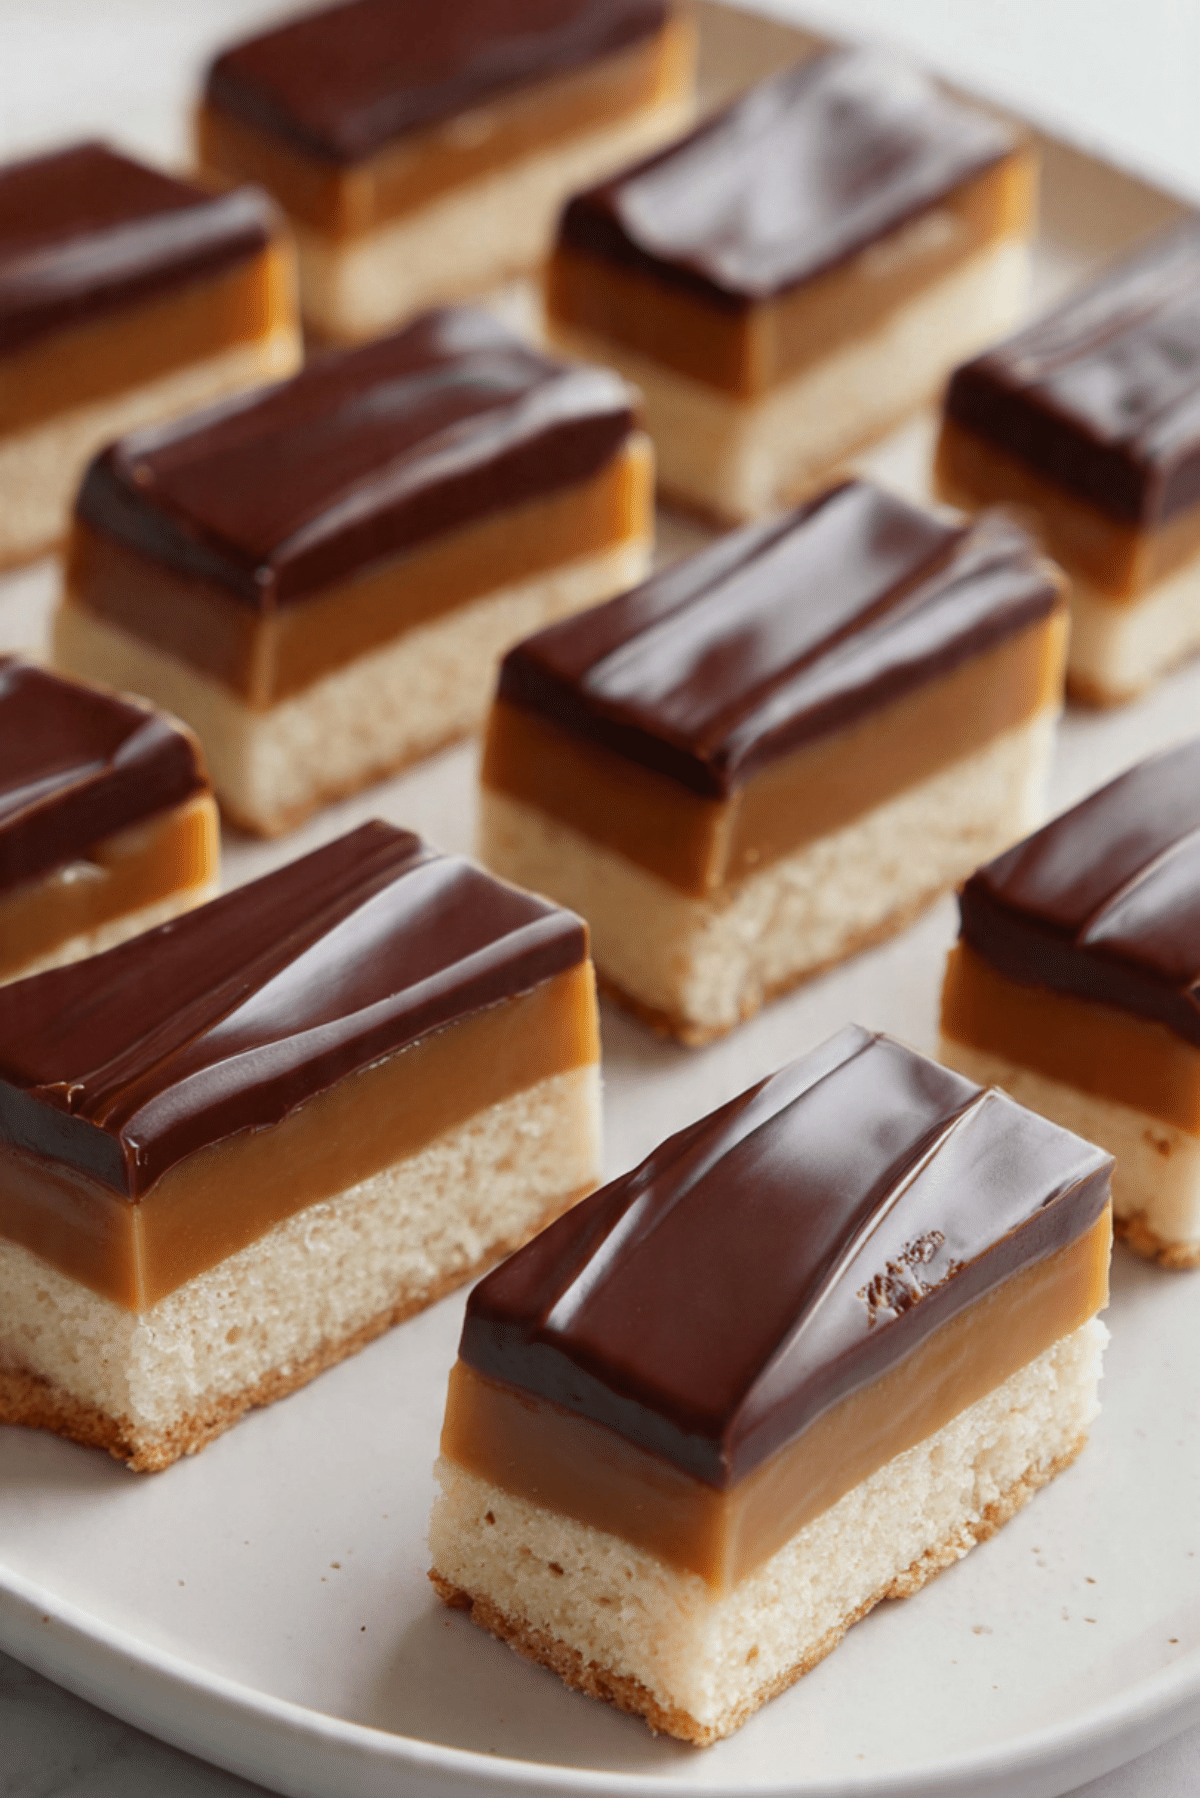
Sugar Free Twix Bars
Imagine biting into a perfectly layered bar with a crumbly shortbread base, luscious golden caramel, and a silky chocolate top that melts just right — all without a single grain of added sugar. These sugar free Twix bars are a dreamy treat that hits every nostalgic note while keeping things a little lighter. Whether you’re following a low-sugar lifestyle or just want a guilt-free indulgence, these bars deliver big-time on flavor, texture, and satisfaction.
Why These Will Be Your New Favorite Bars
There’s something magical about the classic combo of cookie, caramel, and chocolate. Now imagine all of that with zero added sugar. These bars don’t taste like a compromise — they taste like a win.
The Sweet Story Behind Twix-Inspired Treats
The original Twix bar has been delighting candy lovers since the late 1960s in the UK before sweeping across the globe. Known for its dual-stick format and iconic caramel crunch, it has inspired endless homemade takes. This sugar free version pays homage to the classic while reimagining it for modern tastes and lifestyles. Perfect for those avoiding refined sugars but still craving that old-school joy.
Why This Recipe Is a Keeper
Let me tell you, this one’s a total game-changer. It’s got the nostalgic taste, the delightful chew, and the irresistible chocolate snap — and it’s made with ingredients that love you back.
Versatile: Works as a snack, dessert, or even a sweet party platter centerpiece.
Budget-Friendly: Made with pantry staples like almond flour and coconut oil.
Quick and Easy: No candy thermometer needed, and no baking required for some steps.
Customizable: Swap the nut flours, change the chocolate, or add a sprinkle of sea salt.
Crowd-Pleasing: No one will guess it’s sugar free — trust me.
Make-Ahead Friendly: Bars keep beautifully in the fridge or freezer.
Great for Leftovers: Slice into smaller bites for lunchbox snacks or weeknight desserts.
Let’s Talk Technique
Before we start layering, let’s look at a few pro tricks to really make these bars shine.
- Chill Between Layers: Patience pays off. Give each layer time to set for the cleanest cuts.
- Use Parchment Paper: It’s a lifesaver when lifting out the finished bars.
- Don’t Overheat Chocolate: Melt it slowly to keep it smooth and glossy.
- Taste the Caramel Layer: Adjust the sweetness or salt to your liking before pouring.
- Cut With a Hot Knife: Dip your knife in hot water and wipe dry for clean edges.
Kitchen Tools You’ll Need
You won’t need fancy gadgets, just a few basics to make this recipe work like a charm.
Mixing Bowls: For combining your crust and caramel layers.
Spatula: Helps spread layers evenly without sticking.
8×8 Baking Pan: The perfect size for thick, satisfying bars.
Parchment Paper: Essential for easy removal and neat slicing.
Small Saucepan: To gently melt and mix the caramel layer.
Microwave-Safe Bowl: Ideal for melting chocolate without burning.
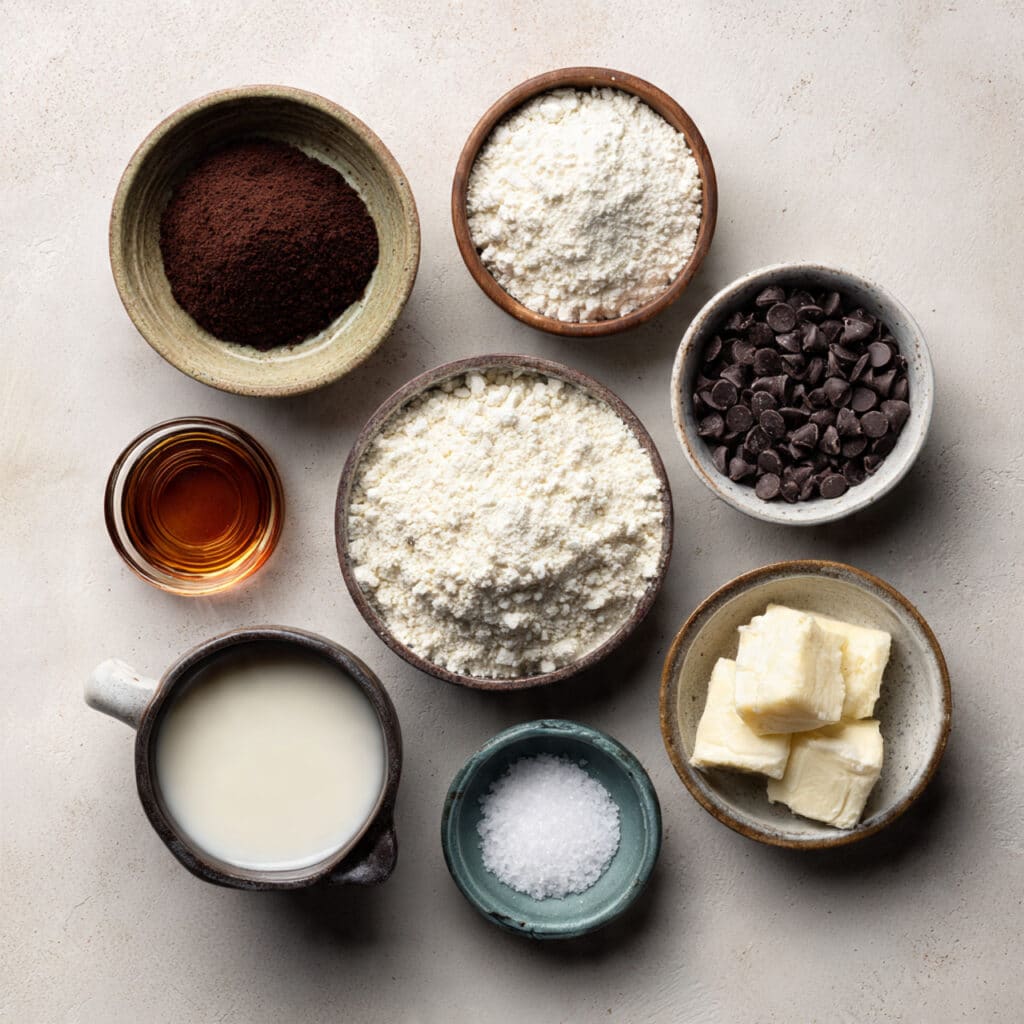
Ingredients You’ll Need for This Recipe
This recipe is all about layering flavors and textures in the most delightful way. Each component works in harmony to recreate that beloved bite.
- Almond Flour: 1 cup — Forms the soft, nutty shortbread-like base.
- Coconut Flour: 2 tablespoons — Adds structure and lightness to the crust.
- Coconut Oil: 1/3 cup, melted — Binds the crust and gives a hint of richness.
- Sugar-Free Maple Syrup: 1/4 cup — Naturally sweetens the crust and caramel.
- Vanilla Extract: 1 teaspoon — Adds warm flavor to both the base and caramel.
- Salt: 1/4 teaspoon — Balances out the sweetness perfectly.
- Unsweetened Almond Milk: 2 tablespoons — Helps smooth the caramel texture.
- Sugar-Free Dark Chocolate Chips: 3/4 cup — Creates a glossy, indulgent top layer.
Ingredient Swaps and Easy Substitutions
Need to switch things up? No problem. These swaps will still keep the spirit of the recipe alive.
Almond Flour: Oat flour or hazelnut flour.
Coconut Flour: Extra almond flour (add slightly more to balance texture).
Coconut Oil: Unsalted butter or vegan butter.
Sugar-Free Maple Syrup: Erythritol syrup or monk fruit syrup.
Unsweetened Almond Milk: Coconut milk or cashew milk.
Dark Chocolate Chips: Sugar-free milk chocolate or chopped chocolate bars.
Star Ingredients That Make It Shine
Sugar-Free Maple Syrup: Gives the caramel its golden hue and sticky richness without the sugar spike.
Almond Flour: Delivers that classic shortbread texture while keeping things light and nutty.
Ready to Make Magic? Let’s Get Cooking
This is the part where the fun really begins. Get everything set up and follow the steps below for sweet success.
1. Preheat Your Equipment:
No oven required, but line an 8×8 pan with parchment paper and set it aside.
2. Combine Ingredients:
Mix almond flour, coconut flour, melted coconut oil, maple syrup, vanilla, and salt in a bowl until a dough forms.
3. Prepare Your Cooking Vessel:
Press the dough evenly into your lined pan to form the base. Chill in the freezer for 15–20 minutes.
4. Assemble the Dish:
In a saucepan over low heat, combine almond milk, more maple syrup, a bit of vanilla, and a touch of coconut oil. Stir until thickened to a caramel-like texture.
5. Cook to Perfection:
Pour caramel mixture over the chilled crust. Return to freezer for 30 minutes or until set.
6. Finishing Touches:
Melt the chocolate chips in a microwave-safe bowl in short bursts, stirring between. Pour over the caramel layer and smooth out.
7. Serve and Enjoy:
Chill until firm, then slice into bars with a hot knife. Enjoy cold or slightly softened.
The Texture and Flavor Experience
Each bite starts with a firm, crumbly base that gives way to gooey caramel and a crisp snap of chocolate. The richness of the chocolate contrasts with the light nuttiness of the crust, while the caramel adds that dreamy, sticky sweetness that lingers on the tongue. It’s the kind of dessert you’ll want to savor slowly, even though it’s hard to resist reaching for seconds.
Smart Tips for Sweet Success
Let’s make your sugar free Twix bars turn out just right, every time.
- Use a metal spatula for cleaner edges when slicing.
- Chill each layer longer if your kitchen is warm.
- Store bars wrapped in parchment to prevent sticking.
- Taste the caramel before layering to adjust salt or sweetness.
What Can Go Wrong and How to Fix It
Mistakes happen, but here’s how to keep them from ruining your treat.
- Crumbly Crust: Add a little more coconut oil to help bind it better.
- Too Soft Caramel: Cook a bit longer to reduce liquid, or add a bit more coconut flour.
- Chocolate Separates: Melt slowly and stir often for a smooth finish.
- Bars Don’t Slice Cleanly: Chill thoroughly and use a hot, sharp knife.
Nutrition At a Glance
Servings: 12
Calories per serving: 180
Note: These are approximate values.
Timing Breakdown
Prep Time: 20 minutes
Cook Time: 5 minutes
Total Time: 25 minutes
Storage and Make-Ahead Magic
These bars were made for planning ahead. You can prepare the entire batch a day or two in advance and store in the fridge for up to a week. If you want to freeze them, place slices in an airtight container with parchment between layers. When you’re ready to enjoy, thaw in the fridge overnight or at room temp for a few minutes.
How to Plate and Serve Beautifully
Serve these on a slate board or white ceramic platter to make the chocolate shine. Add a sprinkle of flaky sea salt on top if you like that salty-sweet vibe. They pair wonderfully with an afternoon espresso or as part of a dessert tray at gatherings.
Turn Leftovers Into New Treats
- Chop them up and add to a sugar-free ice cream sundae.
- Crumble into Greek yogurt with berries for a parfait.
- Use as a base for mini cheesecake bites.
Bonus Tips to Make It Even Better
- Add a pinch of espresso powder to the chocolate for deeper flavor.
- Sprinkle crushed nuts on top before the chocolate sets.
- Let bars sit at room temp for 5 minutes before serving for the softest bite.
Present Like a Pro
Once your bars are sliced, line them up evenly on a minimal platter. Keep the layers visible by cutting with a clean, straight edge. Want to take it up a notch? Add a few gold sprinkles or edible glitter for a festive vibe.
Fun Twists You Can Try
- Peanut Butter Twix Bars: Swap caramel for a thick sugar-free peanut butter layer.
- Mint Chocolate Bars: Add peppermint extract to the chocolate layer.
- Hazelnut Delight: Use hazelnut flour and top with chopped hazelnuts.
- Chili Chocolate: Add a pinch of cayenne to the chocolate for a spicy kick.
- Coconut Dream: Add shredded coconut to the crust and top layer.
FAQ’s
1. Can I use regular maple syrup?
Yes, but it will no longer be sugar free.
2. Can I bake the crust instead of chilling?
Yes, bake at 350°F for 8–10 minutes for a firmer texture.
3. Can I use a different flour?
Yes, oat flour works well in place of almond.
4. How long do they keep?
Up to a week in the fridge or a month in the freezer.
5. Are these bars vegan?
Yes, as long as your chocolate chips are dairy-free.
6. Can I make these nut-free?
Try sunflower seed flour instead of almond.
7. Do they taste like real Twix?
Very close, with a slightly more natural sweetness.
8. Can I add protein powder?
Yes, add 1 tablespoon to the crust for a boost.
9. Are they keto-friendly?
They can be, if you use keto-approved sweeteners.
10. Can kids enjoy them?
Absolutely, they’re perfect for little hands and sugar-free diets.
Conclusion
These sugar free Twix bars are the kind of treat you make once and find yourself craving again and again. They’re nostalgic, satisfying, and surprisingly simple to put together. Whether you’re making them for a crowd or stashing them away for late-night cravings, trust me, they’re worth every bite.
Print
Sugar Free Twix Bars
- Prep Time: 20 minutes
- Cook Time: 5 minutes
- Total Time: 25 minutes
- Yield: 12 bars 1x
- Category: Dessert
- Method: No-Bake
- Cuisine: American
- Diet: Diabetic
Description
These sugar free Twix bars feature a buttery almond flour crust, rich caramel layer, and a smooth chocolate topping — all without added sugar. Perfect for low-sugar diets and irresistibly indulgent.
Ingredients
- 1 cup almond flour
- 2 tablespoons coconut flour
- 1/3 cup coconut oil, melted
- 1/4 cup sugar-free maple syrup
- 1 teaspoon vanilla extract
- 1/4 teaspoon salt
- 2 tablespoons unsweetened almond milk
- 3/4 cup sugar-free dark chocolate chips
Instructions
- Line an 8×8 pan with parchment paper and set aside.
- In a mixing bowl, combine almond flour, coconut flour, melted coconut oil, 2 tablespoons maple syrup, vanilla, and salt. Stir until dough forms.
- Press the crust mixture evenly into the prepared pan and place in the freezer for 15–20 minutes.
- In a saucepan over low heat, mix almond milk, remaining maple syrup, vanilla, and a small amount of coconut oil. Stir constantly until thickened to a caramel-like consistency.
- Pour the caramel mixture over the chilled crust and return to the freezer for 30 minutes or until set.
- Melt chocolate chips in a microwave-safe bowl in short intervals, stirring until smooth.
- Spread melted chocolate over the caramel layer and smooth the top. Chill until firm.
- Once set, slice into bars with a hot, sharp knife. Serve cold or slightly softened.
Notes
- Use parchment paper for easy removal and clean slicing.
- Taste caramel layer before pouring to adjust sweetness or saltiness.
- Store in the fridge or freezer with parchment between bars to avoid sticking.
Nutrition
- Serving Size: 1 bar
- Calories: 180
- Sugar: 1g
- Sodium: 60mg
- Fat: 14g
- Saturated Fat: 8g
- Unsaturated Fat: 5g
- Trans Fat: 0g
- Carbohydrates: 9g
- Fiber: 3g
- Protein: 3g
- Cholesterol: 0mg
Keywords: sugar free Twix bars, healthy Twix, no sugar dessert, low carb Twix, homemade Twix