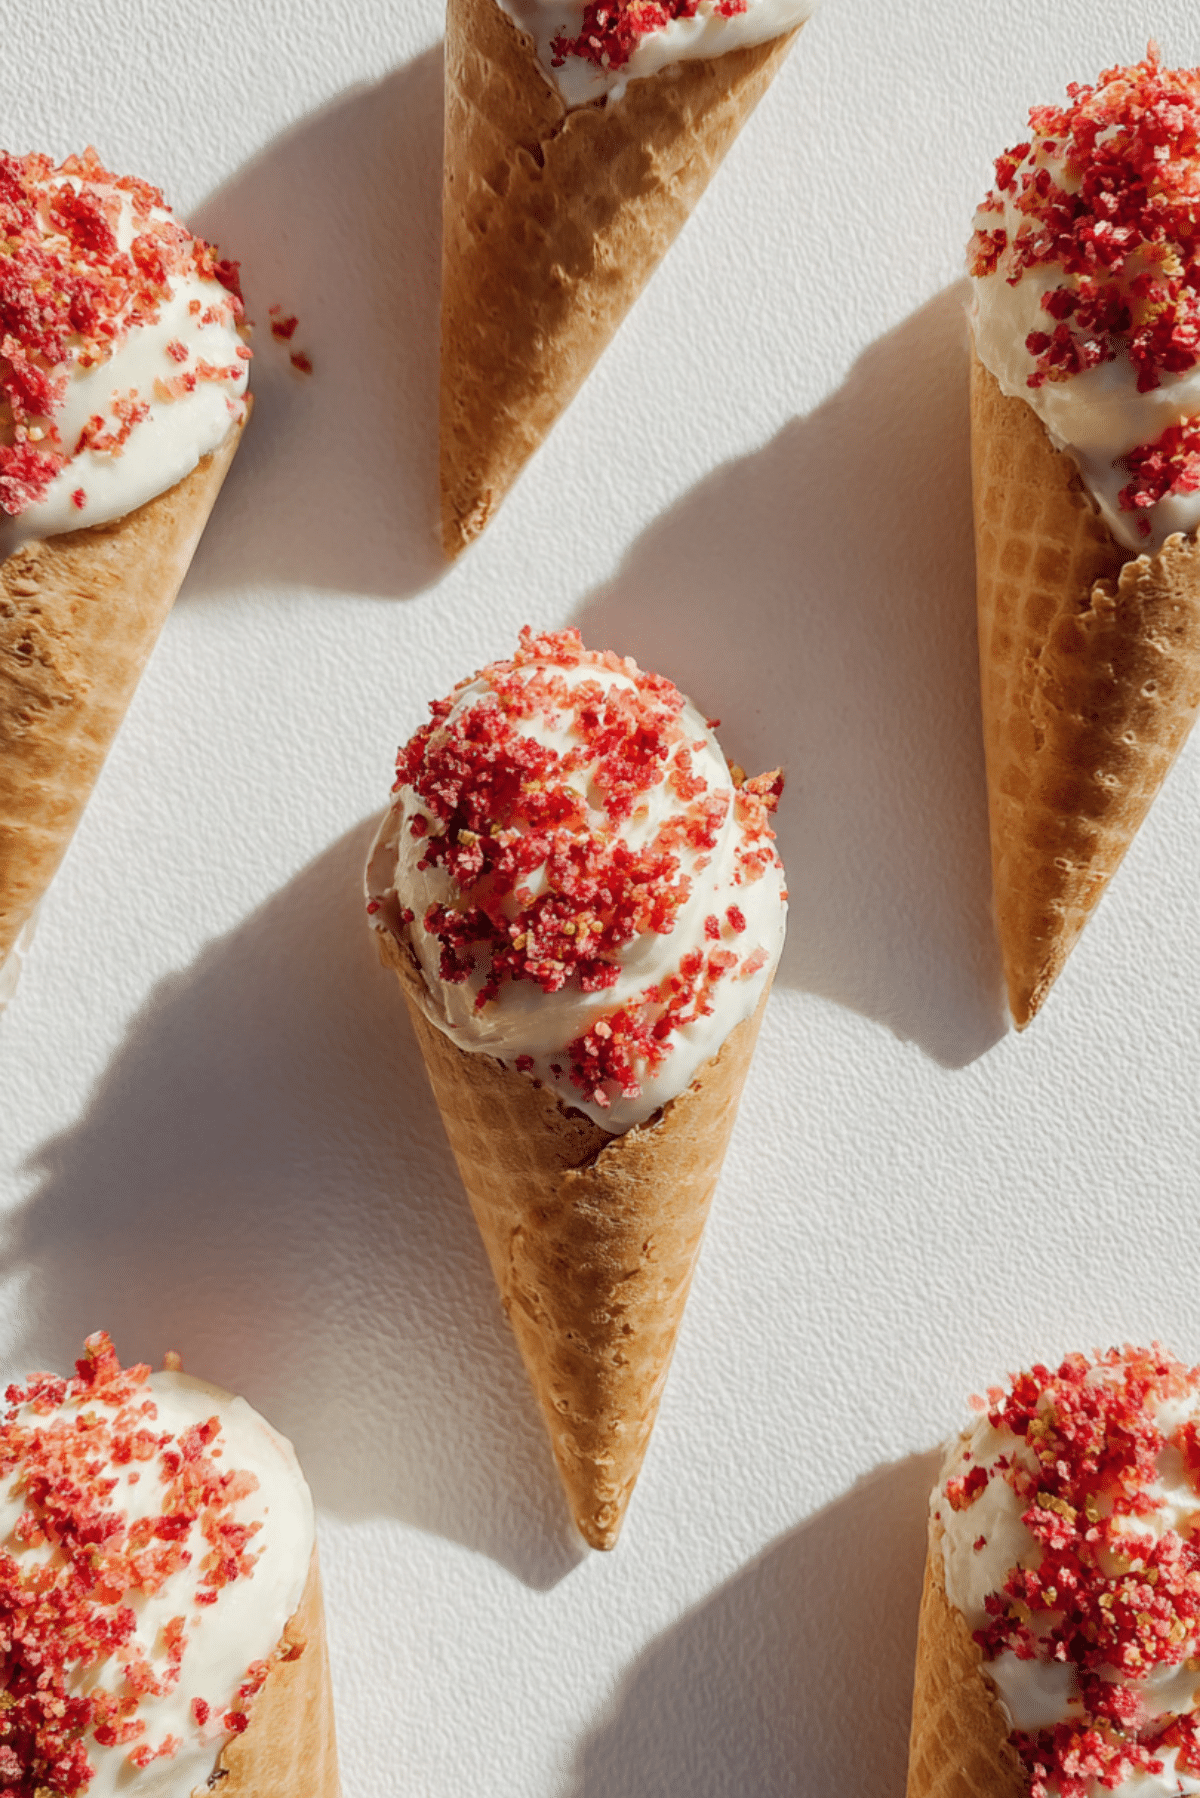
Strawberry Crunch Cheesecake Cones
The first time I made these, I was just looking for something fun, something that feels like summer in every bite. And let me tell you, the moment that creamy cheesecake filling meets that sweet strawberry crunch and crispy cone, it becomes something you keep thinking about long after the last bite. Trust me, you’re going to love this, it is playful, nostalgic, and honestly a little addictive.
A Sweet Treat That Feels Like Pure Joy
There is something about handheld desserts that instantly makes everything more exciting, and these cones are exactly that kind of treat. You get the smooth, rich cheesecake texture, balanced with the buttery crunch and that pop of strawberry flavor that feels bright and fresh.
And now as you take that first bite, the contrast hits you, creamy, crunchy, slightly tangy, and perfectly sweet. This one’s a total game-changer for dessert lovers who want something easy but impressive.
Where This Fun Dessert Inspiration Comes From
While this dessert is more of a modern creation than a traditional one, it takes inspiration from classic strawberry shortcake ice cream bars that many of us grew up loving. That iconic strawberry crunch coating is what gives this dessert its personality.
Cheesecake itself has roots going all the way back to ancient Greece, but over time it has evolved into countless variations. Combining it with cones brings a playful twist that feels both nostalgic and completely new.
Why You’ll Keep Coming Back to This Recipe
Before we dive deeper, let me tell you why this recipe works so well every single time.
Versatile: You can switch up toppings, fillings, or even the cones depending on what you have at home.
Budget-Friendly: Simple ingredients, nothing fancy, yet the result feels bakery-level.
Quick and Easy: No baking required, which makes it perfect for busy days.
Customizable: Add chocolate drizzle, swap fruits, or adjust sweetness easily.
Crowd-Pleasing: Everyone loves it, kids, adults, and anyone with a sweet tooth.
Make-Ahead Friendly: You can prepare the filling and crunch ahead of time.
Great for Leftovers: The filling can be reused in other desserts if needed.
A Few Insider Tips Before You Start
Before we jump into the kitchen, here are a few little secrets that make all the difference.
- Chill the filling before assembling, it helps it hold its shape better.
- Crush the cookies finely but not into powder, you want that signature crunch.
- Use firm waffle cones so they do not soften too quickly.
- Fold the whipped topping gently to keep the texture light and airy.
Tools That Make Everything Easier
Having the right tools makes the whole process smoother and honestly more enjoyable.
Mixing Bowl: For combining the cheesecake filling smoothly.
Hand Mixer: Helps achieve that creamy, lump-free texture quickly.
Spatula: Perfect for folding ingredients gently without deflating them.
Food Processor or Bag and Rolling Pin: To crush cookies evenly.
Piping Bag or Spoon: Makes filling the cones neat and easy.
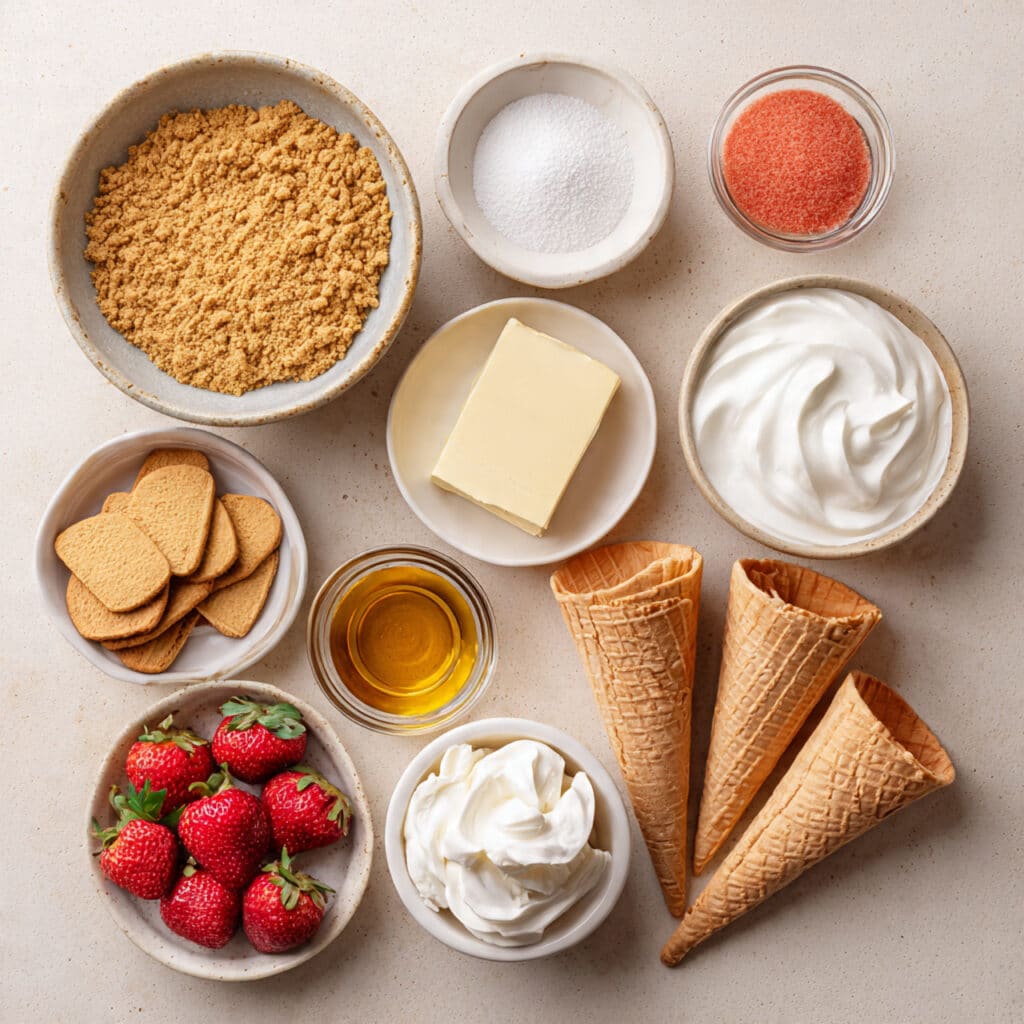
Ingredients That Bring It All Together
Now let’s talk about what makes this dessert so special, it is all about simple ingredients working in harmony.
- Graham Cracker Crumbs: 1 cup, adds a subtle buttery base flavor
- Golden Sandwich Cookies: 1 cup crushed, creates that signature crunch
- Unsalted Butter: 4 tablespoons melted, binds the crumble together
- Cream Cheese: 8 ounces softened, the heart of the cheesecake filling
- Powdered Sugar: 1 cup, gives smooth sweetness without graininess
- Vanilla Extract: 1 teaspoon, enhances the overall flavor
- Fresh Strawberries: 1 cup chopped, brings freshness and color
- Strawberry Gelatin Powder: 3 tablespoons, boosts that fruity flavor
- Whipped Topping: 1 cup, keeps the filling light and fluffy
- Waffle Cones: 6 cones, the crunchy base that holds everything together
Easy Swaps If You Want to Get Creative
Sometimes you want to switch things up, and that is totally part of the fun.
Cream Cheese: Mascarpone cheese for a richer taste
Golden Cookies: Vanilla wafers or digestive biscuits
Fresh Strawberries: Frozen strawberries, just thaw and drain
Whipped Topping: Homemade whipped cream
The Star Ingredients You Should Not Skip
Some ingredients truly define this dessert.
Cream Cheese: This is what gives that classic cheesecake richness and slight tang.
Strawberries: They bring brightness, freshness, and that beautiful color contrast.
Let’s Put Everything Together
Alright, now let’s dive into the fun part, bringing it all together step by step.
- Preheat Your Equipment: No oven needed, but prepare your tools and chill a mixing bowl if possible.
- Combine Ingredients: In a bowl, mix cream cheese, powdered sugar, and vanilla until smooth.
- Prepare Your Cooking Vessel: In another bowl, mix graham crumbs, crushed cookies, melted butter, and strawberry gelatin until combined.
- Assemble the Dish: Fold whipped topping into the cream cheese mixture, then gently mix in chopped strawberries.
- Cook to Perfection: No cooking required, but let the filling chill for 30 minutes to set.
- Finishing Touches: Fill each cone with the cheesecake mixture and roll or sprinkle the strawberry crunch mixture on top.
- Serve and Enjoy: Serve immediately for the best crunch, or chill slightly before serving.
The Texture and Flavor Magic
What makes this dessert unforgettable is the contrast. The filling is silky and creamy, almost like mousse, while the topping gives that satisfying crunch. Then comes the cone, crisp and slightly sweet, tying everything together.
The strawberry flavor is bright and slightly tangy, balancing the richness perfectly.
Helpful Tips for Best Results
- Keep cones dry until serving to avoid sogginess
- Use cold ingredients for a firmer filling
- Do not overmix after adding whipped topping
What to Avoid for Perfect Results
It is easy to get this right, but a few things can go wrong if you are not careful.
- Avoid overfilling the cones, it can get messy
- Do not skip chilling, the texture will be too soft
- Avoid overly fine crumbs, you want texture, not powder
Nutrition Snapshot
Servings: 6
Calories per serving: 320
Note: These are approximate values.
Time Breakdown
Prep Time: 20 minutes
Cook Time: 0 minutes
Total Time: 20 minutes
Make Ahead and Storage Tips
If you want to get ahead, you can prepare the filling and crunch mixture separately and store them in the fridge for up to 2 days. Assemble the cones just before serving to keep that perfect crisp texture.
Freezing is not recommended once assembled, but the filling alone can be frozen and thawed later.
Serving Ideas That Make It Extra Special
Serve these cones on a dessert stand for a fun presentation, or add a drizzle of white chocolate for an extra indulgent touch. They are perfect for parties, picnics, or just a sweet treat at home.
Fun Ways to Use Leftovers
If you have extra filling, you can turn it into parfaits, layer it in cups with cookies, or even spread it on pancakes for a sweet twist.
Extra Tips You’ll Appreciate
Use ripe but firm strawberries for the best texture, and always taste your filling before assembling so you can adjust sweetness if needed.
Make It Look Stunning
Dip the tops of the cones in extra crunch mixture and let some fall naturally for that bakery-style finish. A little dusting of crumbs around the top adds visual appeal.
Variations to Try Next Time
Try a chocolate version with cocoa powder, or swap strawberries for raspberries for a tangier flavor. You can even add a caramel drizzle for a richer twist.
FAQ’s
Q1: Can I make these ahead of time?
Yes, prepare the components ahead, but assemble just before serving.
Q2: Can I use homemade whipped cream?
Absolutely, it works perfectly.
Q3: How do I keep the cones from getting soggy?
Fill them right before serving.
Q4: Can I freeze the filling?
Yes, but thaw before using.
Q5: Can I use other fruits?
Yes, raspberries or blueberries work great.
Q6: Is this dessert very sweet?
It is balanced, but you can adjust sugar to taste.
Q7: Can I use sugar cones instead?
Yes, any sturdy cone works.
Q8: How long does it last in the fridge?
Up to 2 days for the filling.
Q9: Can I make it dairy-free?
Yes, with dairy-free substitutes.
Q10: What if I do not have gelatin powder?
You can skip it, but flavor will be milder.
Conclusion
And just like that, you have a dessert that feels fun, fresh, and completely irresistible. It is simple, a little playful, and honestly one of those treats that brings a smile with every bite. Let me tell you, it is worth every bite, and once you try it, you will keep coming back to it again and again.
Print
Strawberry Crunch Cheesecake Cones
- Prep Time: 20 minutes
- Cook Time: 0 minutes
- Total Time: 20 minutes
- Yield: 6 cones 1x
- Category: Dessert
- Method: No-Bake
- Cuisine: American
- Diet: Vegetarian
Description
Creamy cheesecake filling paired with a sweet strawberry crunch topping, all served in crispy waffle cones for a fun and irresistible dessert.
Ingredients
- 1 cup graham cracker crumbs
- 1 cup crushed golden sandwich cookies
- 4 tablespoons unsalted butter, melted
- 8 ounces cream cheese, softened
- 1 cup powdered sugar
- 1 teaspoon vanilla extract
- 1 cup fresh strawberries, chopped
- 3 tablespoons strawberry gelatin powder
- 1 cup whipped topping
- 6 waffle cones
Instructions
- In a mixing bowl, beat the cream cheese, powdered sugar, and vanilla extract until smooth and creamy.
- In a separate bowl, combine graham cracker crumbs, crushed golden sandwich cookies, melted butter, and strawberry gelatin powder. Mix until evenly coated.
- Gently fold the whipped topping into the cream cheese mixture until light and fluffy.
- Fold in the chopped fresh strawberries carefully to maintain texture.
- Chill the cheesecake filling in the refrigerator for 30 minutes to firm up.
- Spoon or pipe the filling into each waffle cone.
- Top or roll the filled cones in the strawberry crunch mixture.
- Serve immediately or chill briefly before serving.
Notes
- Chill the filling before assembling for better structure.
- Do not crush the cookies too finely to keep a crunchy texture.
- Fill cones just before serving to prevent sogginess.
- You can substitute whipped topping with homemade whipped cream.
Nutrition
- Serving Size: 1 cone
- Calories: 320
- Sugar: 22g
- Sodium: 180mg
- Fat: 18g
- Saturated Fat: 10g
- Unsaturated Fat: 6g
- Trans Fat: 0g
- Carbohydrates: 34g
- Fiber: 1g
- Protein: 4g
- Cholesterol: 45mg
Keywords: strawberry crunch cheesecake cones, no bake cheesecake cones, strawberry dessert, cheesecake cone recipe, easy dessert cones