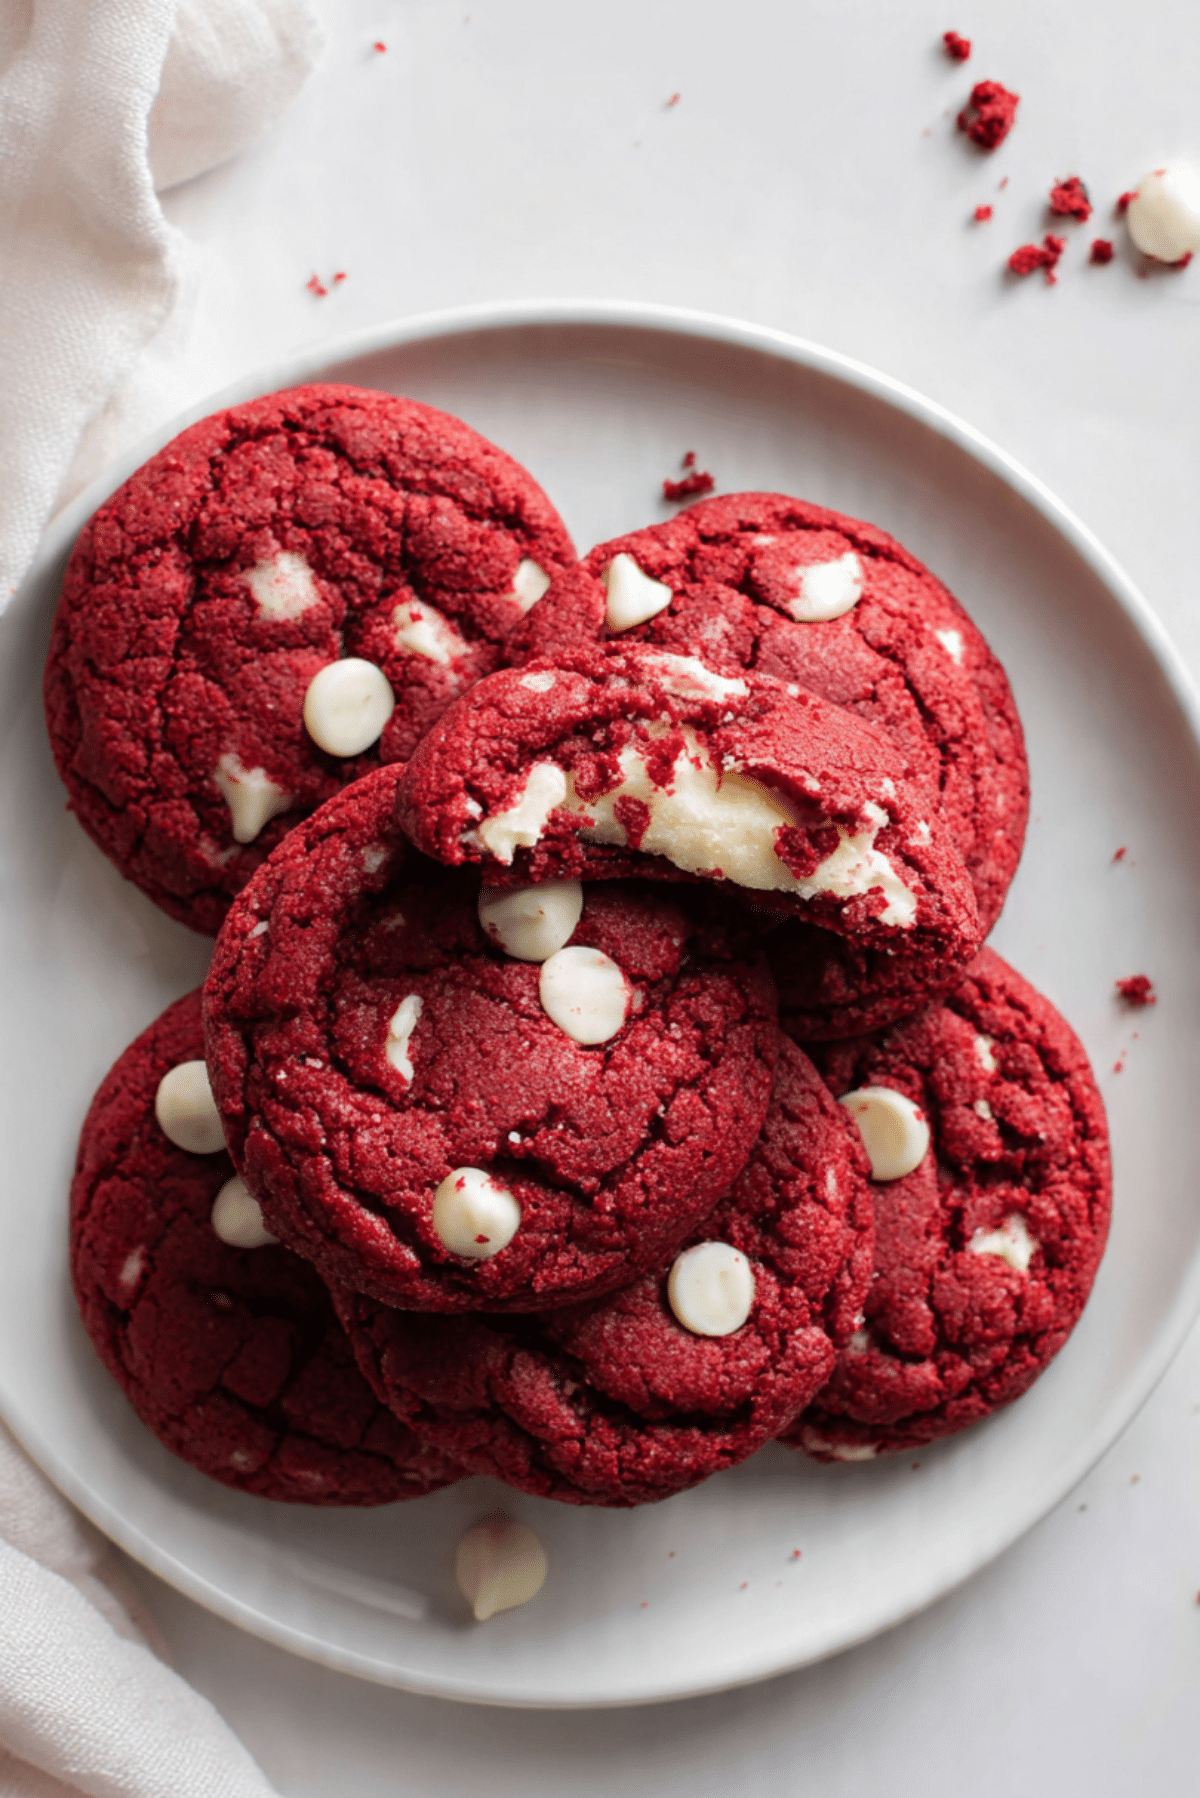
Red Velvet Cheesecake Cookies
The moment you bite into one of these soft, rich cookies, something magical happens. The deep cocoa flavor of red velvet meets a creamy cheesecake center that slowly melts into the warm cookie crumb. The outside has that slightly crisp edge, the inside stays tender and velvety, and right in the middle sits a smooth, tangy surprise that makes every bite feel special.
Trust me, you are going to love this. These cookies bring together the comfort of a bakery style treat and the indulgence of a classic cheesecake filling. They look beautiful with their bold red color, but even better, they taste unforgettable. Let me tell you, it is worth every bite.
Why These Cookies Always Steal the Show
There is something about the balance of flavors and textures here that keeps people reaching for another cookie. The soft red velvet base pairs perfectly with the creamy center, and the little bursts of white chocolate add a touch of sweetness that rounds everything out.
The best part is how approachable they are. Even if you do not bake often, this recipe guides you through a process that feels simple and rewarding. The aroma alone, rich cocoa with hints of vanilla and butter, will fill your kitchen in the most comforting way.
And now that we have imagined that first bite, let’s step back for a moment and talk about where this delicious idea came from.
A Sweet Twist Inspired by Classic Red Velvet
Red velvet desserts have a fascinating history. The flavor itself started appearing in cakes during the early twentieth century in the United States. Bakers loved the subtle cocoa taste combined with a soft, tender crumb. Over time, cream cheese frosting became the natural partner for red velvet cake, creating the iconic pairing we know today.
These cookies borrow that same flavor story. Instead of frosting on top, a smooth cream cheese filling hides inside the cookie dough. It is a playful twist on tradition that keeps the familiar flavors while creating a completely new experience.
It feels nostalgic, comforting, and just a little indulgent, which makes it perfect for sharing at gatherings or simply enjoying with a cup of coffee.
And now let’s talk about why this recipe works so well every single time.
Reasons This Recipe Works Every Time
These cookies are more than just pretty. The method and ingredients come together in a way that makes the results reliable and delicious.
Versatile: You can serve these cookies for holidays, parties, bake sales, or simply a cozy weekend treat. They fit almost any occasion.
Budget-Friendly: Most of the ingredients are pantry staples like flour, sugar, butter, and eggs, which keeps the cost reasonable.
Quick and Easy: The steps are straightforward, and the dough comes together quickly without complicated techniques.
Customizable: You can add extra white chocolate chips, adjust the sweetness, or even experiment with flavored fillings.
Crowd-Pleasing: The bright red color and creamy center make these cookies irresistible on any dessert table.
Make-Ahead Friendly: The dough and cheesecake filling can both be prepared ahead of time and assembled later.
Great for Leftovers: If any cookies remain, they stay soft and delicious for days when stored properly.
Before we dive into the ingredients, let me share a few insider tricks that make these cookies even better.
Insider Baking Tips for Perfect Results
Sometimes the smallest details make the biggest difference in baking. Keep these tips in mind and you will get beautiful cookies every time.
- Chill the cream cheese filling: This makes it much easier to wrap the dough around the filling without it leaking during baking.
- Use softened butter: Butter that is soft but not melted helps create the perfect cookie texture.
- Do not overmix the dough: Gentle mixing keeps the cookies tender instead of dense.
- Space cookies well: These cookies spread slightly, so leaving space on the baking sheet helps them bake evenly.
- Watch the baking time carefully: Removing them while the centers still look slightly soft keeps the texture perfect.
With those tips in mind, let’s gather the tools that will make the process smooth and enjoyable.
Kitchen Tools That Make the Process Easier
A few simple tools will help you move through this recipe with confidence.
Mixing bowls: Needed for preparing the cookie dough and the cheesecake filling separately.
Electric mixer: Helps cream the butter and sugars until light and fluffy.
Baking sheet: A sturdy sheet ensures even baking and golden cookie bottoms.
Parchment paper: Prevents sticking and makes cleanup easy.
Cookie scoop: Helps portion the dough evenly so all cookies bake at the same rate.
Now that the kitchen is ready, let’s take a closer look at the ingredients that make these cookies so irresistible.
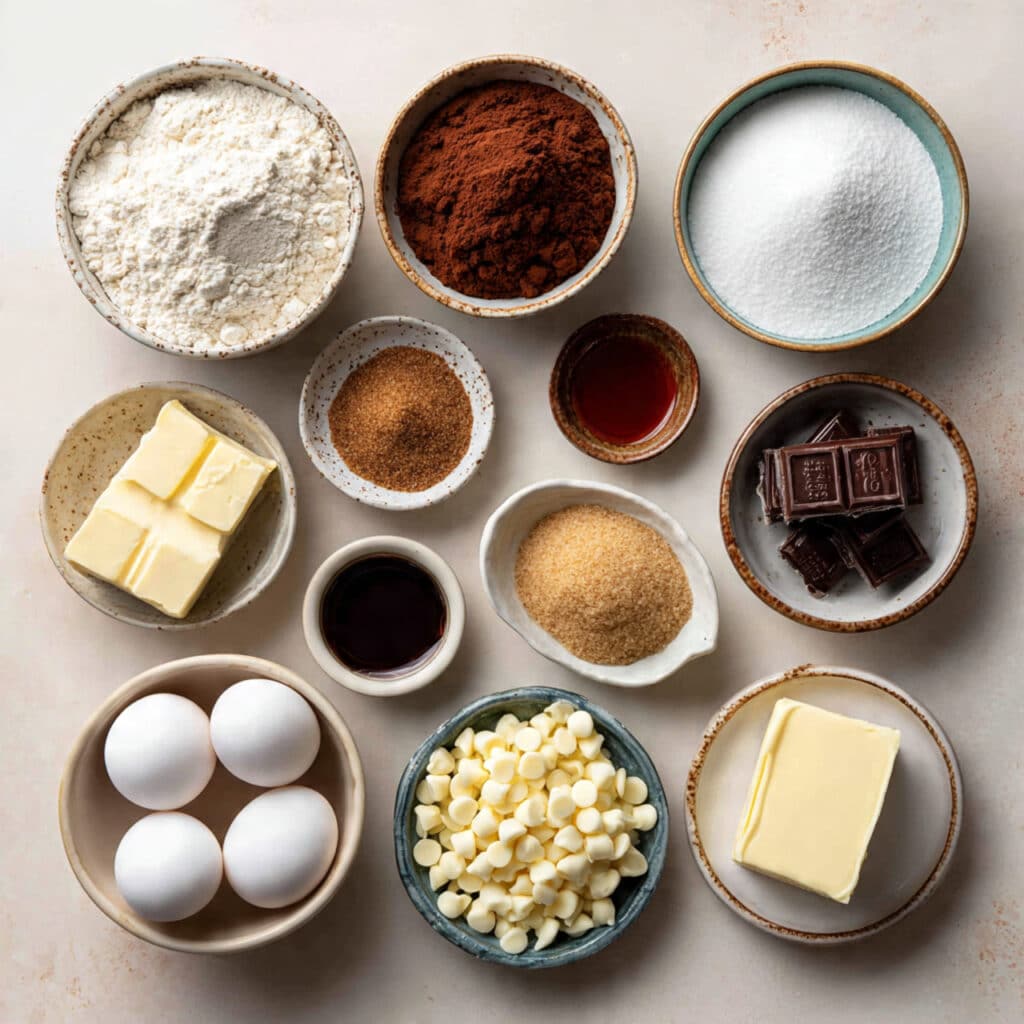
Ingredients That Bring Everything Together
The magic of this recipe comes from how simple ingredients combine into something truly special.
- All Purpose Flour: 2 cups, provides the structure that holds the cookie together.
- Unsweetened Cocoa Powder: 2 tablespoons, adds that classic red velvet chocolate note.
- Baking Soda: 1 teaspoon, helps the cookies rise and stay soft.
- Salt: ½ teaspoon, balances the sweetness and enhances flavor.
- Unsalted Butter: ½ cup softened, creates a rich and tender cookie base.
- Granulated Sugar: ¾ cup, adds sweetness and helps the cookies spread slightly.
- Brown Sugar: ¼ cup packed, contributes moisture and a hint of caramel flavor.
- Eggs: 1 large egg, binds the dough and adds richness.
- Vanilla Extract: 1 teaspoon, deepens the flavor of the cookie.
- Red Food Coloring: 1 tablespoon, gives the dough its signature vibrant color.
- Cream Cheese: 8 ounces softened, forms the creamy filling at the center.
- White Chocolate Chips: ½ cup, add little pockets of sweetness throughout the cookie.
Once you see these ingredients together, it becomes clear how each one contributes to the final flavor and texture.
But sometimes you might need alternatives, so let’s explore a few flexible swaps.
Ingredient Swaps That Still Taste Amazing
If you need to adapt the recipe slightly, these substitutions work well.
Unsalted Butter: Margarine or plant based butter can work as an alternative.
White Chocolate Chips: Dark chocolate chips or chopped white chocolate pieces.
All Purpose Flour: A gluten free flour blend designed for baking.
Granulated Sugar: Coconut sugar for a slightly deeper sweetness.
Now let’s shine a spotlight on a couple of ingredients that truly define this recipe.
The Ingredients That Make These Cookies Special
Cream Cheese: This is the star of the filling. Its slight tang balances the sweetness of the cookie and creates a creamy surprise inside.
Unsweetened Cocoa Powder: Just a small amount gives the dough that subtle chocolate depth that makes red velvet so distinctive.
And now comes the fun part, turning these ingredients into warm cookies.
Let’s Bake These Cookies Together
This process is simple, and once you try it once you will want to make them again and again.
- Preheat Your Equipment: Preheat your oven to 350°F and line a baking sheet with parchment paper.
- Combine Ingredients: In a bowl mix flour, cocoa powder, baking soda, and salt. In another bowl cream butter, granulated sugar, and brown sugar until fluffy. Add the egg, vanilla, and red food coloring, then mix in the dry ingredients. Fold in the white chocolate chips.
- Prepare Your Cooking Vessel: Prepare the baking sheet with parchment and ensure there is enough spacing for the cookies.
- Assemble the Dish: Scoop a portion of cookie dough, flatten it slightly, add a small spoonful of cream cheese in the center, then wrap the dough around it to seal.
- Cook to Perfection: Place cookies on the baking sheet and bake for about 10 to 12 minutes until the edges are set.
- Finishing Touches: Allow the cookies to cool slightly so the filling sets while remaining creamy.
- Serve and Enjoy: Serve warm or at room temperature for the perfect balance of textures.
The Texture and Flavor Magic Inside Every Bite
These cookies offer a beautiful contrast of textures. The outer cookie is soft with lightly crisp edges, while the interior stays tender and slightly chewy. When you reach the center, the creamy cheesecake filling brings a smooth richness that melts beautifully into the cocoa flavored dough.
The white chocolate chips add gentle sweetness and a creamy note that complements the tangy cream cheese. It creates a layered flavor experience that feels indulgent but comforting at the same time.
Helpful Baking Tips for Even Better Cookies
A few extra tricks can take your cookies from good to unforgettable.
- Chill the dough for 20 minutes if it feels too soft to handle.
- Use a cookie scoop for evenly sized cookies.
- Slightly underbake for softer centers.
Common Baking Mistakes and How to Avoid Them
Even simple recipes can have small pitfalls, but they are easy to fix.
- Overbaking: Remove cookies when the centers still look slightly soft.
- Leaking filling: Make sure the dough fully seals around the cream cheese.
- Overmixing dough: Mix just until ingredients combine.
Nutrition Overview
Servings: 12 cookies
Calories per serving: 210
Note: These values are approximate. :contentReference[oaicite:0]{index=0}
Time Breakdown for This Recipe
Prep Time: 20 minutes
Cook Time: 12 minutes
Total Time: 32 minutes
Make Ahead and Storage Tips
If you want to prepare ahead, you can refrigerate the dough for up to 24 hours before baking. The cheesecake filling can also be made ahead and kept chilled.
Once baked, store the cookies in an airtight container in the refrigerator for up to four days. Let them sit at room temperature for a few minutes before eating so the filling becomes soft and creamy again.
You can also freeze the baked cookies for up to two months. Reheat gently in the oven for the best texture.
Delicious Ways to Serve These Cookies
These cookies are wonderful on their own, but they can also become part of a bigger dessert spread.
Serve them with coffee, hot chocolate, or a glass of cold milk. They also look beautiful arranged on a holiday dessert platter or wrapped as a homemade gift.
Creative Ways to Use Leftover Cookies
If you have extra cookies, here are some fun ideas.
Crumble them over vanilla ice cream for an instant dessert topping. You can also chop them and mix them into a milkshake or layer them in a dessert parfait with whipped cream.
Extra Tips for Flavor and Texture
Let the cookies cool for a few minutes before serving so the cheesecake filling sets slightly. This keeps the center creamy without being too soft.
Using high quality cocoa powder and real vanilla extract will also deepen the flavor of the cookies.
Make Them Look Bakery Worthy
For a beautiful finish, press a few extra white chocolate chips onto the tops of the cookies right after baking. The contrast against the red color makes them look stunning.
A light dusting of powdered sugar can also give them a festive touch.
Fun Variations to Try
- Add chopped pecans for a nutty crunch.
- Mix in dark chocolate chips instead of white chocolate.
- Add orange zest to the dough for a bright citrus twist.
- Create mini sandwich cookies using cream cheese frosting.
- Sprinkle crushed cookies on top of ice cream sundaes.
FAQ’s
1. Can I freeze the cookie dough?
Yes, the dough freezes well for up to two months. Thaw slightly before baking.
2. Can I skip the food coloring?
Yes, the cookies will still taste delicious, though they will appear more chocolate brown.
3. How do I keep the filling from leaking?
Make sure the dough completely surrounds the cream cheese before baking.
4. Can I make these cookies smaller?
Absolutely. Just reduce the baking time slightly.
5. Do they need refrigeration?
Because of the cream cheese filling, storing them in the refrigerator is best.
6. Can I use low fat cream cheese?
Yes, but the filling may be slightly less creamy.
7. Can I add extra chocolate chips?
Of course. A little extra sweetness never hurts.
8. Why are my cookies spreading too much?
The butter may have been too soft. Chilling the dough helps.
9. Can I use gel food coloring?
Yes, gel coloring works very well and often produces a brighter color.
10. How long do they stay fresh?
Stored properly, they stay delicious for up to four days.
Conclusion
These red velvet cheesecake cookies combine everything people love about classic red velvet desserts with the creamy indulgence of cheesecake. The result is a cookie that feels special, comforting, and completely irresistible.
Once you bake a batch and take that first bite, soft cookie, creamy center, and sweet chocolate chips all together, you will understand why this recipe quickly becomes a favorite.
Trust me, you are going to want to make these again very soon.
Print
Red Velvet Cheesecake Cookies
- Prep Time: 20 minutes
- Cook Time: 12 minutes
- Total Time: 32 minutes
- Yield: 12 cookies 1x
- Category: Dessert
- Method: Baking
- Cuisine: American
- Diet: Vegetarian
Description
Soft red velvet cookies with a creamy cheesecake center and sweet white chocolate chips. Rich cocoa flavor, tender texture, and a smooth filling make these cookies an indulgent bakery style treat perfect for holidays, parties, or everyday baking.
Ingredients
- 2 cups all purpose flour
- 2 tablespoons unsweetened cocoa powder
- 1 teaspoon baking soda
- 1/2 teaspoon salt
- 1/2 cup unsalted butter, softened
- 3/4 cup granulated sugar
- 1/4 cup brown sugar, packed
- 1 large egg
- 1 teaspoon vanilla extract
- 1 tablespoon red food coloring
- 8 ounces cream cheese, softened
- 1/2 cup white chocolate chips
Instructions
- Preheat the oven to 350°F and line a baking sheet with parchment paper.
- In a bowl combine flour, cocoa powder, baking soda, and salt.
- In another bowl cream the butter, granulated sugar, and brown sugar until light and fluffy.
- Add the egg, vanilla extract, and red food coloring to the butter mixture and mix until smooth.
- Gradually add the dry ingredients to the wet mixture and mix just until combined.
- Fold in the white chocolate chips.
- Scoop a portion of cookie dough and flatten slightly in your hand.
- Place a small spoonful of cream cheese in the center and wrap the dough around it to seal.
- Place the filled dough balls on the prepared baking sheet with space between each cookie.
- Bake for 10 to 12 minutes until the edges are set and the centers remain soft.
- Allow cookies to cool slightly before serving so the cheesecake center sets gently.
Notes
- Chill the dough for 20 minutes if it feels too soft to handle.
- Make sure the dough fully seals around the cream cheese to prevent leaking.
- Do not overbake to keep the cookies soft and tender.
- Store cookies in the refrigerator in an airtight container for best freshness.
Nutrition
- Serving Size: 1 cookie
- Calories: 210
- Sugar: 16g
- Sodium: 140mg
- Fat: 11g
- Saturated Fat: 6g
- Unsaturated Fat: 4g
- Trans Fat: 0g
- Carbohydrates: 25g
- Fiber: 1g
- Protein: 3g
- Cholesterol: 35mg
Keywords: red velvet cheesecake cookies, stuffed red velvet cookies, cream cheese filled cookies, red velvet dessert cookies, bakery style cookies