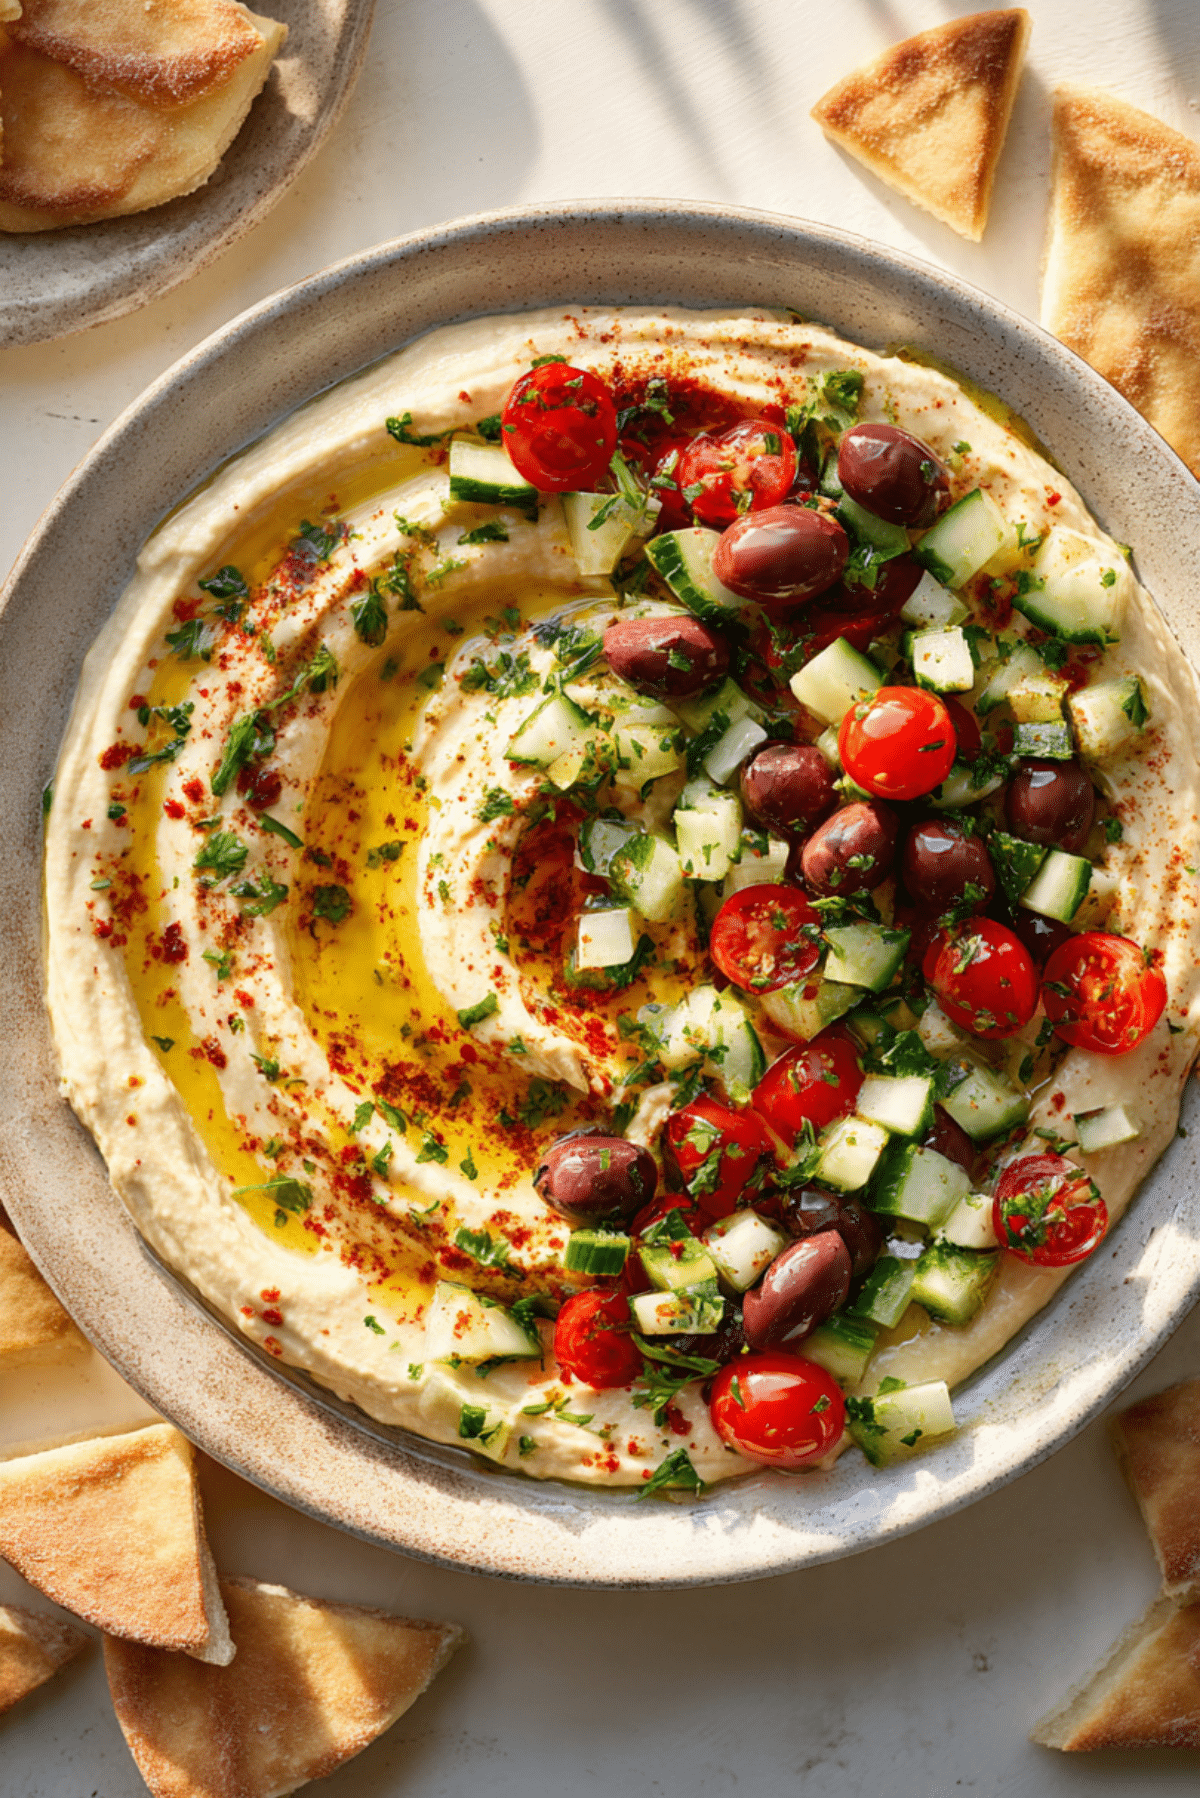
Loaded Hummus Dip
There is something so instantly inviting about a bowl of loaded hummus dip sitting in the middle of the table. It is creamy, bright, colorful, and packed with those fresh Mediterranean-style flavors that make every scoop feel a little special. Between the silky chickpea base, the lemony lift, and the crisp topping of cucumbers, tomatoes, olives, and parsley, this is the kind of appetizer that disappears faster than you expect. Trust me, you’re going to love this.
The kind of dip that steals the spotlight
Some appetizers are just there to fill the table, but this one absolutely earns its place. Loaded hummus dip brings together smooth, garlicky hummus and a fresh, crunchy topping that turns a familiar classic into something that feels party-ready and a little extra in the best way.
It has that perfect mix of creamy and crisp, savory and bright. Every bite gives you soft hummus, juicy tomato, cool cucumber, briny olive, and a little pop of paprika and parsley. Let me tell you, it’s worth every bite.
A little backstory behind this crowd favorite
Hummus has deep roots in Middle Eastern cuisine, where chickpeas, tahini, lemon, and garlic come together in one of the most beloved dips around. Over time, it has found its way onto snack boards, mezze platters, lunch tables, and party spreads all over the world.
This loaded version leans into that same classic base, then adds a fresh topping inspired by the bright ingredients people already love serving alongside hummus. It feels traditional at heart, but with a colorful twist that makes it especially fun for gatherings, potlucks, or easy weekend snacking.
Why this dip earns a permanent spot in your rotation
This one’s a total game-changer, especially when you want something easy that still feels fresh and homemade.
Versatile: You can serve it as an appetizer, a light lunch centerpiece, or part of a larger snack board. It works with pita, crackers, flatbread, or crisp vegetables.
Budget-Friendly: Most of the ingredients are pantry staples or easy-to-find fresh produce. You get big flavor without spending much at all.
Quick and Easy: The base comes together in minutes in a food processor, and the topping is just a little chopping and layering. It looks impressive, but the process is wonderfully simple.
Customizable: You can adjust the garlic, lemon, and toppings to suit your taste. A little more paprika, extra herbs, or a heavier olive topping all work beautifully.
Crowd-Pleasing: It is creamy, colorful, and easy to scoop, which means people naturally gather around it. It has broad appeal and always looks inviting.
Make-Ahead Friendly: The hummus can be made ahead and chilled until you are ready to serve. Toppings can be prepped separately and added right before serving.
Great for Leftovers: Extra dip keeps well in the fridge and makes a great spread for wraps, sandwiches, or grain bowls the next day.
Smart little tricks that make it even better
Once you see how easy this is, a few small details can make it taste even more incredible.
- Use very smooth chickpeas: If you want an extra silky texture, blend the hummus a little longer than you think you need.
- Add ice water slowly: A spoonful or two helps create that light, fluffy texture that makes homemade hummus feel really special.
- Taste before serving: Lemon, salt, and garlic can shift slightly after blending, so give it one final taste and adjust as needed.
- Pat the toppings dry: This keeps the surface fresh and colorful without watering down the dip.
- Serve it slightly chilled or at cool room temperature: That is where the flavor and texture really shine.
The simple tools that make the whole process easy
Before we dive into the ingredients, it helps to gather the few kitchen basics that make this dip feel effortless.
Food Processor: This is the key to getting the hummus smooth, creamy, and evenly blended.
Chef’s Knife: You will need it for chopping the cucumber, tomatoes, olives, and parsley neatly.
Cutting Board: A sturdy board keeps topping prep quick and organized.
Citrus Juicer: Fresh lemon juice makes a huge difference, and a juicer helps you get every drop.
Measuring Cups and Spoons: These keep the hummus balanced, especially with tahini, olive oil, lemon juice, and seasoning.
Serving Bowl or Shallow Plate: A wide bowl or plate gives you room to swirl the hummus and show off all those colorful toppings.
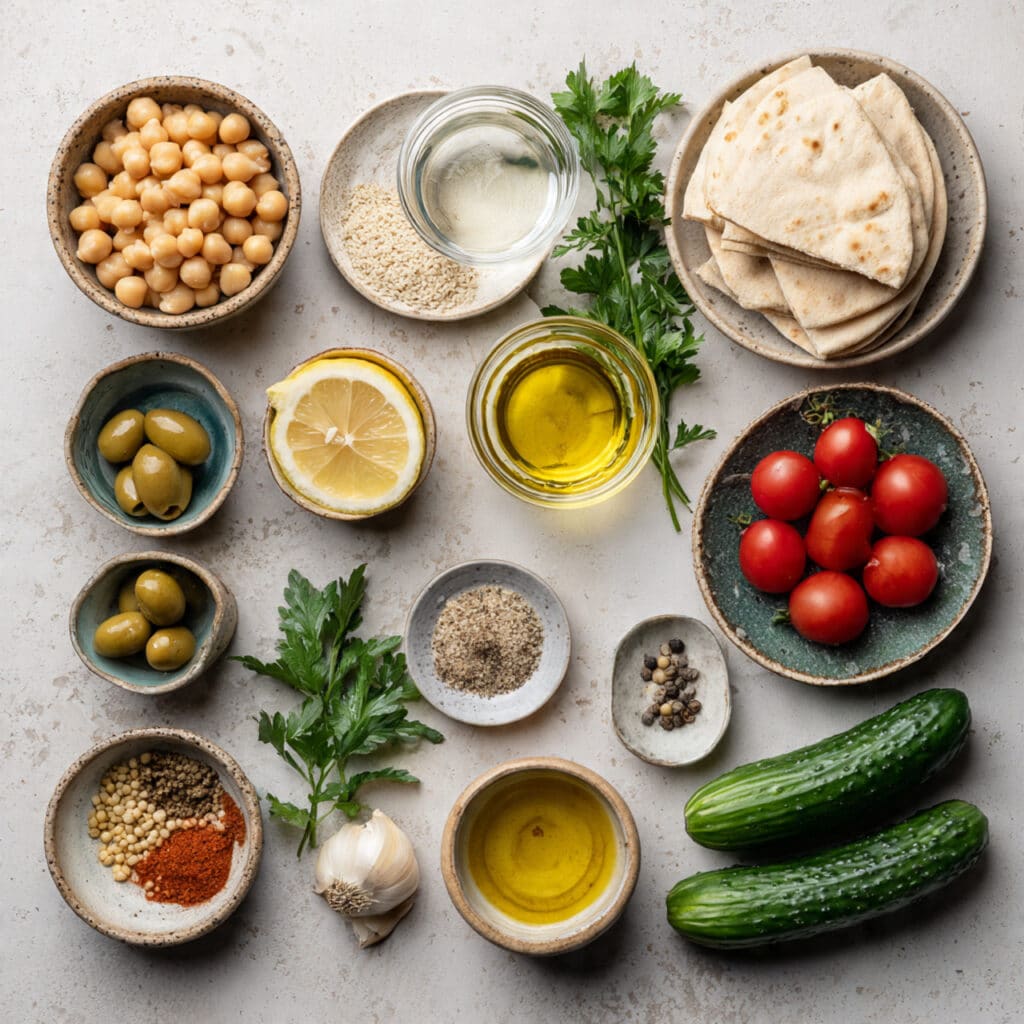
Ingredients that bring every layer to life
Now let’s get into the heart of it, because this dip is all about how beautifully a few simple ingredients come together. The hummus base is creamy and nutty, while the topping adds freshness, color, and little bursts of briny, juicy flavor that make each scoop more exciting than the last.
- Chickpeas: 2 cups canned chickpeas, drained and rinsed. These are the creamy, hearty foundation of the dip and give it that signature smooth body.
- Tahini: 1/3 cup. This adds rich sesame flavor and gives the hummus its classic nutty depth.
- Fresh Lemon Juice: 1/4 cup. It brightens everything and keeps the dip tasting fresh instead of heavy.
- Garlic: 2 cloves. Garlic adds punch and savory warmth that cuts through the creaminess beautifully.
- Extra Virgin Olive Oil: 3 tablespoons, divided. Two tablespoons go into the hummus for richness, and one tablespoon is drizzled on top for a glossy finish.
- Ground Cumin: 1/2 teaspoon. This gives the dip a gentle earthy note that rounds everything out.
- Salt: 3/4 teaspoon, plus more to taste. Salt sharpens the flavors and helps the lemon and tahini pop.
- Ice Water: 2 to 4 tablespoons. This loosens the mixture and helps create a smoother, lighter texture.
- Cucumber: 1/2 cup, finely diced. It adds cool crunch and a refreshing bite.
- Cherry Tomatoes: 1/2 cup, halved or finely chopped. These bring juicy sweetness and color.
- Kalamata Olives: 1/3 cup, sliced. Their briny flavor makes the whole bowl taste more vibrant.
- Fresh Parsley: 2 tablespoons, chopped. Parsley gives the topping freshness and a bright green finish.
- Paprika: 1/4 teaspoon. A little dusting adds warmth and that beautiful final touch.
- Pita Bread or Fresh Vegetables: For serving. These turn the dip into an easy, scoopable appetizer everyone can dig into.
Easy swaps when you want to change things up
One of the nicest things about this dish is how flexible it is. You can tweak it with what you have and still end up with something delicious.
Chickpeas: White beans for a slightly softer, milder base.
Tahini: Sunflower seed butter, if you need a sesame-free option and do not mind a different flavor.
Fresh Lemon Juice: Lime juice, for a brighter, slightly sharper finish.
Kalamata Olives: Black olives, for a milder salty bite.
Parsley: Fresh cilantro or dill, if you want a different herbal note.
Pita Bread: Crackers, cucumber rounds, carrot sticks, or bell pepper strips.
The ingredients that quietly do the heavy lifting
Some ingredients show up and instantly make the whole bowl better, and here there are two that really deserve the spotlight.
Tahini: This is what gives the hummus its nutty richness and unmistakable depth. Without it, the dip would still be creamy, but it would miss that rounded, savory character that makes hummus taste like hummus.
Fresh Lemon Juice: Lemon is what keeps the dip lively. It cuts through the richness, lifts the garlic, and makes every bite feel fresher and brighter.
Let’s bring it all together
And now we get to the fun part, where a few simple ingredients turn into something scoopable, creamy, and absolutely irresistible. Here are the steps you’re going to follow, and each one builds on the last so the whole thing comes together smoothly.
- Preheat Your Equipment: There is no actual cooking required for this dip, but now is the perfect time to set up your food processor, measure your ingredients, and prepare your serving bowl so everything flows easily.
- Combine Ingredients: Add the chickpeas, tahini, lemon juice, garlic, 2 tablespoons olive oil, cumin, and salt to the food processor. Blend until mostly smooth, then add 2 tablespoons ice water and continue blending until creamy. Add a little more ice water if needed to loosen the texture.
- Prepare Your Cooking Vessel: Spoon the hummus into a shallow serving bowl or plate. Use the back of a spoon to create soft swirls and little dips across the surface so the topping and olive oil settle in beautifully.
- Assemble the Dish: Scatter the diced cucumber, cherry tomatoes, sliced olives, and chopped parsley evenly over the hummus. You want every scoop to have a little bit of everything.
- Cook to Perfection: Since this is a no-cook appetizer, this step is all about letting the flavors settle. Chill the assembled dip for 10 to 15 minutes if you have time, which helps the topping feel crisp and the hummus stay cool and creamy.
- Finishing Touches: Drizzle the remaining 1 tablespoon olive oil over the top, then finish with a dusting of paprika and a tiny pinch of salt if needed.
- Serve and Enjoy: Serve with warm pita wedges, crackers, or crisp vegetables and let everyone scoop straight in while it is fresh and vibrant.
The magic of creamy, crunchy, bright, and briny in one bite
What makes this dip so satisfying is the contrast. The hummus itself is smooth, rich, and almost fluffy when blended well, while the topping brings snap, juiciness, and little bursts of saltiness. That creamy base catches the olive oil in its swirls, the paprika adds a subtle warm note, and the lemon keeps the whole thing tasting clean and lively.
As it sits for a few minutes, the flavors mingle just enough to feel connected without losing the fresh texture of the topping. It is balanced, layered, and seriously hard to stop eating.
Helpful little tips for the best bowl every time
A few simple habits can make the final result even better, especially if you want that polished, homemade look and flavor.
- Blend longer than expected: Extra blending makes the hummus smoother and more luscious.
- Use fresh lemon juice: Bottled juice can taste flat, while fresh juice keeps the dip bright.
- Chop toppings small: Smaller pieces make each scoop more balanced and easier to eat.
- Serve with contrast: Soft pita and crisp vegetables together make the whole platter more fun.
Common pitfalls and how to avoid them
Even an easy dip has a few tiny things that can throw it off, but they are all easy to fix.
- Do not skip rinsing the chickpeas: Rinsing removes excess canning liquid and helps the flavor stay clean.
- Do not add too much water at once: The hummus can turn thin quickly, so add ice water little by little.
- Do not overload wet toppings: Too much tomato juice or watery cucumber can make the surface messy, so pat them dry first.
- Do not under-season: Tahini and chickpeas need enough lemon and salt to really come alive.
A quick look at the nutrition
This dip feels indulgent because it is creamy and rich, but it is also built from wholesome, satisfying ingredients that make it a great sharable snack.
Servings: 8
Calories per serving: 195
Note: These are approximate values.
Timing that works beautifully for busy days
One more reason to love this one is how quickly it comes together. It looks thoughtful and generous on the table, but it barely asks for any time at all.
Prep Time: 20 minutes
Cook Time: 0 minutes
Total Time: 20 minutes
Make-ahead, storage, and next-day goodness
If you are planning for a gathering, this dip is a dream. The hummus base can be made up to 2 days ahead and stored in an airtight container in the refrigerator. The topping ingredients can also be chopped ahead, though it is best to keep them separate until closer to serving time so everything stays crisp.
Leftovers keep well in the fridge for up to 3 days. Store the dip covered, and if it looks a little firm after chilling, let it sit at room temperature for 10 to 15 minutes and give it a gentle stir. Freezing is possible for the hummus base, though the fresh topping is best added after thawing. For reheating, there is really none needed here, just bring it back to a cool room temperature and serve.
The best ways to serve this fresh favorite
This dip is wonderful as part of a mezze-style spread with pita, cucumber sticks, carrot batons, and crackers. It also fits beautifully beside falafel, grilled vegetables, stuffed grape leaves, or a bright chopped salad.
For a more filling setup, spread it onto a platter, add extra vegetables and warm flatbread, and let it become the centerpiece of a light lunch board. You can even tuck leftovers into wraps or grain bowls for an easy next-day meal.
Clever ways to turn leftovers into something new
If you happen to have some left, and that is a big if, you can stretch it into a few really tasty second acts.
Spread it inside wraps with greens and sliced vegetables for a fast lunch. Spoon it onto toast and top with extra cucumber and tomato for a savory snack. Thin it with a little lemon juice and olive oil, then use it as a creamy dressing for grain bowls or chopped salads. You can even use it as a sandwich spread in place of mayonnaise for extra flavor.
A few extra notes that make all the difference
Sometimes it is the little finishing details that turn a good dip into one you keep thinking about later.
Use a shallow bowl so the toppings do not all slide into the center. Taste the chopped topping before adding it so you can catch if the olives are especially salty. Warm the pita slightly before serving because it makes the whole experience feel more generous and fresh. And do not be shy with the olive oil drizzle, it gives the final dish shine and that lovely rich finish.
How to make it look as good as it tastes
Presentation matters with a dip like this because the colors do so much of the work for you. Spread the hummus with broad swirls so the surface looks inviting and textured. Sprinkle the cucumber, tomatoes, olives, and parsley in a loose, even way rather than piling everything in one spot.
A final dusting of paprika adds warmth and contrast, while the olive oil catches the light beautifully. Serve it in a white or earthy ceramic bowl if you can, because the creamy beige hummus and bright toppings look stunning against a simple background.
Variations worth trying next time
Once you have the base down, there are so many fun directions you can go.
Roasted Red Pepper Version: Blend roasted red peppers into the hummus for a sweeter, smoky note and even more color.
Spicy Chili Version: Add a pinch of crushed red pepper or a spoonful of chili paste for heat.
Herb-Loaded Version: Mix fresh dill and mint into the topping for an extra fresh, garden-like finish.
Extra Garlic Version: Roast the garlic before blending if you want a softer, sweeter garlic flavor throughout.
Crunchy Chickpea Version: Top the bowl with roasted chickpeas for a little extra texture on top of the creamy base.
FAQ’s
Q1: Can I use store-bought hummus instead of homemade?
Yes, absolutely. If you are short on time, use a good-quality plain hummus and add the toppings just before serving.
Q2: How do I make the texture extra smooth?
Blend the hummus longer and add ice water gradually. That usually creates a lighter, creamier finish.
Q3: Can I make this ahead for a party?
Yes. Prepare the hummus base in advance and store the topping separately, then assemble shortly before serving.
Q4: What can I serve with it besides pita?
Crackers, cucumber slices, carrot sticks, bell pepper strips, and toasted flatbread all work really well.
Q5: Is this dip vegan?
Yes, this version is completely vegan as written.
Q6: Can I use dried chickpeas instead of canned?
Yes, as long as they are fully cooked until very tender before blending.
Q7: What if my hummus tastes too thick?
Add a little more ice water or lemon juice, one spoonful at a time, until it loosens up.
Q8: How long does it last in the fridge?
It is best within 3 days when stored covered in the refrigerator.
Q9: Can I leave out the olives?
Of course. You can skip them or replace them with another topping you enjoy, like extra cucumber or herbs.
Q10: Does it need to be served cold?
Cool or lightly chilled is best. Very cold hummus can dull the flavor a little, so letting it sit out briefly before serving can help.
Conclusion
Loaded hummus dip is one of those simple dishes that feels a little special every single time. It is creamy, colorful, fresh, and packed with flavor, and it comes together with very little effort. Whether you are building a snack board, setting out appetizers for friends, or just treating yourself to something delicious in the fridge, this one delivers. Trust me, once you make it this way, you will want to come back to it again and again.
Print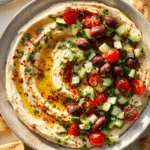
Loaded Hummus Dip
- Prep Time: 20 minutes
- Cook Time: 0 minutes
- Total Time: 20 minutes
- Yield: 8 servings 1x
- Category: Appetizer
- Method: No-Cook
- Cuisine: Middle Eastern Inspired
- Diet: Vegan
Description
A creamy, lemony hummus dip topped with cucumber, cherry tomatoes, kalamata olives, parsley, paprika, and olive oil for a fresh, colorful appetizer.
Ingredients
- 2 cups canned chickpeas, drained and rinsed
- 1/3 cup tahini
- 1/4 cup fresh lemon juice
- 2 cloves garlic
- 3 tablespoons extra virgin olive oil, divided
- 1/2 teaspoon ground cumin
- 3/4 teaspoon salt, plus more to taste
- 2 to 4 tablespoons ice water
- 1/2 cup cucumber, finely diced
- 1/2 cup cherry tomatoes, halved or finely chopped
- 1/3 cup kalamata olives, sliced
- 2 tablespoons fresh parsley, chopped
- 1/4 teaspoon paprika
- Pita bread or fresh vegetables, for serving
Instructions
- Set up a food processor and gather all ingredients.
- Add the chickpeas, tahini, lemon juice, garlic, 2 tablespoons olive oil, cumin, and salt to the food processor. Blend until mostly smooth.
- Add 2 tablespoons ice water and continue blending until creamy. Add more ice water, 1 tablespoon at a time, if needed for a smoother texture.
- Spoon the hummus into a shallow serving bowl or plate and use the back of a spoon to create swirls.
- Top evenly with the diced cucumber, cherry tomatoes, sliced olives, and chopped parsley.
- Drizzle with the remaining 1 tablespoon olive oil and sprinkle with paprika.
- Chill for 10 to 15 minutes if desired, then serve with pita bread or fresh vegetables.
Notes
- For extra smooth hummus, blend a little longer than usual.
- Pat the cucumber and tomatoes dry before topping so the dip stays fresh and thick.
- The hummus base can be made up to 2 days ahead and topped just before serving.
- Store leftovers in an airtight container in the refrigerator for up to 3 days.
Nutrition
- Serving Size: 1/8 of recipe
- Calories: 195
- Sugar: 2g
- Sodium: 320mg
- Fat: 11g
- Saturated Fat: 1.5g
- Unsaturated Fat: 8.5g
- Trans Fat: 0g
- Carbohydrates: 19g
- Fiber: 5g
- Protein: 6g
- Cholesterol: 0mg
Keywords: loaded hummus dip, hummus appetizer, vegan dip, chickpea dip, Mediterranean dip, easy party dip