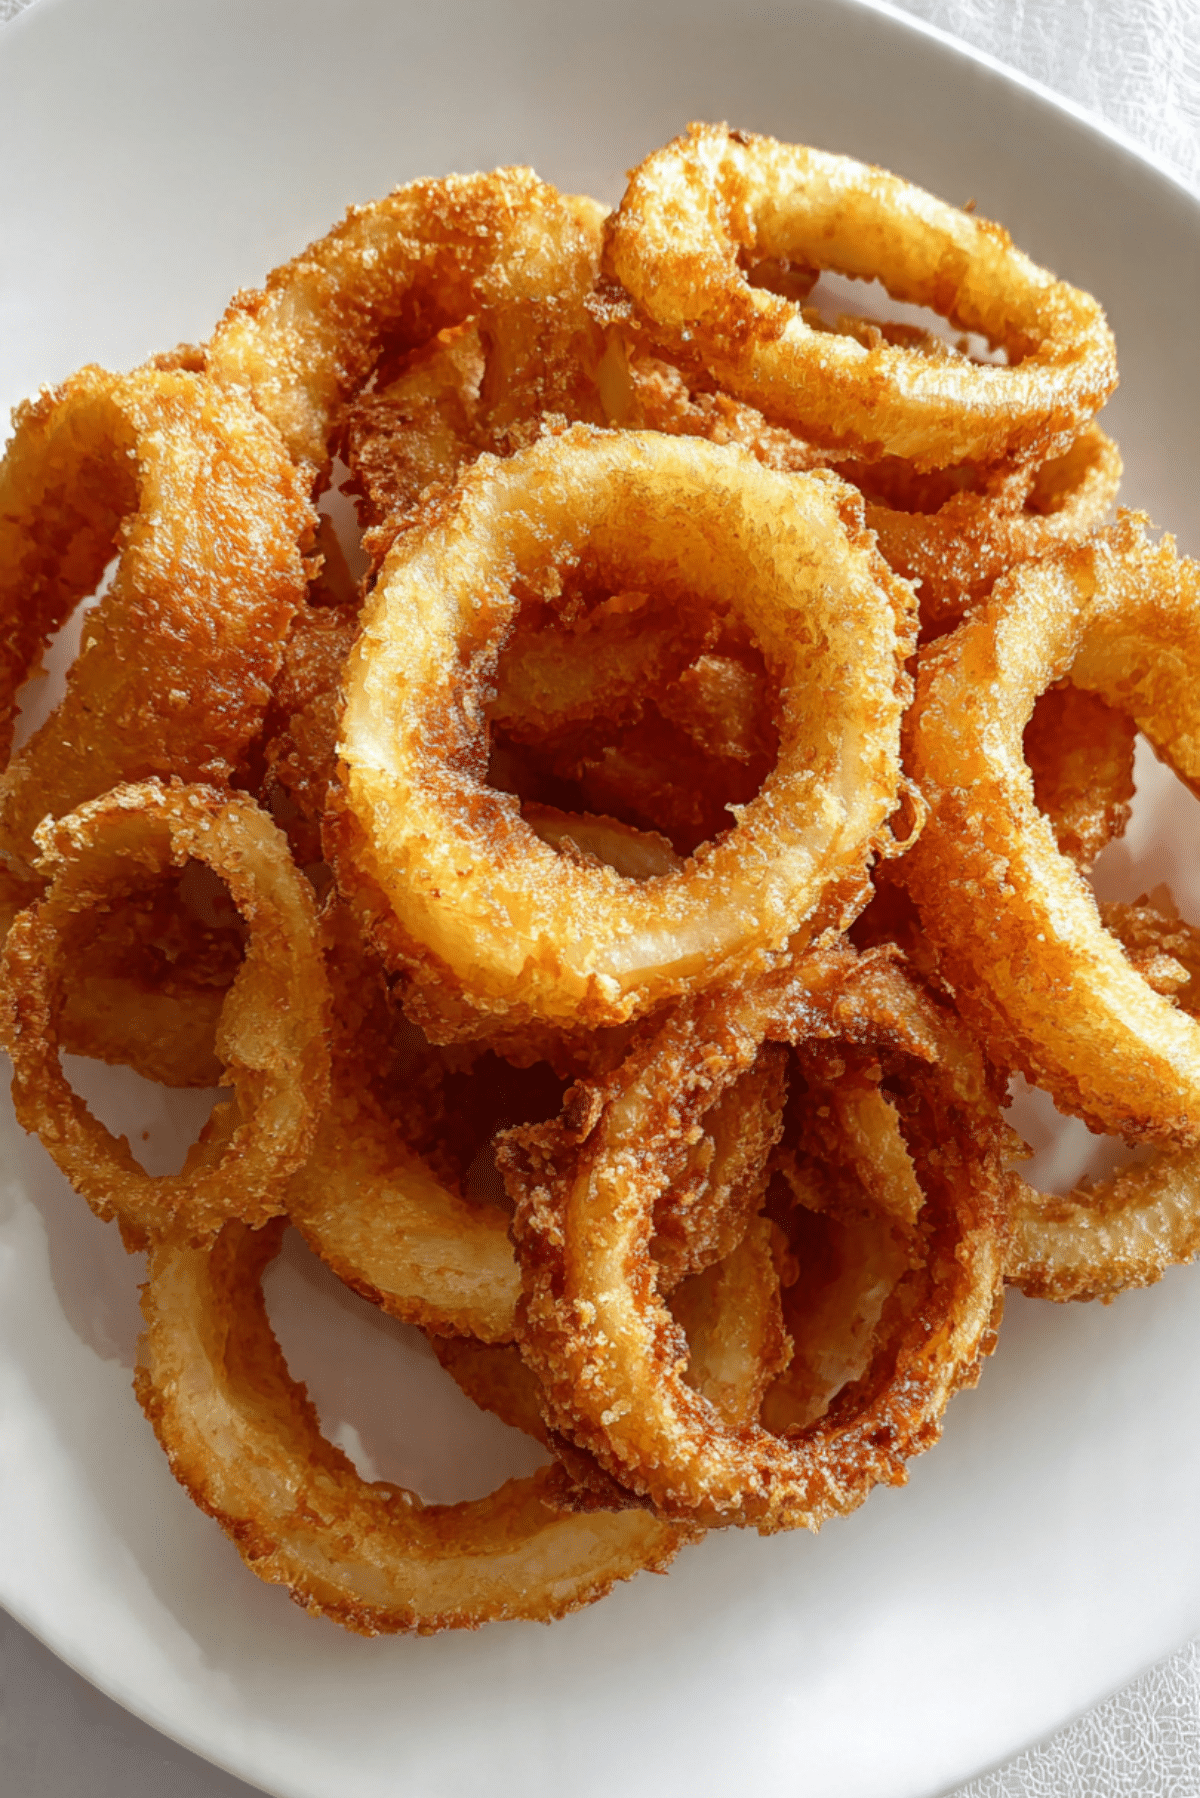
Crispy Homemade Onion Rings
Crispy homemade onion rings are one of those irresistible indulgences that bring everyone to the table. The golden, crackly coating gives way to tender, sweet onion with every bite, and the satisfying crunch is nothing short of addictive. Whether you’re serving them as a side for burgers, a party snack, or just because you’re craving something comforting and crunchy, these onion rings never fail to impress. Trust me, once you try making them at home, you’ll never want the frozen version again.
Behind the Recipe
There’s something nostalgic about the scent of onions frying in hot oil, bubbling away until perfectly golden. It instantly brings back memories of summer carnivals, diner visits, and late-night cravings. I still remember my first time biting into a homemade onion ring at a friend’s backyard cookout. The crispness was unmatched, the flavor bold yet familiar. That moment stuck with me, and it sparked a journey to recreate that magic in my own kitchen. Now, these rings have become a family favorite, always disappearing faster than I can fry them.
Recipe Origin or Trivia
Onion rings are believed to have originated in the early 1900s in the United States, with recipes appearing in old cookbooks and even advertisements. While no one can say exactly who made the first batch, their popularity quickly grew. Today, onion rings are a staple in American diners, fast food joints, and homemade comfort food menus. Some variations even dip them in beer batter for extra richness, while others use cornmeal or panko for extra crunch.
Why You’ll Love Crispy Homemade Onion Rings
Homemade onion rings aren’t just fun to make, they’re absolutely mouthwatering to eat. Here’s why they’ll win your heart:
Versatile: Perfect as a snack, appetizer, or side dish, they pair beautifully with burgers, sandwiches, or even as a standalone treat.
Budget-Friendly: Made with pantry staples and onions, this recipe delivers big flavor without a hefty price tag.
Quick and Easy: With just a bit of slicing, dipping, and frying, you can have a basket of fresh onion rings ready in under 30 minutes.
Customizable: Spice up the batter, use different onions, or tweak the coating to suit your preferences.
Crowd-Pleasing: Everyone loves that first crunchy bite. These disappear fast at gatherings.
Make-Ahead Friendly: Prepare the onion slices and batter ahead of time, and fry just before serving.
Great for Leftovers: Reheat in the oven or air fryer and they’re crispy all over again.
Chef’s Pro Tips for Perfect Results
To help you fry up the most irresistible onion rings every single time, here are a few tried-and-true tips:
- Chill your onion slices: A short trip to the fridge helps them firm up and makes coating easier.
- Double-dip for crunch: A wet batter followed by a breadcrumb coating gives unbeatable texture.
- Use neutral oil: Vegetable oil is ideal for a clean, crisp taste.
- Don’t overcrowd the pan: Fry in small batches to keep the oil temperature steady.
- Drain on a rack, not paper towels: This keeps them crispy and prevents sogginess.
Kitchen Tools You’ll Need
Before we start frying, here’s what you’ll want to have on hand:
Sharp Knife: For slicing onions into even, thick rings.
Mixing Bowls: You’ll need a few for the batter, dredging, and breadcrumb station.
Whisk: To get that batter smooth and lump-free.
Slotted Spoon or Tongs: For safe flipping and removal from hot oil.
Large Frying Pan or Deep Pot: For even cooking and golden results.
Cooling Rack: Keeps onion rings crisp while draining excess oil.
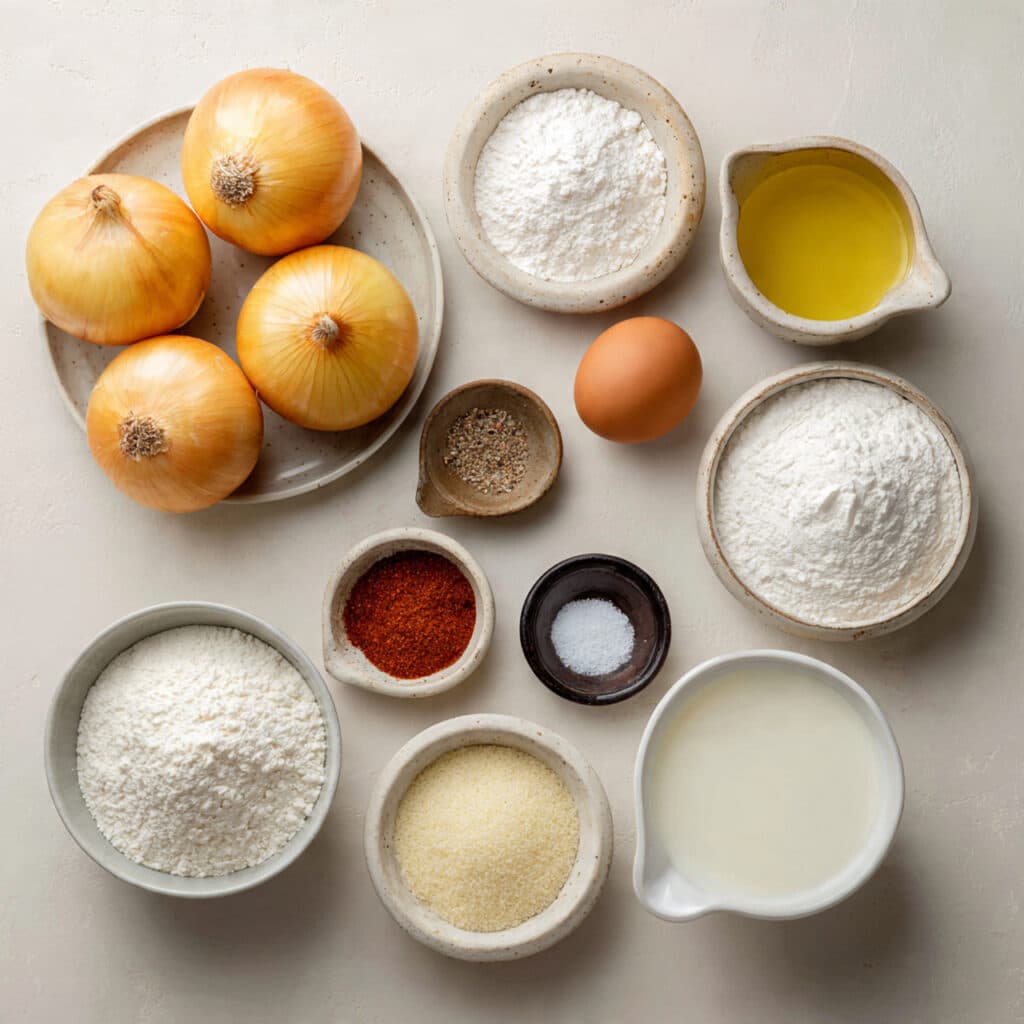
Ingredients in Crispy Homemade Onion Rings
Every ingredient here plays its part in building that crunchy, golden perfection. Let’s break it down:
- Large Yellow Onions: 2-3 medium onions, sliced into thick rings – These are naturally sweet and ideal for frying.
- All-Purpose Flour: 1 cup – Helps the batter cling and adds body to the coating.
- Cornstarch: 1/2 cup – Adds lightness and crisp texture to the batter.
- Baking Powder: 1 teaspoon – Gives a slight lift for airy crunch.
- Salt: 1 teaspoon – Enhances flavor in every bite.
- Black Pepper: 1/2 teaspoon – Adds subtle warmth and spice.
- Paprika: 1/2 teaspoon – Gives color and a gentle smoky note.
- Garlic Powder: 1/4 teaspoon – Brings a savory undertone.
- Egg: 1 large – Helps bind the batter for a smooth dip.
- Whole Milk: 3/4 cup – Keeps the batter smooth and dippable.
- Breadcrumbs: 2 cups – The final crunchy layer for a shatteringly crisp texture.
- Vegetable Oil: for frying – Neutral and perfect for achieving a golden finish.
Ingredient Substitutions
We all run out of ingredients sometimes. Here’s how you can pivot:
Yellow Onions: Sweet onions or white onions.
Whole Milk: Buttermilk or plant-based milk for a dairy-free option.
Breadcrumbs: Panko for extra crunch or crushed cornflakes for a fun twist.
Egg: Plain yogurt or flaxseed mixture if avoiding eggs.
Ingredient Spotlight
Yellow Onions: These have a natural sweetness that deepens when fried, making them the perfect choice for onion rings.
Cornstarch: This ingredient is key for that ultra-light, crispy texture. It keeps the coating from becoming too heavy or doughy.
Instructions for Making Crispy Homemade Onion Rings
Making onion rings from scratch is simpler than you think. Just follow these steps and you’ll be in crispy heaven in no time.
-
Preheat Your Equipment:
Heat vegetable oil in a large pan or deep fryer to 350°F. Set a wire rack over a baking sheet for draining. -
Combine Ingredients:
In one bowl, whisk together flour, cornstarch, baking powder, salt, pepper, paprika, and garlic powder. In a second bowl, beat the egg and whisk in milk until smooth. -
Prepare Your Cooking Vessel:
Set up a dredging station with three bowls: seasoned flour mixture, wet batter, and breadcrumbs. -
Assemble the Dish:
Dip each onion ring into the flour, then into the egg-milk batter, then press into breadcrumbs to coat thoroughly. -
Cook to Perfection:
Fry 3-4 rings at a time for about 2-3 minutes per side until golden brown. Remove with a slotted spoon and place on the wire rack. -
Finishing Touches:
Sprinkle a little salt on the hot rings right after frying to boost flavor. -
Serve and Enjoy:
Serve hot with your favorite dips like ranch, spicy ketchup, or chipotle mayo.
Texture & Flavor Secrets
The magic of onion rings is all in the contrast. The exterior should be audibly crisp and golden, while the inside reveals a tender, almost melt-in-your-mouth onion. The seasoning in the batter adds layers of savory flavor, while the breadcrumbs give that addictive crunch.
Cooking Tips & Tricks
Here’s how to elevate your onion ring game:
- Use panko if you like a super-crunchy finish
- Add a pinch of cayenne to the batter for a spicy kick
- For extra crispness, chill the breaded rings for 10 minutes before frying
- Always use a thermometer to monitor oil temperature
What to Avoid
Avoid these common mistakes to keep your rings perfect:
- Overcrowding the pan, which leads to soggy rings
- Skipping the breadcrumb step, which adds that essential crunch
- Not draining on a rack, which traps steam and softens the crust
- Using too thin batter, which doesn’t cling well to the onion
Nutrition Facts
Servings: 4
Calories per serving: 280
Note: These are approximate values.
Preparation Time
Prep Time: 20 minutes
Cook Time: 15 minutes
Total Time: 35 minutes
Make-Ahead and Storage Tips
These onion rings are best enjoyed fresh, but you can prep in advance by slicing the onions and prepping the batter a few hours ahead. Store leftovers in an airtight container in the fridge for up to 2 days. Reheat in the oven or air fryer at 375°F until crisp again. Freezing is not recommended as it alters texture.
How to Serve Crispy Homemade Onion Rings
Serve them as a side to burgers, with dipping sauces for game night, or stacked high on a platter for a party. Pair with cold sodas, lemonade, or iced tea for the ultimate combo.
Creative Leftover Transformations
Leftover onion rings? Try these fun ideas:
- Chop and toss into a salad for a crunchy topping
- Layer inside a grilled cheese sandwich
- Use as a burger topping
- Crumble and mix into mac and cheese
Additional Tips
- For consistent cooking, use similarly sized onion rings
- Let your oil come back to temp between batches
- Add herbs to the breadcrumb mix for extra aroma
Make It a Showstopper
Pile your onion rings high on a rustic serving tray lined with parchment. Add a few dipping sauces in mini bowls. A sprinkle of fresh parsley or paprika on top adds a pop of color and flair.
Variations to Try
- Spicy Kick: Add cayenne or chili powder to the batter
- Cheesy Coating: Mix grated parmesan with breadcrumbs
- Gluten-Free: Use gluten-free flour and crumbs
- Herb-Infused: Add Italian herbs or dill to the batter
- Vegan Version: Use plant milk and flax egg
FAQ’s
Q1: Can I bake these instead of frying?
A1: Yes, but the texture will be slightly different. Bake at 425°F for about 20 minutes, flipping halfway.
Q2: What type of onion is best?
A2: Yellow onions offer a balance of sweet and savory, but sweet onions work beautifully too.
Q3: How do I get the batter to stick?
A3: Make sure to dredge in dry flour before dipping into the wet batter.
Q4: Can I freeze onion rings?
A4: Freezing raw battered rings is fine, but cooked ones may lose their crunch when reheated.
Q5: What oil is best for frying?
A5: Use neutral oils like vegetable or canola oil with high smoke points.
Q6: How do I keep them warm for a party?
A6: Keep them on a wire rack in a 200°F oven until ready to serve.
Q7: Can I use an air fryer?
A7: Yes. Spray with oil and air fry at 375°F for 10 to 12 minutes, flipping halfway.
Q8: How thick should I slice the onions?
A8: About 1/2 inch thick gives the best bite and structure.
Q9: Can I make these dairy-free?
A9: Absolutely, use plant milk and skip the egg with a vegan binder.
Q10: How do I get them extra crispy?
A10: Double-coat with batter and breadcrumbs, and chill before frying.
Conclusion
There you have it, the ultimate crispy homemade onion rings that are crunchy, golden, and packed with flavor. They’re easier than you think to whip up and way better than anything from the freezer aisle. Whether it’s game day, burger night, or just a craving for something fried and fabulous, these onion rings are a total game-changer. So grab those onions, heat that oil, and get ready for the crunch.
Print
Crispy Homemade Onion Rings
- Prep Time: 20 minutes
- Cook Time: 15 minutes
- Total Time: 35 minutes
- Yield: 4 servings 1x
- Category: Side Dish
- Method: Frying
- Cuisine: American
- Diet: Vegetarian
Description
Crispy Homemade Onion Rings are the ultimate crunchy snack or side dish. With a golden, seasoned coating and tender sweet onions inside, they’re impossible to resist and surprisingly easy to make at home.
Ingredients
- 2–3 large yellow onions, sliced into thick rings
- 1 cup all-purpose flour
- 1/2 cup cornstarch
- 1 teaspoon baking powder
- 1 teaspoon salt
- 1/2 teaspoon black pepper
- 1/2 teaspoon paprika
- 1/4 teaspoon garlic powder
- 1 large egg
- 3/4 cup whole milk
- 2 cups breadcrumbs
- Vegetable oil, for frying
Instructions
- Heat vegetable oil in a deep fryer or large skillet to 350°F. Place a wire rack over a baking sheet for draining.
- In one bowl, whisk together flour, cornstarch, baking powder, salt, pepper, paprika, and garlic powder.
- In a separate bowl, beat the egg and whisk in milk until combined.
- Set up three bowls for dredging: seasoned flour, wet batter, and breadcrumbs.
- Dip each onion ring into the flour mixture, then into the batter, then press into breadcrumbs to coat evenly.
- Fry onion rings in small batches for 2–3 minutes per side until golden and crispy.
- Remove with a slotted spoon and place on the wire rack. Sprinkle lightly with salt while hot.
- Serve warm with your favorite dipping sauces.
Notes
- Use panko breadcrumbs for extra crunch.
- Let breaded rings rest for 10 minutes before frying for better coating adhesion.
- Drain on a rack, not paper towels, to maintain crispiness.
Nutrition
- Serving Size: 1 portion
- Calories: 280
- Sugar: 3g
- Sodium: 420mg
- Fat: 14g
- Saturated Fat: 2g
- Unsaturated Fat: 11g
- Trans Fat: 0g
- Carbohydrates: 34g
- Fiber: 2g
- Protein: 5g
- Cholesterol: 35mg
Keywords: onion rings, crispy onion rings, homemade onion rings, fried onion rings, appetizer, snack