Coney Island Chili Dogs
There is something about a loaded chili dog that feels instantly fun. It is messy in the best way, packed with savory flavor, and made for those nights when you want dinner to feel a little more exciting without making life harder. The first bite brings soft warm bread, a snappy hot dog, rich meaty chili, sweet crunch from onions, and that sharp pop of mustard that pulls everything together. Trust me, you’re going to love this.
Why These Chili Dogs Always Hit the Spot
Some recipes are comforting, and some are exciting, but this one somehow manages to be both. It has that old-school diner energy, the kind of meal that feels casual and nostalgic, yet every bite is layered and satisfying. The chili is thick and deeply seasoned, the buns hold everything together just enough, and the toppings make the whole thing feel bright and balanced. This one’s a total game-changer when you want a crowd-friendly dinner that does not feel boring.
A Little Diner History in Every Bite
Before we get too comfortable at the table, it helps to know why this dish has such a loyal following. Coney Island chili dogs are a classic American favorite with roots tied to Greek and Macedonian immigrant communities who helped popularize this style of hot dog in diners and lunch counters across the Midwest and beyond. Despite the name, the dish is not actually from New York’s Coney Island in the way many people assume. Instead, it became famous through regional hot dog shops that served dogs topped with a loose, flavorful meat sauce, onions, and mustard.
That little bit of history makes each bite feel even more charming. It is simple food, but it carries a story, and now let’s dive into why this version works so well in a home kitchen.
Why This Version Earns a Permanent Spot at the Table
This recipe keeps the spirit of the classic while making it easy to pull off at home, even on a busy day.
Versatile: You can serve these for game day, family dinner, casual parties, or even a fun weekend lunch. They fit just about any laid-back occasion.
Budget-Friendly: The ingredient list is simple and familiar, which means you can make a satisfying meal without spending much. A little ground beef and pantry seasoning go a long way here.
Quick and Easy: The chili sauce comes together in one skillet, and the rest is all about assembly. Once the sauce is ready, everything moves fast.
Customizable: Some people love extra onions, some want more mustard, and some want the chili piled high. It is easy to build each one the way people like it.
Crowd-Pleasing: There is something universally lovable about a warm hot dog covered in hearty chili. Let me tell you, it’s worth every bite.
Make-Ahead Friendly: The chili can be made earlier in the day and rewarmed when you are ready to eat. That makes serving stress-free.
Great for Leftovers: Extra chili is never a problem. Spoon it over fries, baked potatoes, or even toast the next day.
Smart Cooking Secrets for Better Flavor
Once you see how simple the method is, a few small tricks make all the difference.
- Brown the beef well: Let the ground beef develop a little color before breaking it up completely. That deeper browning creates a richer sauce.
- Keep the chili thick: The sauce should be spoonable, not soupy. A thicker texture helps it stay on the hot dogs instead of sliding off.
- Toast the buns lightly: A quick toast gives the bread a little structure, which helps it hold the chili better.
- Dice the onions very finely: Small pieces give you crunch and sharpness without overpowering each bite.
- Simmer gently: Low and steady heat gives the spices time to blend and keeps the sauce from tasting rushed.
The Kitchen Tools That Make It Easy
You do not need anything fancy here, which is one more reason this meal is so lovable.
Large skillet: This is where the chili sauce comes together and develops its rich flavor.
Wooden spoon or spatula: Useful for breaking up the beef and stirring the sauce as it simmers.
Small saucepan or grill pan: Handy for warming the hot dogs if you do not want to use the skillet after the chili is done.
Knife: You will need this for finely dicing the onion and getting neat toppings.
Cutting board: Keeps prep organized and makes the topping step feel quick and easy.
Tongs: Helpful for turning the hot dogs and placing them into the buns neatly.
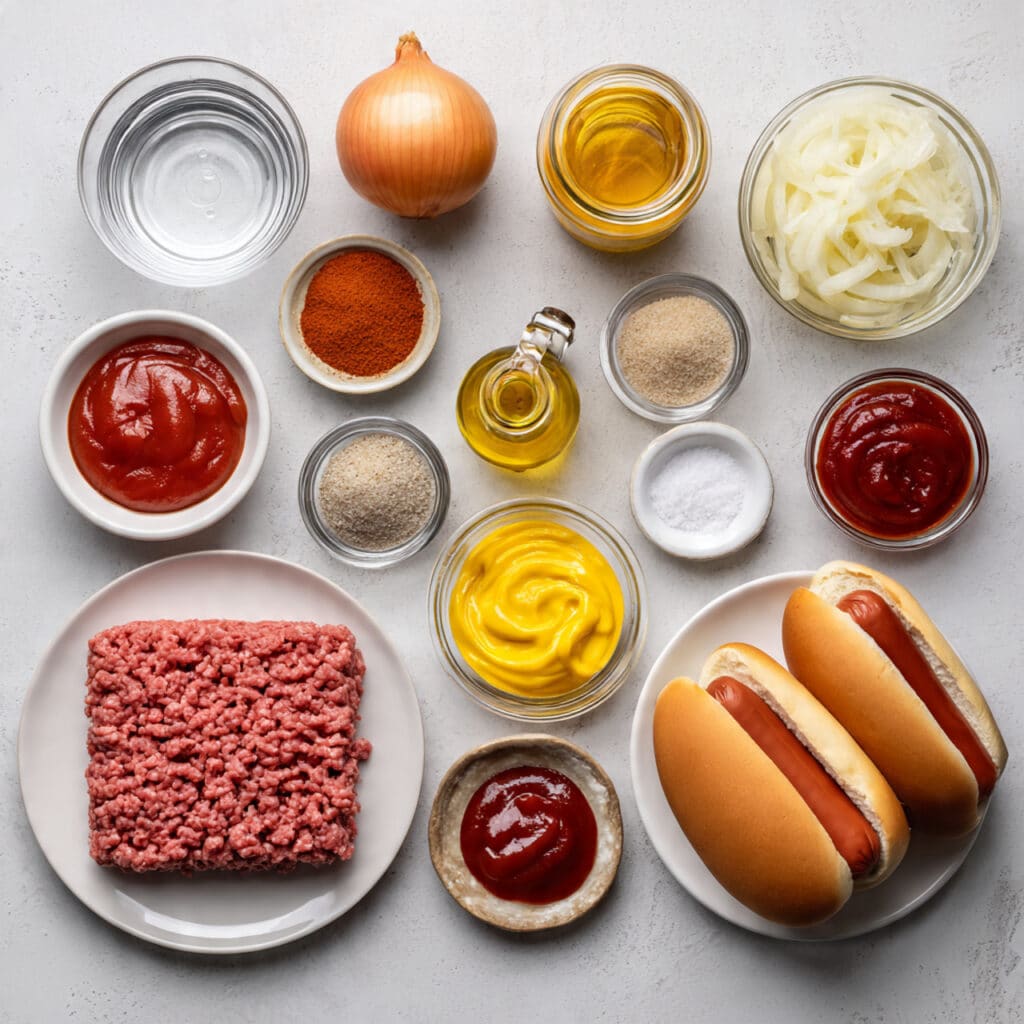
Everything You Need to Build Big Flavor
The beauty of this recipe is how everyday ingredients turn into something bold, savory, and incredibly satisfying.
- Ground beef: 1 pound lean ground beef, this creates the rich and hearty chili topping that makes the whole dish feel substantial.
- Yellow onion: 1 medium yellow onion, finely diced and divided, half cooks into the chili for sweetness and half stays fresh on top for crunch.
- Tomato sauce: 1 cup, this forms the smooth base of the chili and helps carry all the seasonings.
- Water: 1/2 cup, this loosens the sauce just enough while it simmers and thickens.
- Tomato paste: 2 tablespoons, this adds concentrated tomato depth and helps the chili stay thick.
- Chili powder: 2 tablespoons, this brings the classic warm and savory flavor that defines the sauce.
- Paprika: 1 teaspoon, this adds gentle sweetness and a little extra color.
- Garlic powder: 1 teaspoon, this gives the chili a rounded savory backbone.
- Onion powder: 1 teaspoon, this reinforces that mellow onion flavor throughout the sauce.
- Ground cumin: 1/2 teaspoon, this adds earthy warmth and makes the chili taste fuller.
- Salt: 1 teaspoon, this wakes up all the flavors in the sauce.
- Black pepper: 1/2 teaspoon, this gives the chili a subtle bite.
- Granulated sugar: 1 teaspoon, this softens the acidity of the tomato and balances the spices.
- Worcestershire sauce: 1 tablespoon, this adds a deeper savory note that makes the chili taste more complex.
- Beef hot dogs: 8 hot dogs, these are the classic base and give that signature snap.
- Hot dog buns: 8 buns, soft buns cradle all the toppings and make every bite easy to hold.
- Yellow mustard: 1/4 cup, this sharp tang cuts through the richness beautifully.
Easy Swaps That Still Taste Great
Maybe you are missing an ingredient, or maybe you want to tweak things a little. No problem.
Ground beef: Ground turkey, for a lighter version with a similar texture.
Tomato sauce: Crushed tomatoes, if blended briefly for a smoother finish.
Tomato paste: Ketchup, in a pinch, though the sauce will be a little sweeter.
Yellow onion: White onion, for a slightly sharper topping.
Yellow mustard: Dijon mustard, for a punchier finish.
Beef hot dogs: All-beef frankfurters, if that is what you have on hand.
Hot dog buns: Brioche-style buns, for a softer and slightly richer bite.
The Ingredients That Really Make the Difference
Some ingredients do more than just show up, they shape the whole personality of the dish.
Chili powder: This is the heart of the sauce. It brings warmth, color, and that unmistakable chili dog flavor that makes the whole thing feel classic.
Yellow mustard: That bright zigzag on top is not just for looks. It cuts through the richness of the meat and gives each bite a sharp little spark.
Let’s Get These on the Table
Now comes the fun part, and honestly, this recipe moves in a way that feels really satisfying. You build the sauce, warm the hot dogs, toast the buns, and then everything comes together in one gloriously messy finish.
- Preheat Your Equipment: Place a large skillet over medium heat. If you plan to toast the buns, warm a dry skillet or grill pan over medium-low heat as well.
- Combine Ingredients: Add the ground beef and half of the finely diced yellow onion to the large skillet. Cook for 6 to 8 minutes, stirring and breaking up the meat until browned and no longer pink. Stir in the tomato sauce, water, tomato paste, chili powder, paprika, garlic powder, onion powder, ground cumin, salt, black pepper, granulated sugar, and Worcestershire sauce.
- Prepare Your Cooking Vessel: Reduce the heat to low and let the chili simmer for 15 to 20 minutes, stirring occasionally, until it becomes thick and rich. While it simmers, cook the beef hot dogs in a saucepan of gently simmering water for 5 minutes, or heat them in a skillet until warmed through.
- Assemble the Dish: Lightly toast the hot dog buns for 1 to 2 minutes if desired. Place one hot dog into each bun and arrange them on a serving platter or plates.
- Cook to Perfection: Spoon a generous amount of the thick chili over each hot dog, making sure the topping sits neatly along the center without running everywhere.
- Finishing Touches: Sprinkle the remaining finely diced yellow onion over the top and drizzle each one with yellow mustard.
- Serve and Enjoy: Serve right away while everything is hot, soft, and saucy. Add napkins, because this is definitely the kind of meal that gets delightfully messy.
The Best Part, Flavor and Texture in Every Bite
What makes this meal so satisfying is the contrast. The hot dog has that juicy, springy bite. The bun is soft and warm. The chili is thick, meaty, and deeply savory, with gentle spice and a mellow tomato richness. Then the onions come in with a fresh crunch, and the mustard adds that bright tangy finish.
As everything sits together for a moment, the bun catches just enough of the sauce to become flavorful without falling apart. It is rich, balanced, and incredibly comforting.
Helpful Tricks for Foolproof Results
A few little moves can make dinner go from good to really memorable.
- Keep the chili thick: If it seems too loose, simmer it a little longer before serving.
- Toast for better texture: Lightly toasted buns hold up better under all that savory topping.
- Warm everything before assembly: Hot buns, hot dogs, and hot chili make the final dish feel extra satisfying.
- Dice toppings small: Finely chopped onion spreads better and gives a more even crunch.
Common Mistakes and How to Dodge Them
Even an easy recipe has a few places where things can go sideways, and these are worth watching.
- Using watery chili: Thin sauce slides right off the hot dogs, so let it simmer until nicely thickened.
- Skipping seasoning balance: The tiny bit of sugar and Worcestershire sauce really help round out the tomato and spice.
- Overloading the buns too early: Assemble just before serving so the bread stays soft, not soggy.
- Using large onion pieces: Big chunks can overpower the bite, so keep them finely diced.
A Quick Look at the Nutrition
Before we move into timing and storage, here is a helpful snapshot of what to expect per serving.
Servings: 8
Calories per serving: 430
Note: These are approximate values.
Timing That Works for Real Life
This is one of those recipes that feels rewarding without taking over your evening.
Prep Time: 15 minutes
Cook Time: 30 minutes
Total Time: 45 minutes
Make-Ahead, Store, Freeze, Reheat
If you like getting ahead, this recipe is very cooperative. The chili can be made up to 3 days in advance and stored in an airtight container in the refrigerator. Reheat it gently on the stove over low heat, adding a splash of water if it gets too thick.
For longer storage, freeze the chili for up to 2 months. Let it cool completely first, then portion it into freezer-safe containers. Thaw overnight in the refrigerator before reheating.
Hot dogs and buns are best prepared fresh, so the final texture stays just right. If you have assembled leftovers, wrap them well and refrigerate, though the buns will soften quite a bit by the next day.
Favorite Ways to Serve Them
These chili dogs are strong enough to stand alone, but they also play very nicely with classic sides. Serve them with crispy oven fries, potato wedges, coleslaw, pickles, or a simple chopped salad for a fresh contrast. For a fun party spread, set out extra mustard and onions so everyone can finish their own.
A cold sparkling drink on the side makes the whole meal feel even more diner-inspired.
Leftovers That Turn Into Something New
Extra chili is basically a gift. Spoon it over baked potatoes for an easy lunch, pile it onto fries for homemade chili cheese fries without the cheese, or tuck it into toasted sandwich rolls for sloppy-style sandwiches.
You can also warm it and serve it over rice if you want to stretch it into a whole new dinner. It is one of those leftovers that somehow gets even better.
A Few More Little Tips Before You Cook
Sometimes the best cooking advice is the kind that saves you one tiny frustration at a time. Use buns that feel soft but sturdy, because they need to hold the sauce without tearing. Taste the chili before serving, since a little extra salt or mustard on top can wake everything up.
And do not be shy about serving this right away. This is one of those meals that is happiest when hot, fresh, and just a little bit messy.
How to Make It Look Extra Special
Even a casual dish can look seriously tempting with just a little attention. Arrange the assembled hot dogs on a platter in a neat row, spoon the chili down the center of each one, and finish with a clean sprinkle of onion and a bright stripe of mustard.
That color contrast, golden bun, rich red-brown chili, white onion, and yellow mustard, makes the whole dish pop. It feels fun, generous, and completely irresistible.
Delicious Ways to Change It Up
Once you have the basic version down, it is easy to make this recipe feel new again.
Spicier version: Add 1/4 teaspoon cayenne pepper to the chili for more heat.
Smokier version: Swap in smoked paprika for the regular paprika to deepen the flavor.
Mini party version: Use smaller buns and cut the hot dogs in half for appetizer-size servings.
Extra saucy version: Stir an additional 1/4 cup tomato sauce into the chili if you want a softer topping.
Onion-forward version: Quickly soak the diced topping onion in cold water for 10 minutes if you want a cleaner, sharper crunch.
FAQ’s
1. Can I make the chili ahead of time?
Yes, and it actually works beautifully that way. The flavors settle and deepen as it sits, which makes the next-day version especially tasty.
2. Can I use turkey instead of beef?
You can. Ground turkey works well, though the chili will taste a little lighter and less rich.
3. Do I have to toast the buns?
No, but it helps a lot with texture. Toasted buns hold the chili better and add a little extra structure.
4. Can I make this for a party?
Absolutely. Keep the chili warm in a slow cooker and let everyone assemble their own.
5. What kind of hot dogs work best?
Beef hot dogs are classic here because they have a hearty flavor and a nice snap.
6. Is this recipe spicy?
Not really. It is flavorful and warmly seasoned, but not hot. You can add cayenne if you want more kick.
7. Can I freeze the whole assembled hot dogs?
It is better to freeze only the chili. The buns and hot dogs taste best when cooked fresh.
8. What if my chili turns out too thick?
Stir in a tablespoon or two of water until it loosens to the texture you like.
9. Can I skip the onions on top?
Yes, though they add a really nice crunch and brightness. If raw onion feels too sharp, use less.
10. What sides go best with this?
Fries, slaw, pickles, and simple salads all work really well. Anything crisp and fresh balances the richness.
Conclusion
There is a reason this classic has stayed loved for so long. It is warm, hearty, familiar, and just plain fun to eat. Between the rich chili, the snappy hot dog, the soft bun, and those bright finishing touches, every bite feels satisfying in that old-school, comfort-food way. Trust me, you’re going to want this one in your regular dinner rotation.
Print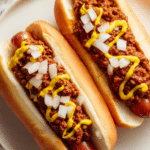
Coney Island Chili Dogs
- Prep Time: 15 minutes
- Cook Time: 30 minutes
- Total Time: 45 minutes
- Yield: 8 servings 1x
- Category: Main Course
- Method: Stovetop
- Cuisine: American
- Diet: Low Lactose
Description
Classic chili dogs made with beef hot dogs in soft buns, topped with thick homemade beef chili, finely diced onion, and yellow mustard for a comforting diner-style meal.
Ingredients
- 1 pound lean ground beef
- 1 medium yellow onion, finely diced and divided
- 1 cup tomato sauce
- 1/2 cup water
- 2 tablespoons tomato paste
- 2 tablespoons chili powder
- 1 teaspoon paprika
- 1 teaspoon garlic powder
- 1 teaspoon onion powder
- 1/2 teaspoon ground cumin
- 1 teaspoon salt
- 1/2 teaspoon black pepper
- 1 teaspoon granulated sugar
- 1 tablespoon Worcestershire sauce
- 8 beef hot dogs
- 8 hot dog buns
- 1/4 cup yellow mustard
Instructions
- Place a large skillet over medium heat. If desired, warm a dry skillet or grill pan over medium-low heat for toasting the buns later.
- Add the ground beef and half of the finely diced yellow onion to the large skillet. Cook for 6 to 8 minutes, stirring and breaking up the meat until browned and no longer pink.
- Stir in the tomato sauce, water, tomato paste, chili powder, paprika, garlic powder, onion powder, ground cumin, salt, black pepper, granulated sugar, and Worcestershire sauce.
- Reduce the heat to low and simmer the chili for 15 to 20 minutes, stirring occasionally, until thick and rich.
- While the chili simmers, cook the beef hot dogs in a saucepan of gently simmering water for 5 minutes, or heat them in a skillet until warmed through.
- Lightly toast the hot dog buns for 1 to 2 minutes if desired.
- Place one hot dog into each bun and arrange on plates or a serving platter.
- Spoon a generous amount of the chili over each hot dog.
- Top with the remaining finely diced yellow onion and drizzle with yellow mustard.
- Serve immediately while hot.
Notes
- Keep the chili thick so it stays on the hot dogs instead of sliding off.
- The chili can be made up to 3 days ahead and reheated gently before serving.
- Toast the buns lightly for better structure and texture.
- Extra chili is great over fries, baked potatoes, or rice.
Nutrition
- Serving Size: 1 chili dog
- Calories: 430
- Sugar: 6g
- Sodium: 980mg
- Fat: 24g
- Saturated Fat: 9g
- Unsaturated Fat: 13g
- Trans Fat: 1g
- Carbohydrates: 31g
- Fiber: 2g
- Protein: 19g
- Cholesterol: 55mg
Keywords: Coney Island chili dogs, chili dogs, beef hot dogs, diner-style hot dogs, homemade chili dog sauce, American comfort food