Classic Tiramisu
The first time you scoop into a homemade Classic Tiramisu, something magical happens. The spoon slides through silky mascarpone cream, dips into coffee soaked ladyfingers, and lifts a bite dusted with deep cocoa. It smells like espresso and sweet cream at the same time, and trust me, you are going to love this. It is rich, soft, slightly bittersweet, and every bite feels like a little moment of indulgence.
This dessert may look elegant and bakery worthy, yet the process is surprisingly approachable. No oven, no complicated techniques, just layers of flavor coming together in the most satisfying way. Let me tell you, it is worth every bite.
The Dessert That Feels Like a Hug in Every Bite
There is something comforting about creamy layered desserts. Each spoonful brings together smooth mascarpone, bold coffee flavor, and a delicate hint of cocoa. The textures are soft and airy, yet rich enough to feel decadent.
And now let us dive a little deeper into what makes this classic treat so beloved. It is the balance. The coffee soaked biscuits add depth, the cream adds sweetness, and the cocoa finishes everything with a gentle bitterness that keeps the dessert from becoming too heavy. It is a perfect harmony.
A Little Italian Story Behind This Beloved Treat
Classic Tiramisu comes from Italy, and its name literally means “pick me up.” That name makes perfect sense when you taste the espresso infused layers.
The dessert became popular in the Veneto region during the twentieth century, especially in restaurants that wanted to serve something elegant but comforting. Coffee, mascarpone, eggs, and ladyfingers were simple pantry staples that turned into something extraordinary when layered together.
Over time, the dish spread around the world. Today it is served in cafés, bakeries, and homes everywhere. Yet the heart of it remains the same, creamy layers, coffee soaked biscuits, and cocoa dusted on top.
Why This Dessert Always Works
When you make this dessert, a few wonderful things happen in your kitchen.
Versatile: This layered dessert works for casual dinners, holidays, or celebrations. It feels fancy but fits almost any occasion.
Budget-Friendly: The ingredients are simple and widely available. A handful of staples turns into a luxurious dessert.
Quick and Easy: No baking required. The hardest part is waiting for the layers to chill and set.
Customizable: You can adjust the sweetness, coffee strength, or cocoa topping depending on your taste.
Crowd-Pleasing: Soft, creamy, and coffee kissed flavors tend to win over almost everyone at the table.
Make-Ahead Friendly: In fact, it tastes even better after resting in the refrigerator.
Great for Leftovers: The flavors deepen overnight, making the next day’s slice even more irresistible.
Chef Secrets That Make It Extra Special
A few small techniques can take this dessert from good to unforgettable.
- Use strong brewed coffee that has cooled completely before dipping the biscuits.
- Fold the mascarpone mixture gently so the cream stays light and airy.
- Dip each biscuit quickly. Too much soaking will make the layers soggy.
- Chill the dessert for several hours so the flavors blend beautifully.
Kitchen Tools That Make the Process Smooth
Before we start assembling layers, it helps to gather the right tools.
Mixing Bowl: A large bowl gives you space to whip and fold the creamy filling comfortably.
Electric Mixer: Helps create a smooth, fluffy mascarpone mixture quickly.
Shallow Dish: Perfect for dipping the ladyfingers in coffee evenly.
Spatula: Ideal for spreading each creamy layer smoothly.
Glass Baking Dish: Allows you to see the beautiful layers as they form.
Ingredients That Build the Perfect Layers
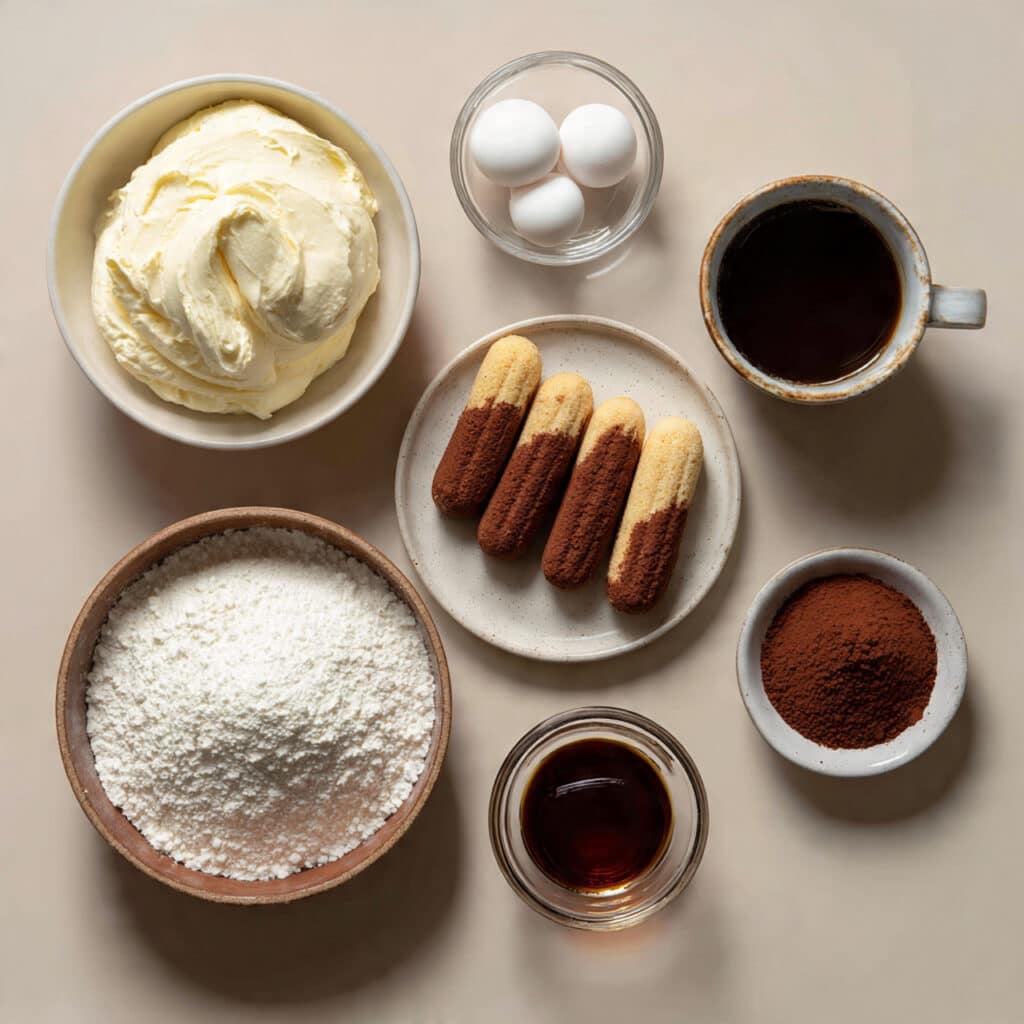
Each ingredient plays a specific role in building the flavors and textures that make this dessert unforgettable.
- Mascarpone Cheese: 16 ounces mascarpone cheese, room temperature. This creamy cheese forms the rich base of the filling.
- Ladyfinger Biscuits: 24 ladyfinger biscuits. These sponge biscuits absorb coffee and create the layered structure.
- Strong Brewed Coffee: 1 cup strong brewed coffee, cooled. Provides the signature espresso flavor.
- Eggs: 3 large eggs, separated. The yolks enrich the cream while the whites add lightness.
- Granulated Sugar: 3/4 cup granulated sugar. Sweetens the filling and balances the coffee.
- Unsweetened Cocoa Powder: 2 tablespoons unsweetened cocoa powder. Adds a slightly bitter finish and classic appearance.
- Vanilla Extract: 1 teaspoon vanilla extract. Enhances the sweetness and rounds out the flavor.
Flexible Ingredient Swaps When Needed
Cooking should always feel flexible, so here are a few easy substitutions.
Mascarpone Cheese: Cream cheese mixed with a little heavy cream.
Ladyfinger Biscuits: Soft sponge cake slices.
Strong Brewed Coffee: Espresso diluted slightly with hot water.
Granulated Sugar: Fine caster sugar for smoother blending.
Vanilla Extract: Vanilla bean paste for a stronger aroma.
The Star Ingredients That Make It Shine
Some ingredients truly define this dessert.
Mascarpone Cheese: Its buttery texture and mild sweetness create the silky cream layer that makes each bite luxurious.
Strong Brewed Coffee: The coffee soak gives depth and balances the sweet cream, making the dessert complex and satisfying.
Let’s Layer This Delicious Dessert Together
Now comes the fun part. The process feels almost like building a delicious edible puzzle.
- Preheat Your Equipment: No oven needed here, but gather all tools and ingredients so the layering process flows smoothly.
- Combine Ingredients: Beat egg yolks with half of the sugar until pale and creamy. Mix in mascarpone cheese and vanilla extract until smooth. In a separate bowl, whip egg whites with the remaining sugar until soft peaks form, then gently fold them into the mascarpone mixture.
- Prepare Your Cooking Vessel: Place the cooled brewed coffee in a shallow dish for dipping the biscuits.
- Assemble the Dish: Quickly dip each ladyfinger into the coffee and arrange a single layer in the bottom of a glass baking dish. Spread half of the mascarpone cream over the biscuits.
- Cook to Perfection: Add another layer of coffee dipped ladyfingers and top with the remaining mascarpone mixture.
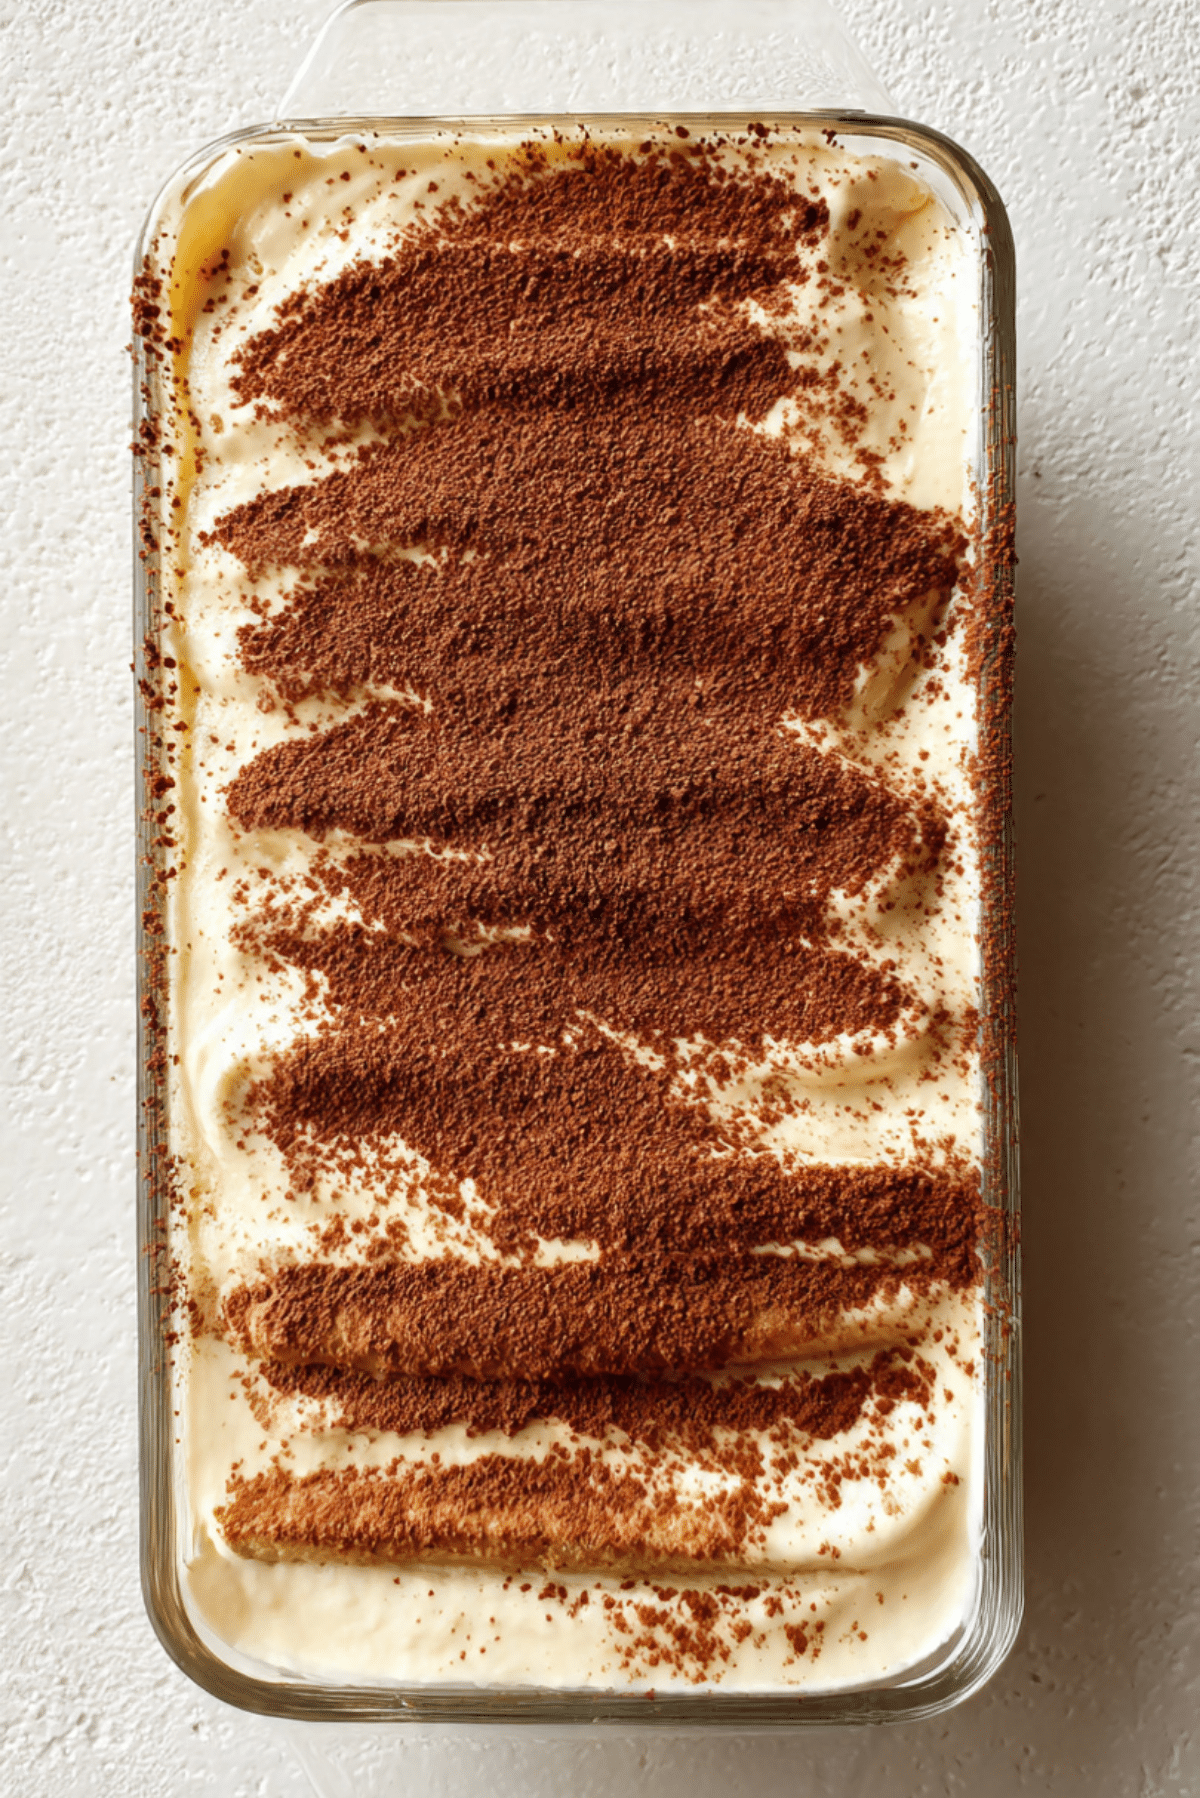
- Finishing Touches: Dust the top generously with unsweetened cocoa powder using a fine sieve.
- Serve and Enjoy: Cover and refrigerate for at least 4 hours before slicing. This resting time allows the layers to set beautifully.
The Texture and Flavor Magic Behind Each Bite
When chilled, the layers become wonderfully cohesive. The ladyfingers soften into delicate sponge like layers that carry the coffee flavor deep into the dessert.
Meanwhile, the mascarpone cream stays airy and smooth. Cocoa powder adds a dry, slightly bitter contrast that keeps every spoonful balanced. The result is creamy, light, and deeply comforting.
Helpful Tips for Perfect Results
If you want flawless results every time, keep these tips in mind.
- Use room temperature mascarpone so it blends smoothly.
- Chill the dessert overnight for the best flavor development.
- Dust cocoa powder right before serving for the freshest appearance.
Common Mistakes and How to Avoid Them
Even simple desserts can have small pitfalls.
- Over soaking biscuits: Dip them briefly so they absorb flavor without falling apart.
- Over mixing cream: Gentle folding keeps the filling light.
- Skipping chill time: The dessert needs time to firm up and develop flavor.
Nutrition Snapshot
Servings: 8
Calories per serving: 360
Note: These are approximate values.
Time Breakdown for This Dessert
Prep Time: 20 minutes
Cook Time: 0 minutes
Total Time: 20 minutes plus chilling time
Make-Ahead and Storage Tips
One of the best things about this dessert is how well it keeps.
You can prepare it a full day ahead and store it covered in the refrigerator. In fact, the flavors become even richer after resting overnight.
Leftovers can be stored in the refrigerator for up to three days. Freezing is possible, although the texture may become slightly firmer after thawing.
How to Serve It Beautifully
Serve chilled slices with a light dusting of cocoa powder just before presenting.
Fresh berries on the side add color and brightness, while a small cup of espresso makes the perfect pairing. A thin chocolate shaving on top can also add a lovely finishing touch.
Creative Leftover Ideas
If you somehow have leftovers, they can turn into something fun.
Layer pieces into small dessert cups for individual treats.
Blend a spoonful into a creamy milkshake style dessert.
Use cubes as a topping for vanilla ice cream.
Extra Helpful Kitchen Tips
For the best flavor and texture, always use fresh ingredients.
Keep the coffee strong but balanced so it does not overpower the cream. And remember, patience during the chilling stage makes all the difference.
Make It Look Like a Bakery Dessert
Presentation matters. Smooth the cream layers evenly and dust cocoa powder through a fine sieve for a delicate finish.
You can also cut slices with a warm knife for clean edges that reveal the beautiful layers.
Fun Variations to Try
Sometimes a small twist makes the dessert even more exciting.
Chocolate Version: Add melted dark chocolate to the mascarpone filling.
Berry Layer: Add a thin layer of raspberries between cream layers.
Mocha Style: Mix a little cocoa powder directly into the coffee soak.
Lighter Version: Replace part of the mascarpone with whipped cream.
Citrus Twist: Add a small amount of orange zest to the filling.
FAQ’s
Q1: Can I make this dessert without eggs?
Yes. You can replace the egg mixture with whipped cream folded into mascarpone.
Q2: How long should it chill?
At least four hours, though overnight gives the best flavor.
Q3: Can I freeze it?
Yes, but the texture may become slightly firmer after thawing.
Q4: Why are my layers too soft?
The biscuits may have soaked too long in the coffee.
Q5: Can I make individual portions?
Absolutely. Small glasses or jars work beautifully.
Q6: What kind of coffee works best?
Strong brewed coffee or espresso creates the most authentic flavor.
Q7: Can I reduce the sugar?
Yes, though the balance between coffee and sweetness may change.
Q8: Can I add chocolate chips?
Yes, they add a pleasant texture contrast.
Q9: What dish size works best?
An 8 by 8 inch dish works perfectly for this quantity.
Q10: How do I get clean slices?
Use a sharp knife dipped in warm water and wipe it between cuts.
Conclusion
A well made Classic Tiramisu is one of those desserts that feels both luxurious and comforting at the same time. The creamy mascarpone, coffee soaked layers, and cocoa finish create a harmony of flavor that is hard to resist.
Once you make it at home, you might never go back to store bought versions again. Trust me, you are going to love sharing this one with family and friends. Every spoonful is soft, rich, and completely satisfying.
Print
Classic Tiramisu
- Prep Time: 10 minutes
- Cook Time: 15 minutes
- Total Time: 25 minutes
- Yield: 4 servings 1x
- Category: Main Course
- Method: Air Fryer
- Cuisine: Tex-Mex
- Diet: Low Lactose
Description
These air fryer chicken fajitas are packed with juicy chicken strips, sweet bell peppers, and warm spices, all roasted together in the air fryer for a quick and colorful meal that is perfect for busy weeknights.
Ingredients
- 1 pound raw chicken strips
- 1 medium red bell pepper, sliced
- 1 medium yellow bell pepper, sliced
- 1 medium green bell pepper, sliced
- 1 medium onion, sliced
- 1 tablespoon olive oil
- 1 whole lime
- 1 teaspoon chili powder
- 1 teaspoon paprika
- 1 teaspoon garlic powder
- 1 teaspoon ground cumin
- 1 teaspoon salt
- 1/2 teaspoon black pepper
- 6 small flour tortillas
Instructions
- Preheat the air fryer to 380°F (193°C) so the cooking begins evenly.
- In a large bowl combine the chicken strips, sliced red bell pepper, yellow bell pepper, green bell pepper, and onion.
- Drizzle olive oil over the mixture and sprinkle chili powder, paprika, garlic powder, cumin, salt, and black pepper. Toss well until everything is evenly coated.
- Place the seasoned mixture into the air fryer basket and spread it in an even layer.
- Cook for 12 to 15 minutes, shaking the basket halfway through cooking so the ingredients roast evenly.
- Once the chicken is fully cooked and the vegetables are slightly charred, remove from the air fryer.
- Squeeze fresh lime juice over the hot mixture and gently toss.
- Serve the chicken and vegetables inside warm flour tortillas and enjoy immediately.
Notes
- Do not overcrowd the air fryer basket because good air circulation helps the ingredients caramelize.
- Warm the tortillas slightly before serving for the best texture.
- A squeeze of fresh lime at the end brightens the entire dish.
- Leftovers can be stored in an airtight container in the refrigerator for up to three days.
Nutrition
- Serving Size: 1 serving
- Calories: 320
- Sugar: 5g
- Sodium: 720mg
- Fat: 10g
- Saturated Fat: 2g
- Unsaturated Fat: 7g
- Trans Fat: 0g
- Carbohydrates: 28g
- Fiber: 4g
- Protein: 30g
- Cholesterol: 75mg
Keywords: air fryer chicken fajitas, chicken fajitas air fryer, easy fajitas, quick chicken fajitas, air fryer dinner