Buttery Herb Stuffing
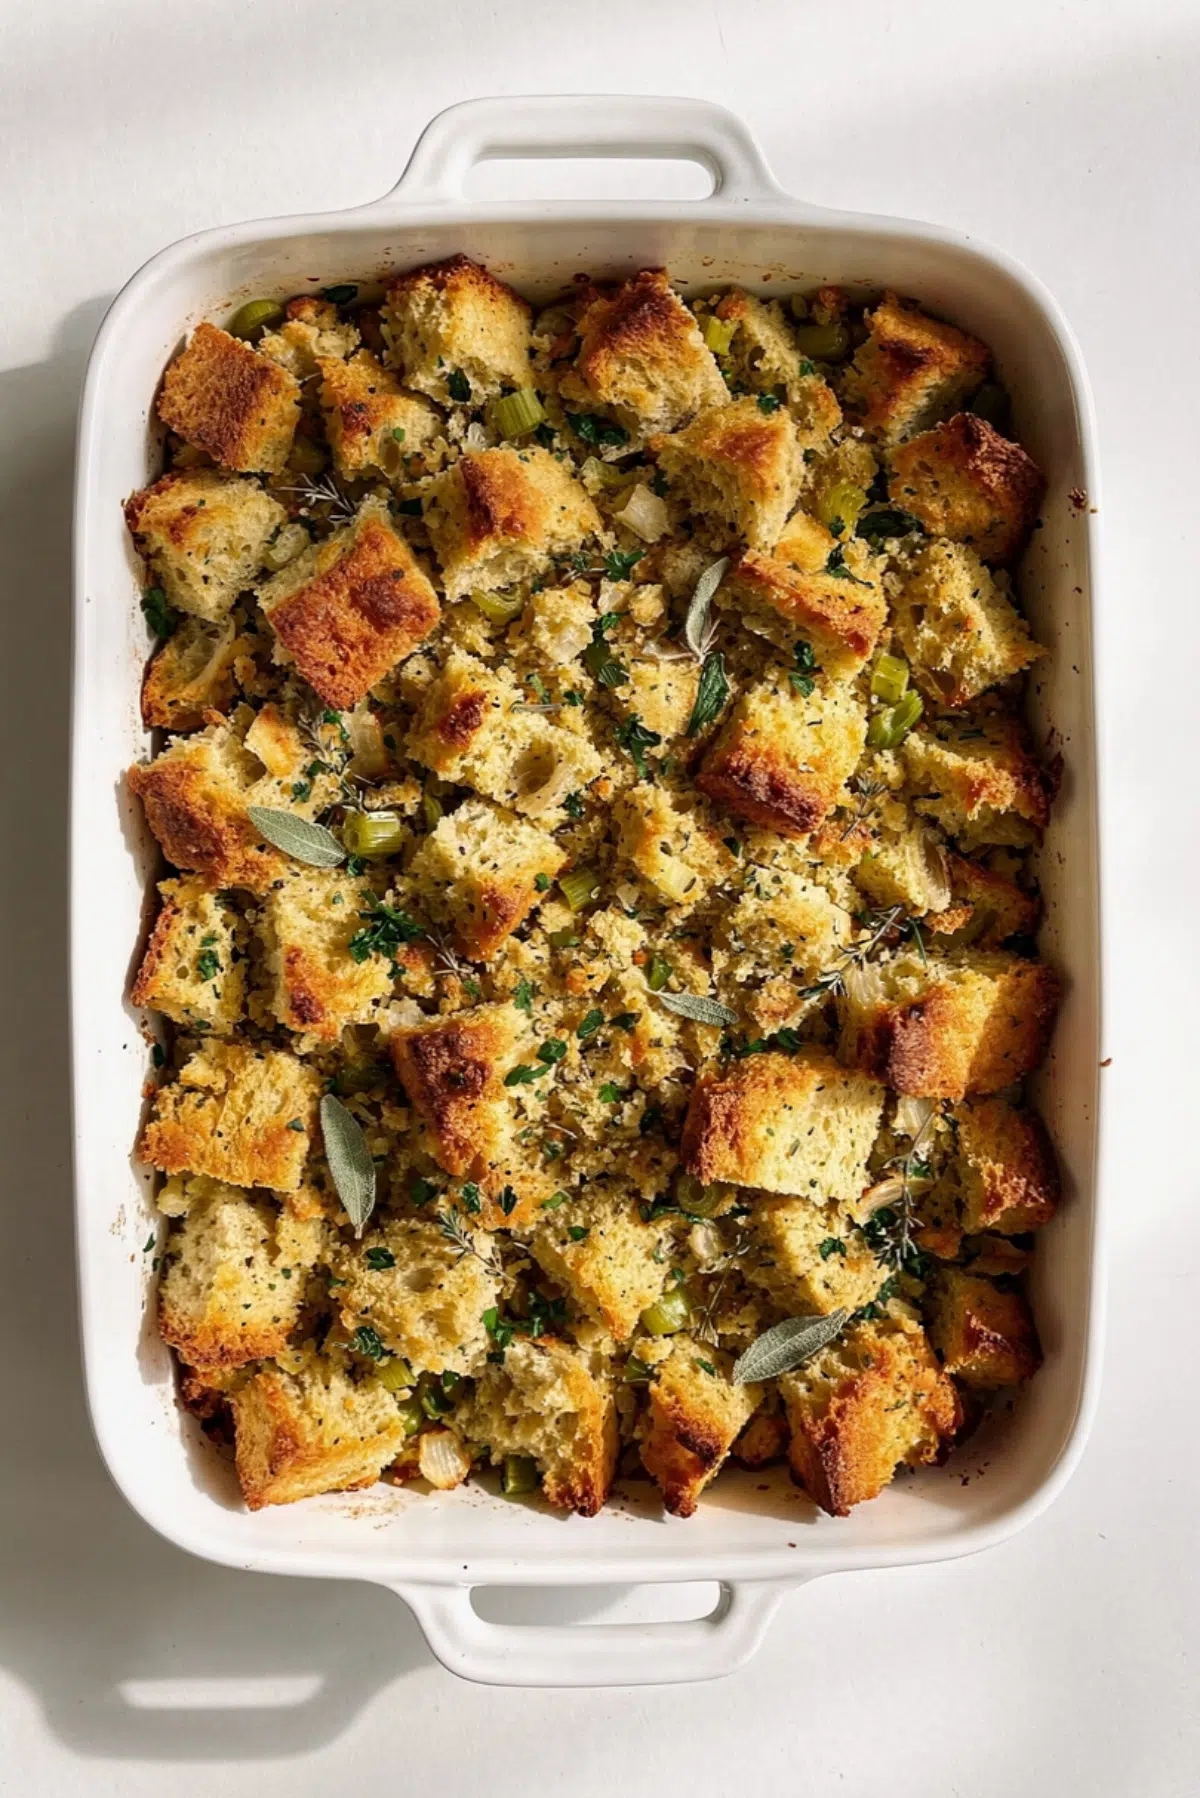
There is something so comforting about a baking dish full of warm, golden stuffing coming out of the oven. The edges are crisp, the center stays soft and savory, and the kitchen smells like butter, herbs, toasted bread, and cozy family dinners. Trust me, you’re going to love this, because it feels classic without being fussy.
The Cozy Side Dish That Always Feels Like Home
This dish has that old-fashioned holiday charm, but it is simple enough to make whenever you want something warm and satisfying beside roasted vegetables, chicken, turkey, or a big Sunday meal. The buttery bread cubes soak up broth, onions, celery, and herbs until every bite tastes rich, savory, and deeply comforting.
And now that the aroma is already easy to imagine, let’s step into where this beloved dish comes from and why it still has a place on so many tables.
A Little Story Behind This Classic Favorite
Stuffing has been part of home cooking for generations, especially in American holiday meals where bread-based side dishes became a delicious way to stretch simple pantry ingredients. Families often made it with whatever bread they had, then added herbs, vegetables, and broth to turn it into something special.
Over time, versions changed from kitchen to kitchen. Some families love it fluffy, others like it crisp on top, and plenty of cooks bake it in a dish rather than inside poultry for a safer, easier, and more reliable result. This one keeps that traditional flavor while making the method clear and dependable.
Why This Recipe Earns a Spot on the Table
Once you make it, you will see why this one’s a total game-changer. It is practical, cozy, and easy to adjust, which makes it perfect for both holidays and casual dinners.
Versatile: This stuffing pairs beautifully with roasted poultry, vegetables, gravy, mashed potatoes, and even simple weeknight mains.
Budget-Friendly: Bread, celery, onion, broth, butter, and herbs turn into something that tastes far more special than the ingredient list suggests.
Quick and Easy: The prep is simple, and the oven does most of the work while the top turns beautifully golden.
Customizable: You can adjust the herbs, use different bread, or add vegetables to match the meal you are serving.
Crowd-Pleasing: The buttery aroma and crisp edges make it one of those sides people reach for first.
Make-Ahead Friendly: You can dry the bread and chop the vegetables ahead, then assemble it when you are ready.
Great for Leftovers: Leftovers reheat well and can turn into breakfast skillets, savory patties, or a cozy casserole topping.
Chef Notes for Better Texture and Flavor
Before we start cooking, let me tell you a few little kitchen secrets that make the difference between okay stuffing and the kind everyone remembers.
- Use dry bread cubes because fresh bread can turn mushy instead of tender.
- Cook the onion and celery in butter first so they become sweet, fragrant, and soft.
- Add broth gradually, because bread absorbs liquid differently depending on how dry it is.
- Cover the dish at first for a moist center, then uncover it so the top gets crisp.
- Let it rest for a few minutes before serving so the texture settles nicely.
Kitchen Tools That Make the Process Easier
You do not need fancy equipment here, which is part of the charm. A few dependable basics will carry you from chopping to baking with no stress.
Large Skillet: Used to soften the onion and celery in butter and build the savory base.
Large Mixing Bowl: Gives you enough room to toss the bread cubes gently without crushing them.
9 by 13 Inch Baking Dish: Helps the stuffing bake evenly with plenty of golden surface area.
Measuring Cups and Spoons: Keep the broth, herbs, and seasoning balanced.
Foil: Covers the dish during the first part of baking so the center stays moist.
Wooden Spoon or Spatula: Perfect for folding everything together without breaking the bread too much.
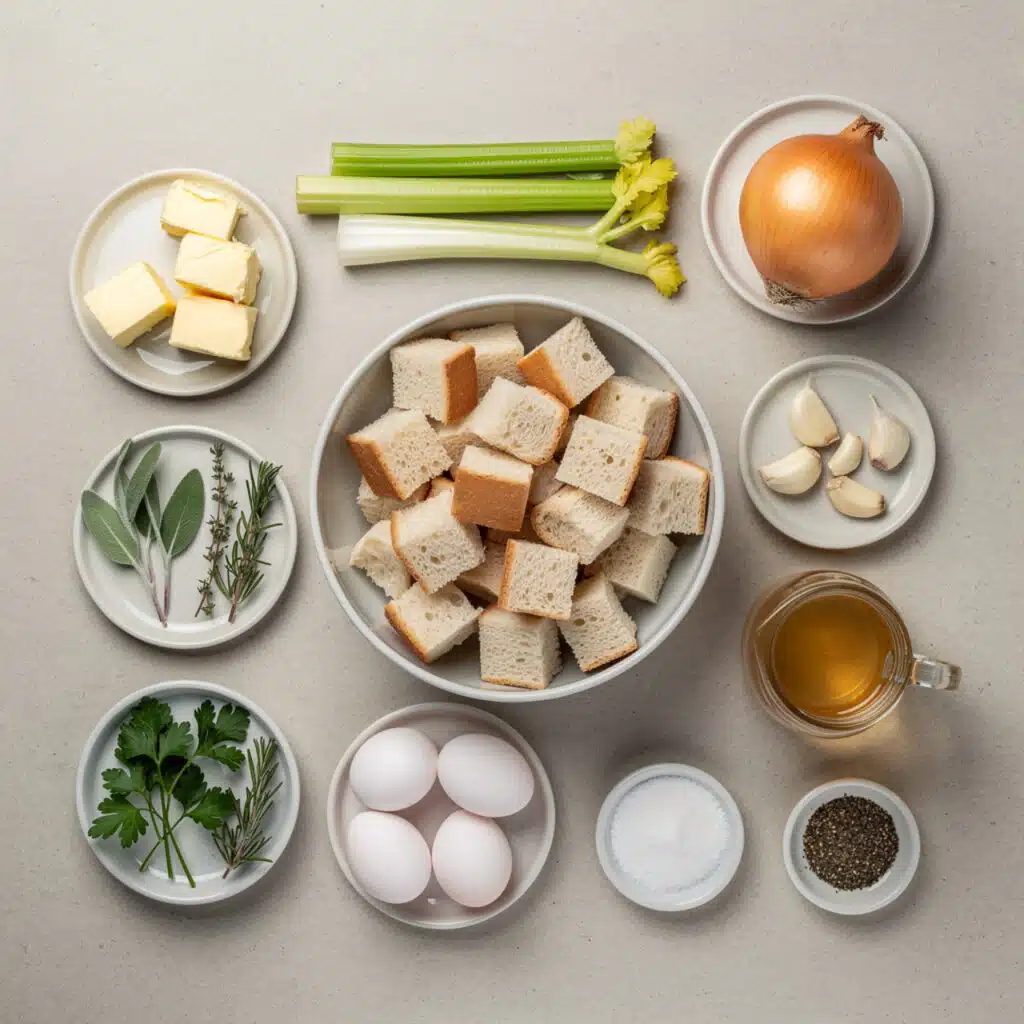
Ingredients You Will Need for Buttery Herb Stuffing
Now let’s gather everything. This ingredient list is simple, but when butter, herbs, broth, and toasted bread come together, the result smells like pure comfort.
- Day-Old Bread Cubes: 12 cups, cut into 1 inch pieces. Dry bread soaks up the broth and butter without falling apart.
- Unsalted Butter: 1 cup. It gives the dish its rich flavor and helps the vegetables soften beautifully.
- Yellow Onion: 2 cups, finely chopped. Onion adds sweetness and a deep savory base.
- Celery: 2 cups, finely chopped. Celery brings freshness, gentle crunch, and classic stuffing flavor.
- Garlic: 3 cloves, minced. Garlic adds warmth without overpowering the herbs.
- Fresh Parsley: 1/2 cup, chopped. Parsley brightens the whole dish and adds fresh color.
- Fresh Sage: 2 tablespoons, finely chopped. Sage gives the stuffing that familiar holiday aroma.
- Fresh Thyme: 1 tablespoon, chopped. Thyme adds earthy flavor that works beautifully with butter.
- Fresh Rosemary: 1 teaspoon, finely chopped. Rosemary adds a woodsy note, so a little goes a long way.
- Low-Sodium Vegetable Broth: 3 cups. Broth moistens the bread and keeps the flavor savory.
- Large Eggs: 2, lightly beaten. Eggs help bind the stuffing so it slices and scoops nicely.
- Kosher Salt: 1 1/2 teaspoons. Salt brings the bread, herbs, and butter into balance.
- Black Pepper: 1 teaspoon. Pepper adds gentle warmth.
Easy Swaps When You Need Them
If your kitchen has a slightly different lineup, do not worry. This recipe is flexible, and a few smart swaps still keep the same cozy feeling.
Day-Old Bread Cubes: Use sourdough, French bread, Italian bread, or a sturdy sandwich loaf.
Unsalted Butter: Use salted butter and reduce the added salt slightly.
Yellow Onion: Use white onion or sweet onion for a similar savory flavor.
Fresh Herbs: Use 2 teaspoons dried sage, 1 teaspoon dried thyme, and 1/2 teaspoon dried rosemary if fresh herbs are not available.
Vegetable Broth: Use chicken broth if you do not need the dish to stay vegetarian.
Large Eggs: For an egg-free version, add a little extra broth and bake until set, though the texture will be looser.
The Ingredients That Carry the Flavor
Every ingredient matters, but a couple of them really make this dish shine. Let’s give them their little moment.
Butter: Butter is the flavor backbone here. It coats the bread, softens the vegetables, and gives the top that golden, rich finish.
Fresh Sage: Sage brings the classic herbal aroma people expect from a cozy stuffing. It tastes earthy, warm, and just a little peppery.
How to Make This Savory Holiday Side
Now we get to the fun part. Here are the steps you’re going to follow, and each one builds flavor in a simple, natural way.
- Preheat Your Equipment: Preheat the oven to 350°F. Lightly grease a 9 by 13 inch baking dish so the edges crisp without sticking.
- Combine Ingredients: Place the dry bread cubes in a large mixing bowl. In a separate bowl, whisk together the broth and beaten eggs until smooth.
- Prepare Your Cooking Vessel: Melt the butter in a large skillet over medium heat. Add the onion and celery, then cook for 8 to 10 minutes until soft and fragrant. Stir in the garlic, parsley, sage, thyme, rosemary, salt, and black pepper, then cook for 1 more minute.
- Assemble the Dish: Pour the buttery vegetable and herb mixture over the bread cubes. Toss gently, then slowly add the broth and egg mixture while folding until the bread is evenly moistened but not soggy.
- Cook to Perfection: Transfer the mixture to the prepared baking dish. Cover with foil and bake for 30 minutes. Remove the foil and bake for another 20 minutes until the top is golden and crisp.
- Finishing Touches: Let the stuffing rest for 10 minutes after baking. This helps the center set while keeping the top crisp.
- Serve and Enjoy: Spoon it warm onto plates and serve with gravy, roasted vegetables, turkey, chicken, or any cozy main dish. Let me tell you, it’s worth every bite.
How the Texture and Flavor Come Together
The best part is the contrast. The top becomes crisp and golden, almost like buttery croutons, while the inside stays soft, moist, and full of savory herb flavor. The celery keeps a gentle bite, the onion melts into sweetness, and the sage gives everything that nostalgic, homey aroma.
As it bakes, the broth and eggs help the bread settle into a tender center, while the butter rises just enough to toast the top. That balance is what makes each scoop feel rich but not heavy.
Helpful Cooking Tips for Best Results
By this point, the method is simple, but these little tips help make sure the final dish tastes just right.
- Dry the bread well: If your bread is fresh, spread cubes on a baking sheet and bake at 300°F for 15 to 20 minutes.
- Do not overmix: Fold gently so the bread keeps some shape and texture.
- Taste before adding eggs: Taste the buttery vegetable mixture before combining with eggs so you can adjust seasoning safely.
- Watch the broth: Add just enough liquid to moisten the bread without making it wet and heavy.
Common Mistakes to Avoid
Stuffing is forgiving, but a few simple fixes can save the texture. Think of this as your little safety net before the baking dish goes into the oven.
- Using very soft bread: Fresh bread can collapse, so dry it first for better texture.
- Adding all the broth too fast: Pour slowly and fold as you go so you can control moisture.
- Skipping the foil: Covering first keeps the center soft before the top crisps.
- Overbaking uncovered: The top should be golden, not dry or hard.
- Underseasoning: Bread needs enough salt, herbs, and pepper to taste full and savory.
Comforting Nutrition Snapshot
Servings: 10
Calories per serving: 315
Note: These are approximate values.
Timing for a Smooth Cooking Day
Prep Time: 25 minutes
Cook Time: 50 minutes
Total Time: 1 hour 15 minutes
Make-Ahead and Storage Tips
This is a great dish to plan ahead, especially when the kitchen is busy. You can dry the bread cubes up to 2 days in advance and store them in an airtight container at room temperature.
You can also chop the onion, celery, and herbs a day ahead and refrigerate them separately. For fully assembled stuffing, cover and refrigerate for up to 24 hours before baking. Add a few extra minutes to the covered baking time if it goes into the oven cold.
Store leftovers in an airtight container in the refrigerator for up to 4 days. To freeze, portion cooled stuffing into freezer-safe containers for up to 2 months. Reheat covered at 325°F until warmed through, then uncover for a few minutes to bring back the crisp top.
How to Serve This Cozy Side
This stuffing loves a classic dinner plate. Serve it with gravy, mashed potatoes, roasted carrots, green beans, cranberry sauce, or a simple salad for freshness.
It also works beautifully beside roasted chicken, turkey, mushroom gravy, baked squash, or a vegetarian holiday spread. A little extra parsley on top adds color and makes the whole dish look fresh and inviting.
Creative Leftover Transformations
Leftovers are honestly one of the best parts. Press cold stuffing into small patties and pan-sear until crisp for a savory breakfast side.
You can also spoon it into a casserole dish with roasted vegetables and a little extra broth, then bake until warm. Another fun idea is using it as a topping for creamy vegetable soup or turning it into a cozy stuffing waffle if you have a waffle maker.
Extra Tips for Even More Flavor
For deeper flavor, toast the bread cubes lightly before mixing. It adds a nutty edge and helps the cubes hold their shape.
If you want a richer finish, dot the top with a few small pieces of butter before the uncovered bake. For freshness, add a little more chopped parsley right before serving.
And now that the flavor is handled, let’s make it look as good as it tastes.
Make It a Showstopper on the Table
Bake it in a clean white or cream-colored ceramic dish so the golden top really stands out. Right before serving, sprinkle a small amount of chopped parsley over the surface for color.
For a cozy table look, serve it straight from the baking dish with a large spoon. The crisp top, soft center, and buttery herb aroma will do most of the decorating for you.
Variations to Try Next Time
- Sourdough Herb Stuffing: Use sourdough bread cubes for a slightly tangy flavor and sturdier texture.
- Mushroom Herb Version: Add 2 cups sliced mushrooms when cooking the onion and celery for a deeper savory taste.
- Apple and Herb Twist: Add 1 cup finely diced apple for gentle sweetness and freshness.
- Cornbread Style: Replace half the bread with dry cornbread cubes for a softer, slightly sweet variation.
- Extra Vegetable Version: Add 1 cup finely diced carrots for color and a little natural sweetness.
FAQ’s
Q1: Can I make this stuffing ahead of time?
A1: Yes, assemble it up to 24 hours ahead, cover it tightly, and refrigerate. Bake it covered first, adding a few extra minutes if it is cold from the fridge.
Q2: What bread works best?
A2: Sturdy bread works best, such as sourdough, French bread, Italian bread, or a firm sandwich loaf. Soft fresh bread should be dried before using.
Q3: Can I use dried herbs instead of fresh?
A3: Yes. Use smaller amounts because dried herbs are stronger. Try 2 teaspoons dried sage, 1 teaspoon dried thyme, and 1/2 teaspoon dried rosemary.
Q4: How do I know if I added enough broth?
A4: The bread should feel evenly moistened but not soaked. It should hold together slightly when pressed without dripping liquid.
Q5: Can I make this vegetarian?
A5: Yes, this version uses vegetable broth, so it is already vegetarian as long as your bread is vegetarian-friendly.
Q6: Why is my stuffing mushy?
A6: The bread may have been too fresh, or too much broth may have been added. Dry the bread well and add liquid gradually next time.
Q7: Why is my stuffing dry?
A7: It may need more broth, or it may have baked uncovered too long. Add a splash of warm broth when reheating to bring back moisture.
Q8: Can I freeze it?
A8: Yes, freeze cooled leftovers in airtight containers for up to 2 months. Thaw overnight in the refrigerator before reheating.
Q9: Can I bake it in a smaller dish?
A9: Yes, but a deeper dish may need a little more baking time. The top may be less crisp because there is less surface area.
Q10: Can I double the recipe?
A10: Yes, double the ingredients and bake in two 9 by 13 inch dishes for the most even texture.
Conclusion
Buttery Herb Stuffing is one of those dishes that brings everyone closer to the table before the first bite even happens. It is warm, golden, savory, and full of that cozy herb aroma that makes a meal feel complete. Whether you serve it for a holiday feast or a comforting family dinner, this is the kind of side dish that disappears fast, and honestly, that is always a good sign.
Print
Buttery Herb Stuffing
- Prep Time: 25 minutes
- Cook Time: 50 minutes
- Total Time: 1 hour 15 minutes
- Yield: 10 servings 1x
- Category: Side Dish
- Method: Baked
- Cuisine: American
- Diet: Vegetarian
Description
A cozy baked stuffing made with day-old bread cubes, butter, celery, onion, fresh herbs, broth, and eggs for a crisp golden top and tender savory center.
Ingredients
- 12 cups day-old bread cubes, cut into 1 inch pieces
- 1 cup unsalted butter
- 2 cups yellow onion, finely chopped
- 2 cups celery, finely chopped
- 3 cloves garlic, minced
- 1/2 cup fresh parsley, chopped
- 2 tablespoons fresh sage, finely chopped
- 1 tablespoon fresh thyme, chopped
- 1 teaspoon fresh rosemary, finely chopped
- 3 cups low-sodium vegetable broth
- 2 large eggs, lightly beaten
- 1 1/2 teaspoons kosher salt
- 1 teaspoon black pepper
Instructions
- Preheat the oven to 350°F and lightly grease a 9 by 13 inch baking dish.
- Place the dry bread cubes in a large mixing bowl.
- In a separate bowl, whisk together the vegetable broth and beaten eggs until smooth.
- Melt the butter in a large skillet over medium heat.
- Add the onion and celery, then cook for 8 to 10 minutes until soft and fragrant.
- Stir in the garlic, parsley, sage, thyme, rosemary, salt, and black pepper, then cook for 1 minute.
- Pour the buttery vegetable and herb mixture over the bread cubes and toss gently.
- Slowly add the broth and egg mixture while folding until the bread is evenly moistened but not soggy.
- Transfer the mixture to the prepared baking dish and spread it evenly.
- Cover with foil and bake for 30 minutes.
- Remove the foil and bake for another 20 minutes until the top is golden and crisp.
- Let the stuffing rest for 10 minutes before serving warm.
Notes
- Use dry bread cubes for the best texture.
- Add broth gradually so the stuffing does not become soggy.
- For extra crispness, bake uncovered for a few more minutes while watching closely.
- Leftovers can be refrigerated for up to 4 days.
Nutrition
- Serving Size: 1 serving
- Calories: 315
- Sugar: 4g
- Sodium: 520mg
- Fat: 21g
- Saturated Fat: 12g
- Unsaturated Fat: 7g
- Trans Fat: 0g
- Carbohydrates: 27g
- Fiber: 3g
- Protein: 7g
- Cholesterol: 75mg
Keywords: buttery herb stuffing, herb stuffing, baked stuffing, holiday side dish, vegetarian stuffing