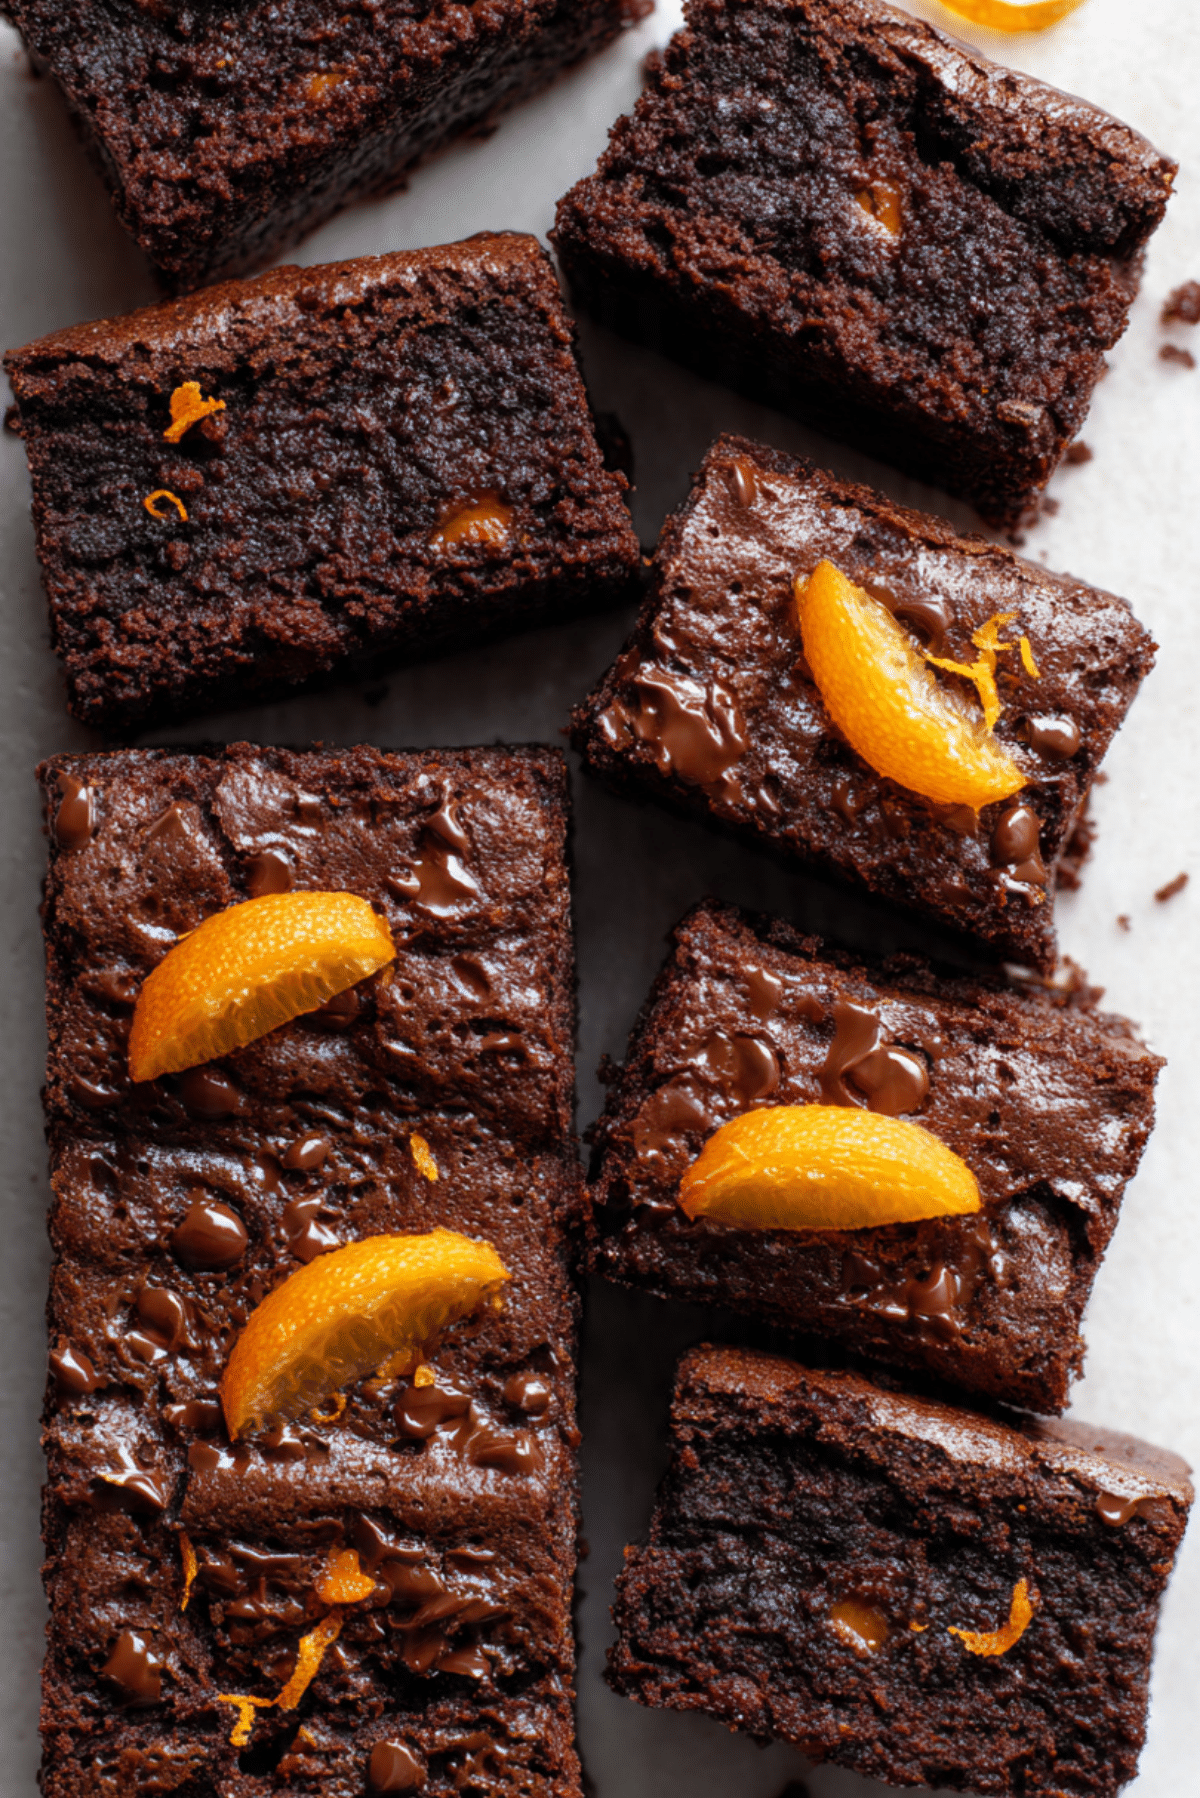
Terry’s Chocolate Orange Cookie Bars
There is something about chocolate and orange together that just feels a little nostalgic and a little irresistible at the same time. These cookie bars come out rich, chewy, and packed with those familiar citrusy chocolate notes, with crisp edges and a soft middle that practically begs for a second square. Trust me, you’re going to love this, especially when the whole kitchen starts smelling warm, sweet, and just a little bit festive.
Why these bars always disappear first
Some bakes are nice to have on the table, and then there are the ones people keep wandering back to for just one more bite. This one falls firmly into that second category. The deep cocoa base keeps everything rich without feeling too heavy, and the orange lifts every bite so it tastes bright as well as chocolatey.
The texture is what really seals the deal. The top turns delicately crackly, the edges bake into that lovely chewy-cookie finish, and the middle stays soft and dense in the best possible way. Let me tell you, it’s worth every bite.
A sweet little story behind the flavor
And now that the first craving has kicked in, let’s talk about why this flavor pairing feels so familiar. Chocolate and orange have been loved together for generations in British baking and confectionery, and Terry’s Chocolate Orange helped make that combination especially iconic. It became one of those treats that instantly brings a bit of holiday cheer and a lot of nostalgia to the table.
That same flavor works beautifully in home baking because orange keeps chocolate from tasting flat or overly sweet. Instead, it gives everything a fresher, brighter finish, which is exactly why these bars feel both cozy and lively at the same time.
What makes this bake such a keeper
Before we head into the mixing bowl, here is why this recipe earns a regular spot in the baking rotation.
Versatile: These bars work as an afternoon snack, a lunchbox treat, a holiday traybake, or a casual dessert with ice cream. They fit almost any moment where something chocolatey sounds like a good idea.
Budget-Friendly: Most of the ingredients are basic baking staples, and the main splurge is the chocolate orange itself. That means you get a bakery-style result without spending much.
Quick and Easy: The dough comes together fast, and there is no scooping individual cookies. You simply press it into the tin and bake.
Customizable: You can lean more citrusy with extra zest, go darker with dark chocolate orange pieces, or add a tiny pinch of flaky salt on top once baked.
Crowd-Pleasing: This one’s a total game-changer when you need a traybake people instantly recognize and want to try. Chocolate lovers and orange lovers both tend to meet happily in the middle here.
Make-Ahead Friendly: These bars keep well for a few days, and the flavor seems to settle in even more beautifully by the next day.
Great for Leftovers: If you somehow have any left, they warm up wonderfully. A few seconds in the microwave brings back that soft center and melty chocolate feel.
Insider baking notes for the best texture
Now let’s get into the little things that make a good traybake turn into a really memorable one.
- Melt the butter gently: You want it just melted, not sizzling hot. Warm butter helps create that dense, chewy texture, but overly hot butter can make the dough greasy.
- Do not overmix once the flour goes in: Stir only until the dough comes together. This keeps the bars tender instead of tough.
- Chop the chocolate orange into mixed-size pieces: Smaller bits melt into the dough, while chunkier pieces leave those dreamy pockets of chocolate.
- Pull the tin when the top looks set: The center should not look raw, but it should still have a little softness. That is what keeps the bars fudgy and chewy.
- Cool before slicing: It is tempting to cut in right away, but a short cooling time helps the bars hold their shape and gives cleaner slices.
The simple tools that make baking easier
And now that the texture secrets are out of the way, here are the kitchen basics that make everything smooth from start to finish.
Mixing Bowl: You will need one medium bowl for the dry ingredients and one larger bowl for the wet mixture.
Whisk: Perfect for blending the dry ingredients evenly and for smoothing out the melted butter, sugar, egg, and flavorings.
Spatula or Wooden Spoon: This helps fold the dough together without overworking it.
9×9-inch Square Baking Tin: The ideal size for thick, chewy bars with a soft center and nicely baked edges.
Baking Paper: Makes lifting the finished bake out of the tin much easier, especially when you want neat slices.
Knife: A sharp knife gives you clean squares once the bars have cooled.
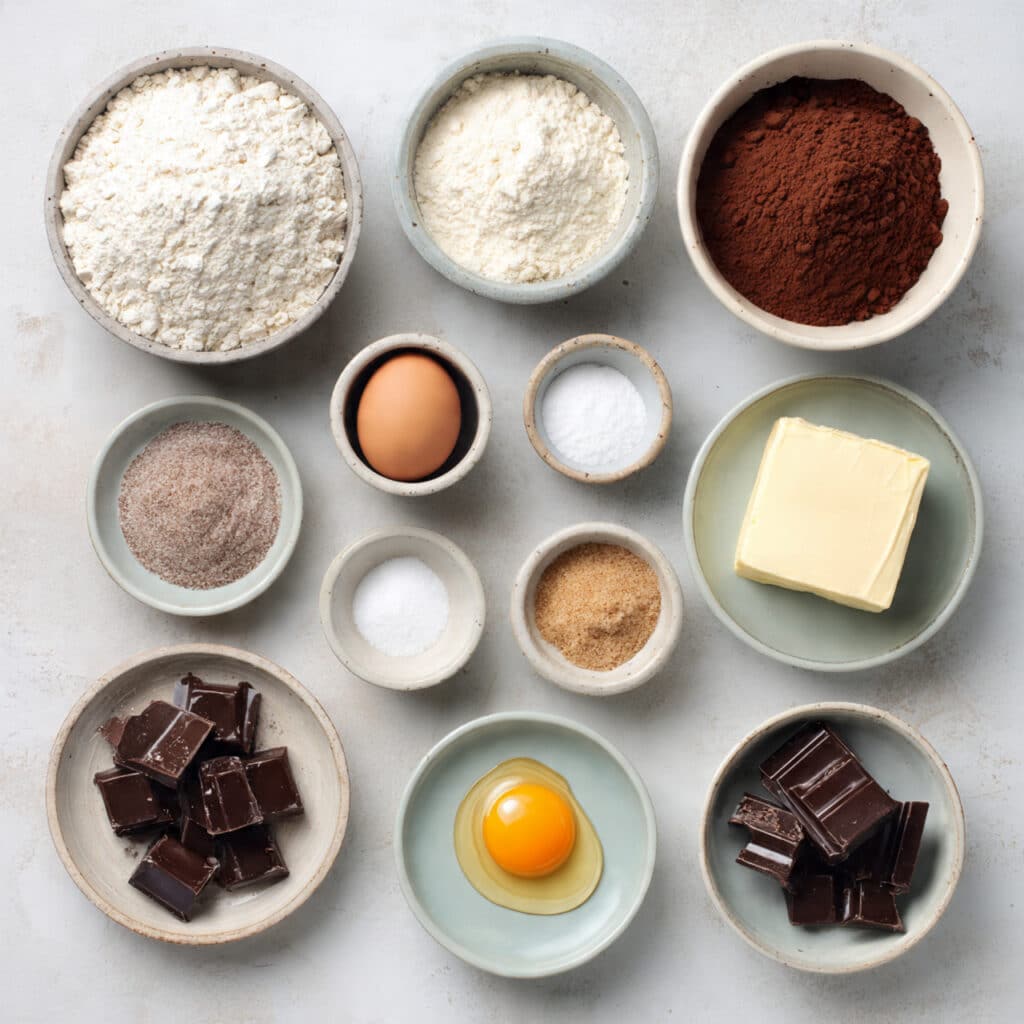
Everything that goes into these gooey squares
At this stage, the ingredient list starts to tell the whole story. Every item here has a job, and together they create that perfect mix of rich cocoa flavor, bright orange aroma, and chewy cookie bar texture.
- Plain Flour: 200 g, this gives the bars structure and keeps the crumb soft rather than cakey.
- Cocoa Powder: 50 g, this deepens the chocolate flavor and gives the dough its dark, dramatic color.
- Bicarbonate of Soda: 1 teaspoon, this helps the bars spread and bake into a chewy, tender texture.
- Salt: 1/2 teaspoon, a small amount makes the chocolate taste fuller and balances the sweetness.
- Cornflour: 1 tablespoon, this is the little trick that helps create a softer, more tender bite.
- Unsalted Butter: 115 g, melted, this brings richness and helps create that dense cookie bar texture.
- Granulated Sugar: 55 g, this adds sweetness and a slight crispness around the edges.
- Light Brown Sugar: 135 g, this adds moisture, chewiness, and a subtle caramel note.
- Medium Egg: 1, this binds everything together and adds richness.
- Vanilla Extract: 1/2 teaspoon, this rounds out the chocolate and makes the whole bake taste warmer.
- Orange Extract: 1 teaspoon, this gives the bars that unmistakable citrus kick that makes the flavor pop.
- Terry’s Chocolate Orange: 314 g, chopped, this is the star ingredient, melting into pockets of creamy chocolate with that classic orange finish.
Easy swaps if you need them
Sometimes you are halfway through baking and realize you need a little flexibility, so here are a few simple substitutions that still keep the spirit of the recipe intact.
Plain Flour: Self-raising flour can work in a pinch, but skip the bicarbonate of soda if you use it.
Cocoa Powder: Dutch-process cocoa can be used for an even darker, smoother chocolate flavor.
Unsalted Butter: Salted butter works too, just reduce the added salt slightly.
Light Brown Sugar: Dark brown sugar can be used for a deeper, more caramel-like finish.
Orange Extract: Finely grated zest of 1 orange makes a lovely fresh substitute.
Terry’s Chocolate Orange: Any orange-flavored chocolate bar can stand in if needed.
The ingredients that do the heavy lifting
Before the oven gets involved, it is worth pausing for the ingredients that really define the character of these bars.
Orange Extract: This is what gives the dough that bright, unmistakable lift. Without it, the bars would still be chocolatey and good, but this is what turns them into something memorable.
Terry’s Chocolate Orange: Chopped through the dough, it creates those creamy little pools of chocolate and brings the signature flavor that makes each square feel familiar and indulgent.
Let’s bake these beauties together
This is the fun part, where the pantry staples turn into something warm, fragrant, and almost impossible to leave alone. Here are the steps you’re going to follow.
- Preheat Your Equipment: Heat your oven to 190°C, or 170°C fan, and line a 9×9-inch square tin with baking paper so the bars lift out easily later.
- Combine Ingredients: In a medium bowl, whisk together the plain flour, cocoa powder, bicarbonate of soda, salt, and cornflour until everything looks evenly mixed and no cocoa lumps remain.
- Prepare Your Cooking Vessel: In a larger bowl, melt the butter gently. Add the granulated sugar and light brown sugar, then whisk for about 2 minutes until the mixture looks glossy and smoother. Whisk in the egg, vanilla extract, and orange extract until fully combined.
- Assemble the Dish: Add the dry ingredients to the wet mixture, then fold in the chopped chocolate orange. Stir with a spatula just until a thick cookie dough forms. Press the dough evenly into the prepared tin, smoothing the top lightly.
- Cook to Perfection: Bake for 18 to 20 minutes, until the top looks set and dry to the touch, with a few moist crumbs still clinging to a skewer.
- Finishing Touches: Let the bake cool in the tin for about 10 minutes, then transfer it carefully to a wire rack to cool fully. This helps the texture settle and makes slicing much easier.
- Serve and Enjoy: Cut into 16 squares for generous bars, or smaller pieces if you are serving a crowd. Enjoy them as they are, or warm one slightly for an extra gooey center.
Why the texture and flavor work so well
Once baked, these bars really show off their charm. The edges have that classic cookie chew, while the center stays softer and denser, almost like the meeting point between a brownie and a cookie. That contrast is what makes each bite interesting.
Flavor-wise, the cocoa gives depth, the chopped chocolate orange melts into creamy bursts, and the orange extract lingers gently in the background so the citrus never feels overpowering. It builds as you chew, which makes the finish taste especially satisfying.
Handy little baking tips that help a lot
By now, your kitchen probably already smells amazing, so here are a few extra pointers to keep things stress-free.
- Use room temperature egg: It blends more smoothly into the melted butter and sugar mixture.
- Line the tin with overhang: Leave a little baking paper hanging over the sides so you can lift the whole bake out easily.
- Chop the chocolate evenly enough: A mix of sizes is nice, but avoid pieces that are too huge or they may make slicing messy.
- Let the bars cool fully for neat cuts: Warm bars are delicious, but cooler bars slice much more cleanly.
Common slip-ups and how to avoid them
Even an easy bake has a few little traps, and knowing them ahead of time makes all the difference.
- Do not overbake: If the bars stay in too long, they lose that soft, chewy center. Pull them when the top is set and the middle still feels slightly tender.
- Do not skip the salt: It may seem tiny, but it keeps the sweetness balanced and makes the chocolate taste richer.
- Do not add the chocolate to very hot butter alone: Mix the wet ingredients first so the chocolate pieces do not melt too early.
- Do not slice too soon: The bars need a bit of time to settle, or they can crumble and fall apart while still warm.
A quick look at the nutrition
And now, for anyone who likes to keep an eye on the details, here is the basic nutrition snapshot.
Servings: 16
Calories per serving: 260
Note: These are approximate values.
Timing that fits into a busy day
One of the best things about this bake is that it feels special without demanding a huge chunk of time.
Prep Time: 10 minutes
Cook Time: 20 minutes
Total Time: 30 minutes
Make-ahead, storage, and reheating ideas
These bars are wonderfully practical, which is always a bonus. You can make the dough ahead and keep it chilled in the lined tin for several hours before baking. That makes them a great option for busy days or party prep.
Once baked, keep the bars in an airtight container at room temperature for 3 to 4 days. They stay soft and tasty, though the edges may firm up a little over time. For longer storage, freeze them either baked or unbaked. If freezing baked bars, wrap them individually so you can grab one at a time. To reheat, a quick 10 to 15 seconds in the microwave brings back that soft, melty texture beautifully.
The best ways to serve them
And now for the really fun part, serving. These are lovely with tea or coffee in the afternoon, but they also make a simple dessert feel extra special.
Try serving a square slightly warm with a scoop of vanilla ice cream. The cold creaminess against the soft chocolate center is absolute magic. They are also great on a dessert board with fresh orange slices and a little whipped cream on the side.
Clever ways to use any extras
If you somehow end up with leftovers, there are a few very good ways to make them feel brand new again.
Crumble a bar over vanilla yogurt for a dessert-style breakfast treat. Warm a square and turn it into an ice cream sandwich filling moment with a scoop pressed on top. You can even chop the bars into chunks and fold them into a no-churn ice cream base for something extra indulgent.
A few more helpful tricks before you bake again
Sometimes the smallest details are the ones that really improve a bake, so here are a few extra ideas worth keeping in mind.
A tiny bit of fresh orange zest can make the aroma even brighter without changing the texture. If you like a deeper chocolate finish, use a darker cocoa powder. And if you want very even bars, press the dough into the corners carefully with the back of a spoon before baking.
How to make them look bakery-worthy
Presentation is half the fun with a traybake like this. Once the bars are fully cool, use a sharp knife and wipe it between cuts for the cleanest edges. That little step makes a big difference.
For a finishing touch, tuck a small chocolate orange segment onto each square just before serving, or add the faintest dusting of cocoa powder for a polished look. They already smell incredible, so making them look the part is just the final flourish.
Fun ways to switch things up
Once you have made the classic version, it is very easy to play around with the flavor.
Double Chocolate Twist: Add a handful of dark chocolate chips for even richer bites.
Fresh Orange Boost: Stir in the finely grated zest of 1 orange for a more natural citrus note.
Crunchy Version: Add a small handful of chopped hazelnuts or pecans for contrast.
Salted Finish: Sprinkle a tiny pinch of flaky sea salt over the top after baking to sharpen the chocolate flavor.
Festive Style: Decorate the top with extra chocolate orange segments before serving for a more holiday-ready look.
FAQ’s
Q1: Can I use orange zest instead of orange extract?
Yes, absolutely. Finely grated zest of 1 orange works well and gives a fresher citrus aroma.
Q2: Can I make these without cocoa powder?
You can, but the bars will lose that rich dark chocolate base. They will taste much lighter and sweeter.
Q3: How do I know when they are done?
The top should look set and dry, and a skewer should come out with a few moist crumbs rather than wet batter.
Q4: Can I use a different chocolate orange product?
Yes. Any orange-flavored chocolate bar will work, as long as you chop it into chunks.
Q5: Why are my bars dry?
They were likely baked a little too long. Pull them out when the center still has a touch of softness.
Q6: Can I freeze the dough?
Yes. Press it into the lined tin, freeze until firm, then wrap well and store frozen until needed.
Q7: Can I make them in a different tin size?
Yes, but the thickness and bake time will change. A larger tin will make thinner bars that bake faster.
Q8: Do I need to chill the dough?
No, this recipe works beautifully without chilling, which makes it especially convenient.
Q9: How should I store them?
Keep them in an airtight container at room temperature for 3 to 4 days.
Q10: Are they better warm or cool?
Both are lovely. Cool bars slice more neatly, while slightly warm bars have a softer, gooier center.
Conclusion
These bars are the kind of bake that feels easy to love from the very first bite. They are rich, soft, chewy, and full of that bright chocolate-orange flavor that somehow feels both comforting and exciting all at once. This one’s a total game-changer when you want something simple to make but memorable to serve, so go ahead and bake a batch, because I have a feeling they will not last long.
Print
Terry’s Chocolate Orange Cookie Bars
- Prep Time: 10 minutes
- Cook Time: 20 minutes
- Total Time: 30 minutes
- Yield: 16 bars 1x
- Category: Dessert
- Method: Baking
- Cuisine: British
- Diet: Vegetarian
Description
Rich, chewy cookie bars with cocoa, orange extract, and plenty of chopped Terry’s Chocolate Orange in every bite.
Ingredients
- 200 g plain flour
- 50 g cocoa powder
- 1 tsp bicarbonate of soda
- 1/2 tsp salt
- 1 tbsp cornflour
- 115 g unsalted butter, melted
- 55 g granulated sugar
- 135 g light brown sugar
- 1 medium egg
- 1/2 tsp vanilla extract
- 1 tsp orange extract
- 314 g Terry’s Chocolate Orange, chopped
Instructions
- Preheat the oven to 190°C, or 170°C fan, and line a 9×9-inch square tin with baking paper.
- In a medium bowl, whisk together the plain flour, cocoa powder, bicarbonate of soda, salt, and cornflour.
- In a larger bowl, whisk the melted butter with the granulated sugar and light brown sugar for about 2 minutes until smooth and glossy.
- Whisk in the egg, vanilla extract, and orange extract until combined.
- Add the dry ingredients to the wet mixture, then fold in the chopped Terry’s Chocolate Orange until a thick dough forms.
- Press the dough evenly into the prepared tin.
- Bake for 18 to 20 minutes, until the top looks set and a skewer comes out with a few moist crumbs.
- Cool in the tin for 10 minutes, then transfer to a wire rack to cool fully before cutting into 16 bars.
Notes
- For a brighter citrus flavor, add the finely grated zest of 1 orange.
- Do not overbake if you want a soft and chewy center.
- Store in an airtight container for 3 to 4 days.
- Warm a bar for a few seconds in the microwave before serving for an extra gooey texture.
Nutrition
- Serving Size: 1 bar
- Calories: 260
- Sugar: 19 g
- Sodium: 140 mg
- Fat: 13 g
- Saturated Fat: 8 g
- Unsaturated Fat: 4 g
- Trans Fat: 0 g
- Carbohydrates: 34 g
- Fiber: 2 g
- Protein: 3 g
- Cholesterol: 28 mg
Keywords: Terry’s Chocolate Orange Cookie Bars, chocolate orange traybake, chewy cookie bars, British dessert, easy chocolate orange bars