Mini Charcuterie Cups
There is something instantly joyful about Mini Charcuterie Cups. They feel playful, elegant, and effortless all at once. Every little cup is packed with color, texture, and flavor, which makes them perfect for parties, casual gatherings, or even a quiet snack moment that feels a little fancy. Trust me, you’re going to love this, because it delivers big charcuterie vibes in the cutest, most convenient way possible.
Behind the Recipe
This recipe came from those moments when you want to impress without stress. I remember hosting friends and realizing everyone loved grazing more than sitting down for a full meal. That is when these little cups became a staple. They feel personal, almost like a tiny gift for each guest, and they always disappear faster than expected.
Recipe Origin or Trivia
Charcuterie boards have roots in French culinary tradition, where cured meats and cheeses were served simply and intentionally. Over time, they evolved into elaborate boards meant for sharing. Mini Charcuterie Cups are the modern twist, taking all that tradition and turning it into a grab and go experience that fits today’s entertaining style.
Why You’ll Love Mini Charcuterie Cups
These cups are more than just cute, they are incredibly practical and satisfying.
Versatile: They work for parties, picnics, holidays, or even lunchboxes, and they fit right into casual or elegant settings.
Budget-Friendly: You can scale the ingredients up or down easily, using what you already love or have on hand.
Quick and Easy: No cooking required, just smart assembling, which means less time in the kitchen.
Customizable: Every cup can be tailored with different cheeses, fruits, or crackers to suit your taste.
Crowd-Pleasing: Everyone gets their own cup, which makes guests feel special and avoids sharing concerns.
Make-Ahead Friendly: These can be assembled ahead of time and chilled until serving.
Great for Leftovers: Extra ingredients can be reused for snacks, lunches, or another batch the next day.
Chef’s Pro Tips for Perfect Results
A few insider tricks make these cups truly shine. Choose a balance of textures so every bite feels interesting. Fold meats gently instead of stuffing them in, because it adds volume and elegance. Keep everything bite sized so guests can enjoy without utensils.
Kitchen Tools You’ll Need
Before diving in, it helps to have everything ready.
Clear plastic cups: These show off the layers and colors beautifully.
Small cutting board: Perfect for cubing cheese and prepping fruit.
Sharp knife: Makes clean cuts that keep ingredients looking fresh.
Small bowls: Useful for organizing ingredients during assembly.
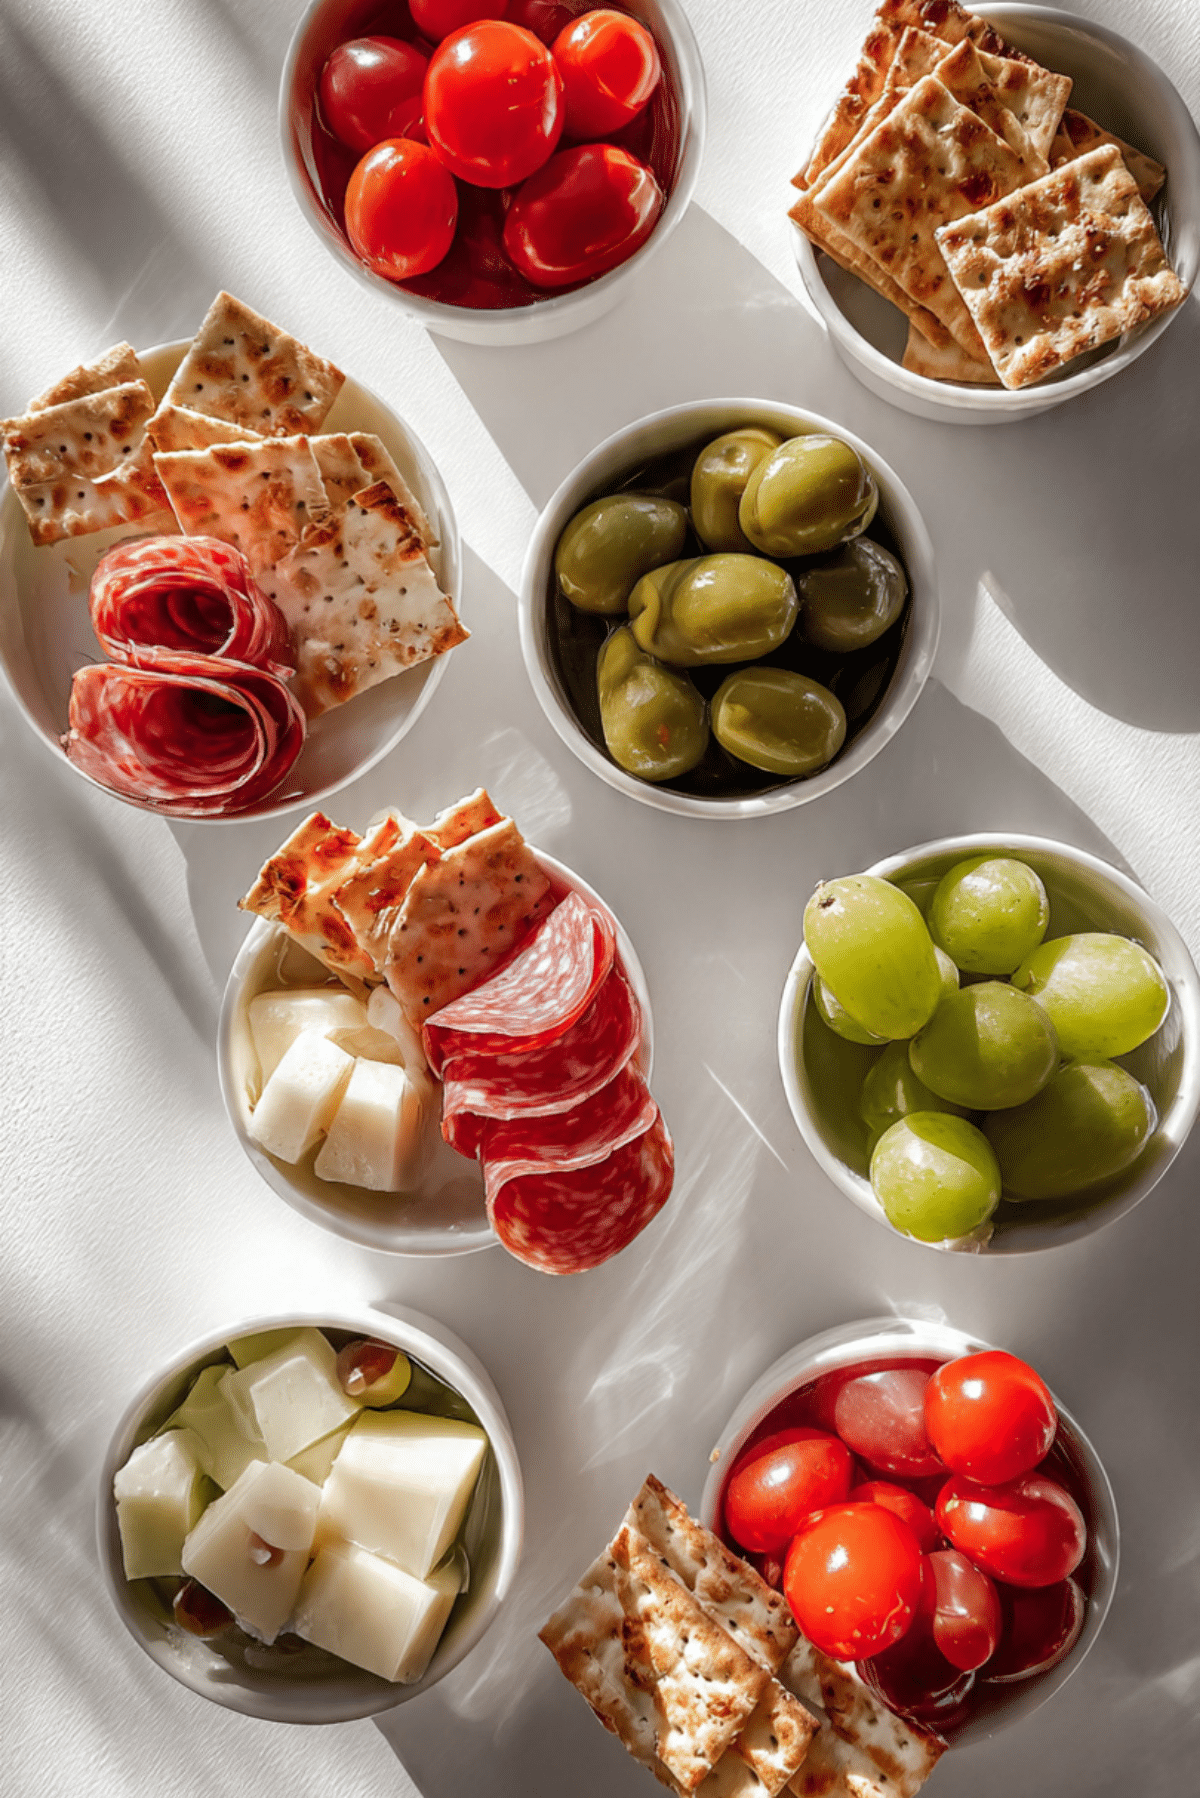
Ingredients in Mini Charcuterie Cups
The magic of this recipe comes from how these simple ingredients work together.
Assorted cured meats: 8 ounces, sliced, which bring savory depth and richness.
Assorted cheese cubes: 6 ounces, cubed, adding creamy and sharp contrast.
Green olives: 1 cup, whole, offering a briny pop of flavor.
Cherry tomatoes: 1 cup, whole, for juicy freshness and color.
Crackers: 2 cups, broken into small pieces, providing crunch and balance.
Fresh grapes: 1 1/2 cups, whole, adding natural sweetness to round everything out.
Ingredient Substitutions
Flexibility is part of the fun with this recipe.
Assorted cured meats: Swap with plant based deli slices for a vegetarian option.
Assorted cheese cubes: Use dairy free cheese alternatives if needed.
Green olives: Try black olives or marinated olives for variety.
Cherry tomatoes: Substitute with sliced cucumber or bell peppers.
Crackers: Use gluten free crackers if preferred.
Fresh grapes: Apples or pears cut into small pieces also work well.
Ingredient Spotlight
A closer look at what makes these cups so satisfying.
Assorted cured meats: Their salty, savory flavor anchors the entire cup and pairs beautifully with cheese and fruit.
Fresh grapes: These add a burst of sweetness that balances the richness of meats and cheeses.
Instructions for Making Mini Charcuterie Cups
Now let’s dive into the fun part, assembling these little beauties.
-
Preheat Your Equipment:
There is no cooking involved, but make sure your workspace is clean and your cups are ready. -
Combine Ingredients:
Prepare all ingredients by slicing meats, cubing cheese, and washing fruit thoroughly. -
Prepare Your Cooking Vessel:
Line up the clear cups on a flat surface so assembly is smooth and organized. -
Assemble the Dish:
Start with crackers at the bottom, then add folded meats, cheese cubes, olives, tomatoes, and grapes, layering evenly. -
Cook to Perfection:
No cooking needed, just ensure everything is neatly arranged and balanced. -
Finishing Touches:
Adjust layers so colors are visible from the outside of each cup. -
Serve and Enjoy:
Serve immediately or refrigerate until ready to enjoy.
Texture & Flavor Secrets
The key to these cups is contrast. Crunchy crackers meet creamy cheese, juicy grapes cut through savory meats, and olives add that salty punch that keeps you coming back for more. Let me tell you, it’s worth every bite.
Cooking Tips & Tricks
A few extra pointers make assembly effortless.
- Keep ingredients cold for the freshest taste.
- Use similar sized pieces for a balanced look.
- Do not overfill cups, breathing room makes them prettier.
What to Avoid
Even simple recipes have a few pitfalls.
- Avoid soggy crackers by adding them last if storing.
- Do not overcrowd cups, which can make them messy.
- Skip overly strong flavors that overpower the balance.
Nutrition Facts
Servings: 8 cups
Calories per serving: 220
Note: These are approximate values.
Preparation Time
Prep Time: 20 minutes
Cook Time: 0 minutes
Total Time: 20 minutes
Make-Ahead and Storage Tips
These cups are ideal for planning ahead. Assemble them up to 24 hours in advance, cover tightly, and store in the refrigerator. For best texture, add crackers shortly before serving. Freezing is not recommended, but leftovers keep well chilled for a day.
How to Serve Mini Charcuterie Cups
Serve them on a large tray for parties, pack them into picnic baskets, or add them to a grazing table for visual impact. They pair beautifully with sparkling drinks or fresh juices.
Creative Leftover Transformations
Leftover ingredients can become wraps, snack boxes, or quick salads the next day. You can even turn them into a full charcuterie board with minimal effort.
Additional Tips
Use clear cups for maximum visual appeal. Keep flavors balanced and colors vibrant. This one’s a total game-changer for entertaining.
Make It a Showstopper
Add small rosemary sprigs or patterned cups for extra flair. Arrange cups in tiers or circles to create a stunning display that guests will remember.
Variations to Try
Try a Mediterranean version with extra olives and tomatoes. Go kid friendly with mild cheese and fruit forward cups. Create a spicy version using peppery meats and bold cheeses. You can even theme them by season for holidays.
FAQ’s
1. Can I make Mini Charcuterie Cups the night before?
Yes, they store well refrigerated for up to 24 hours.
2. How many cups does this recipe make?
It makes about 8 standard sized cups.
3. Are these good for kids?
Absolutely, just use mild flavors they enjoy.
4. Can I make them vegetarian?
Yes, simply omit meats and add more cheese and produce.
5. Do I need special cups?
No, any clear disposable or reusable cups work.
6. How do I keep crackers crunchy?
Add them right before serving if possible.
7. Can I use different fruits?
Yes, just keep them bite sized and fresh.
8. Are these suitable for picnics?
They are perfect for picnics and easy to transport.
9. How do I prevent sogginess?
Keep wet ingredients separate from crackers until serving.
10. Can I double the recipe easily?
Yes, it scales up beautifully for larger crowds.
Conclusion
Mini Charcuterie Cups bring all the joy of a full board into a charming, personal format. They are simple, beautiful, and endlessly adaptable. Trust me, once you try them, they will become your go to entertaining secret.There is something instantly joyful about Mini Charcuterie Cups. They feel playful, elegant, and effortless all at once. Every little cup is packed with color, texture, and flavor, which makes them perfect for parties, casual gatherings, or even a quiet snack moment that feels a little fancy. Trust me, you’re going to love this, because it delivers big charcuterie vibes in the cutest, most convenient way possible.
Behind the Recipe
This recipe came from those moments when you want to impress without stress. I remember hosting friends and realizing everyone loved grazing more than sitting down for a full meal. That is when these little cups became a staple. They feel personal, almost like a tiny gift for each guest, and they always disappear faster than expected.
Recipe Origin or Trivia
Charcuterie boards have roots in French culinary tradition, where cured meats and cheeses were served simply and intentionally. Over time, they evolved into elaborate boards meant for sharing. Mini Charcuterie Cups are the modern twist, taking all that tradition and turning it into a grab and go experience that fits today’s entertaining style.
Why You’ll Love Mini Charcuterie Cups
These cups are more than just cute, they are incredibly practical and satisfying.
Versatile: They work for parties, picnics, holidays, or even lunchboxes, and they fit right into casual or elegant settings.
Budget-Friendly: You can scale the ingredients up or down easily, using what you already love or have on hand.
Quick and Easy: No cooking required, just smart assembling, which means less time in the kitchen.
Customizable: Every cup can be tailored with different cheeses, fruits, or crackers to suit your taste.
Crowd-Pleasing: Everyone gets their own cup, which makes guests feel special and avoids sharing concerns.
Make-Ahead Friendly: These can be assembled ahead of time and chilled until serving.
Great for Leftovers: Extra ingredients can be reused for snacks, lunches, or another batch the next day.
Chef’s Pro Tips for Perfect Results
A few insider tricks make these cups truly shine. Choose a balance of textures so every bite feels interesting. Fold meats gently instead of stuffing them in, because it adds volume and elegance. Keep everything bite sized so guests can enjoy without utensils.
Kitchen Tools You’ll Need
Before diving in, it helps to have everything ready.
Clear plastic cups: These show off the layers and colors beautifully.
Small cutting board: Perfect for cubing cheese and prepping fruit.
Sharp knife: Makes clean cuts that keep ingredients looking fresh.
Small bowls: Useful for organizing ingredients during assembly.
Ingredients in Mini Charcuterie Cups
The magic of this recipe comes from how these simple ingredients work together.
Assorted cured meats: 8 ounces, sliced, which bring savory depth and richness.
Assorted cheese cubes: 6 ounces, cubed, adding creamy and sharp contrast.
Green olives: 1 cup, whole, offering a briny pop of flavor.
Cherry tomatoes: 1 cup, whole, for juicy freshness and color.
Crackers: 2 cups, broken into small pieces, providing crunch and balance.
Fresh grapes: 1 1/2 cups, whole, adding natural sweetness to round everything out.
Ingredient Substitutions
Flexibility is part of the fun with this recipe.
Assorted cured meats: Swap with plant based deli slices for a vegetarian option.
Assorted cheese cubes: Use dairy free cheese alternatives if needed.
Green olives: Try black olives or marinated olives for variety.
Cherry tomatoes: Substitute with sliced cucumber or bell peppers.
Crackers: Use gluten free crackers if preferred.
Fresh grapes: Apples or pears cut into small pieces also work well.
Ingredient Spotlight
A closer look at what makes these cups so satisfying.
Assorted cured meats: Their salty, savory flavor anchors the entire cup and pairs beautifully with cheese and fruit.
Fresh grapes: These add a burst of sweetness that balances the richness of meats and cheeses.
Instructions for Making Mini Charcuterie Cups
Now let’s dive into the fun part, assembling these little beauties.
-
Preheat Your Equipment:
There is no cooking involved, but make sure your workspace is clean and your cups are ready. -
Combine Ingredients:
Prepare all ingredients by slicing meats, cubing cheese, and washing fruit thoroughly. -
Prepare Your Cooking Vessel:
Line up the clear cups on a flat surface so assembly is smooth and organized. -
Assemble the Dish:
Start with crackers at the bottom, then add folded meats, cheese cubes, olives, tomatoes, and grapes, layering evenly. -
Cook to Perfection:
No cooking needed, just ensure everything is neatly arranged and balanced. -
Finishing Touches:
Adjust layers so colors are visible from the outside of each cup. -
Serve and Enjoy:
Serve immediately or refrigerate until ready to enjoy.
Texture & Flavor Secrets
The key to these cups is contrast. Crunchy crackers meet creamy cheese, juicy grapes cut through savory meats, and olives add that salty punch that keeps you coming back for more. Let me tell you, it’s worth every bite.
Cooking Tips & Tricks
A few extra pointers make assembly effortless.
- Keep ingredients cold for the freshest taste.
- Use similar sized pieces for a balanced look.
- Do not overfill cups, breathing room makes them prettier.
What to Avoid
Even simple recipes have a few pitfalls.
- Avoid soggy crackers by adding them last if storing.
- Do not overcrowd cups, which can make them messy.
- Skip overly strong flavors that overpower the balance.
Nutrition Facts
Servings: 8 cups
Calories per serving: 220
Note: These are approximate values.
Preparation Time
Prep Time: 20 minutes
Cook Time: 0 minutes
Total Time: 20 minutes
Make-Ahead and Storage Tips
These cups are ideal for planning ahead. Assemble them up to 24 hours in advance, cover tightly, and store in the refrigerator. For best texture, add crackers shortly before serving. Freezing is not recommended, but leftovers keep well chilled for a day.
How to Serve Mini Charcuterie Cups
Serve them on a large tray for parties, pack them into picnic baskets, or add them to a grazing table for visual impact. They pair beautifully with sparkling drinks or fresh juices.
Creative Leftover Transformations
Leftover ingredients can become wraps, snack boxes, or quick salads the next day. You can even turn them into a full charcuterie board with minimal effort.
Additional Tips
Use clear cups for maximum visual appeal. Keep flavors balanced and colors vibrant. This one’s a total game-changer for entertaining.
Make It a Showstopper
Add small rosemary sprigs or patterned cups for extra flair. Arrange cups in tiers or circles to create a stunning display that guests will remember.
Variations to Try
Try a Mediterranean version with extra olives and tomatoes. Go kid friendly with mild cheese and fruit forward cups. Create a spicy version using peppery meats and bold cheeses. You can even theme them by season for holidays.
FAQ’s
1. Can I make Mini Charcuterie Cups the night before?
Yes, they store well refrigerated for up to 24 hours.
2. How many cups does this recipe make?
It makes about 8 standard sized cups.
3. Are these good for kids?
Absolutely, just use mild flavors they enjoy.
4. Can I make them vegetarian?
Yes, simply omit meats and add more cheese and produce.
5. Do I need special cups?
No, any clear disposable or reusable cups work.
6. How do I keep crackers crunchy?
Add them right before serving if possible.
7. Can I use different fruits?
Yes, just keep them bite sized and fresh.
8. Are these suitable for picnics?
They are perfect for picnics and easy to transport.
9. How do I prevent sogginess?
Keep wet ingredients separate from crackers until serving.
10. Can I double the recipe easily?
Yes, it scales up beautifully for larger crowds.
Conclusion
Mini Charcuterie Cups bring all the joy of a full board into a charming, personal format. They are simple, beautiful, and endlessly adaptable. Trust me, once you try them, they will become your go to entertaining secret.
Print
Mini Charcuterie Cups
- Prep Time: 20 minutes
- Cook Time: 0 minutes
- Total Time: 20 minutes
- Yield: 8 cups
- Category: Appetizer
- Method: No Cook
- Cuisine: American
- Diet: Vegetarian
Description
Mini Charcuterie Cups are individual snack cups filled with cured meats, cheese, fruit, olives, and crackers, perfect for parties, picnics, and easy entertaining.
Ingredients
- Assorted cured meats: 8 ounces, sliced
- Assorted cheese cubes: 6 ounces, cubed
- Green olives: 1 cup, whole
- Cherry tomatoes: 1 cup, whole
- Crackers: 2 cups, broken into small pieces
- Fresh grapes: 1 1/2 cups, whole
Instructions
- Prepare all ingredients by slicing cured meats, cubing cheese, and washing grapes and cherry tomatoes.
- Arrange clear cups on a clean flat surface for easy assembly.
- Add a small layer of crackers to the bottom of each cup.
- Fold and place cured meats into each cup.
- Add cheese cubes, green olives, cherry tomatoes, and fresh grapes evenly.
- Adjust layers so ingredients are visible from the outside of the cup.
- Serve immediately or cover and refrigerate until ready to serve.
Notes
- Add crackers just before serving if storing overnight to keep them crisp.
- Use similar sized ingredients for a balanced look and bite.
- Customize each cup with favorite fruits or cheeses.
Nutrition
- Serving Size: 1 cup
- Calories: 220
- Sugar: 6 g
- Sodium: 520 mg
- Fat: 14 g
- Saturated Fat: 6 g
- Unsaturated Fat: 7 g
- Trans Fat: 0 g
- Carbohydrates: 15 g
- Fiber: 2 g
- Protein: 10 g
- Cholesterol: 30 mg
Keywords: mini charcuterie cups, party appetizers, no cook appetizers, charcuterie snacks, individual snack cups