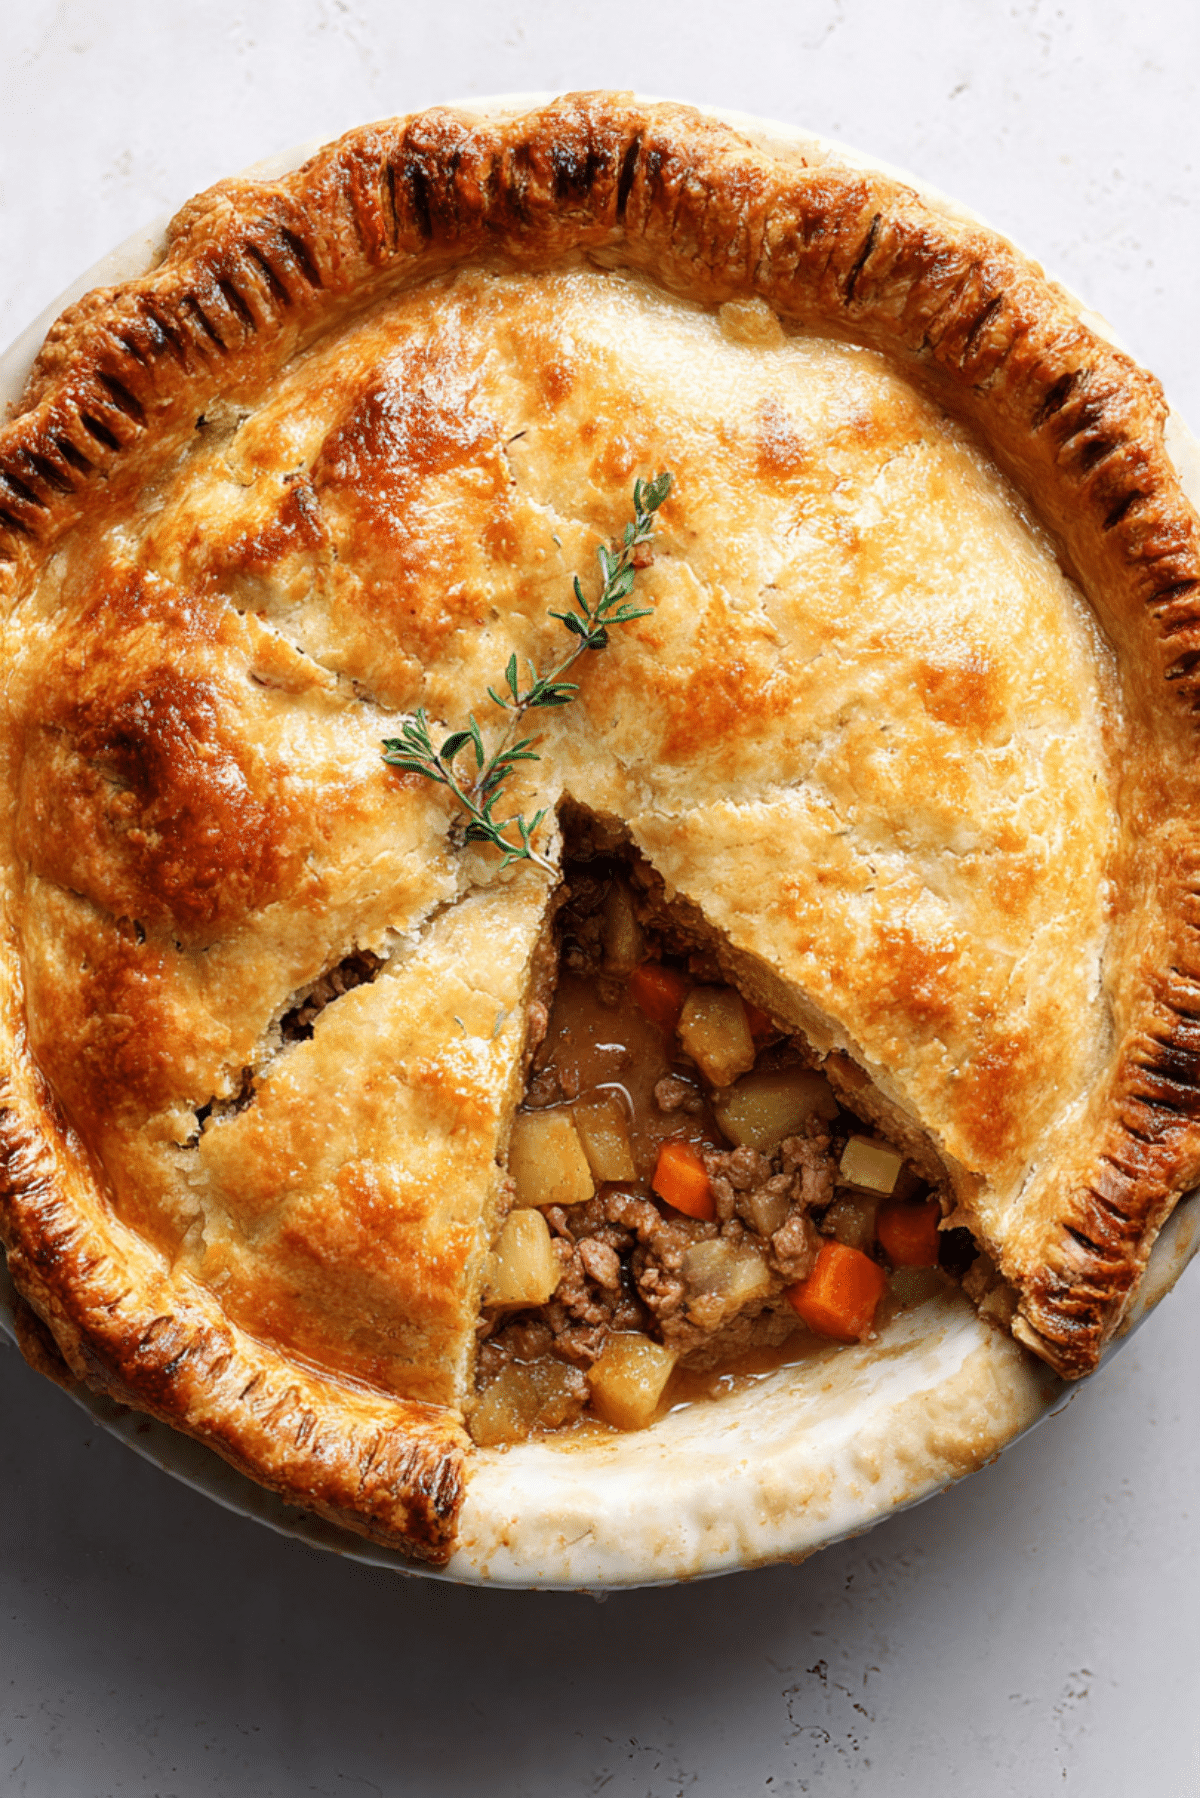
Meat Pie
There is something deeply comforting about pulling a beautiful pie from the oven, especially when the crust is bronzed and crisp and the filling smells rich, savory, and impossibly inviting. This Meat Pie is one of those dishes that feels generous from the very first slice, with tender potatoes, seasoned beef, and vegetables tucked into a flaky crust that turns every bite into pure comfort. Trust me, you’re going to love this.
Why This Savory Bake Always Hits the Spot
Some meals are good, and then there are meals that make the whole kitchen feel warmer. This is one of those. The filling is hearty without being too heavy, the crust gives you that buttery-style crispness people crave in a proper pie, and the whole thing feels like something worth slowing down for. Let me tell you, it’s worth every bite.
A Cozy Classic With Deep Roots
Meat-filled pies have been beloved in many parts of the world for generations, and it is easy to see why. They were practical, filling, and perfect for stretching simple ingredients into something satisfying and beautiful. In British and Irish home cooking, savory pies became staples because they made the most of meat, vegetables, and pastry, all while creating a dish that could feed a whole table with ease.
And now that you know where that cozy tradition comes from, it makes this pie feel even more special. It carries that same homey spirit, but with a version that feels approachable and reliable for a modern kitchen.
Reasons This Recipe Earns a Permanent Spot in Your Kitchen
This is the kind of recipe that wins people over quickly, and once you make it once, it tends to come back often.
Versatile: You can serve it for lunch, dinner, or even a casual weekend gathering. It feels just as right with a crisp salad as it does with mashed peas or roasted vegetables.
Budget-Friendly: Ground beef, potatoes, onions, and carrots are all easy-to-find ingredients that bring a lot of value. You get a hearty, filling result without needing anything fancy.
Quick and Easy: While it looks impressive, the actual process is simple and manageable. A ready-made pie crust keeps things efficient without taking away from the homemade feel.
Customizable: You can adjust the herbs, swap vegetables, or even make the filling a little richer or more peppery to suit your taste. This one’s a total game-changer when you want flexibility.
Crowd-Pleasing: Rich filling and flaky crust are a combination that rarely misses. It is cozy, familiar, and easy to love.
Make-Ahead Friendly: The filling can be made in advance, which takes the pressure off on busy days. That alone makes it feel extra practical.
Great for Leftovers: Slices reheat beautifully, and the flavors settle in even more by the next day. In some ways, it gets even better.
Smart Secrets for a Better Pie Every Time
Before we get into the details, here are a few little tricks that make a real difference.
- Cool the filling slightly: Warm filling can soften the pastry too much, so giving it a few minutes helps the crust stay crisp and structured.
- Do not skip the vent slits: They help steam escape, which keeps the top crust from getting soggy.
- Season in layers: Add salt and pepper as the filling cooks so the flavor builds naturally instead of tasting flat.
- Let the pie rest after baking: This helps the filling settle, which makes slicing cleaner and much more satisfying.
- Use a baking sheet under the pie dish: It catches any drips and makes the transfer in and out of the oven easier.
The Kitchen Tools That Make This Easier
A good pie comes together more smoothly when the basics are ready to go.
Large skillet: This is where the filling develops its flavor. You want enough room for the beef and vegetables to cook evenly.
9-inch pie dish: It gives the pie its shape and helps the crust bake up beautifully around the filling.
Wooden spoon: Perfect for breaking up the meat and stirring the gravy as it thickens.
Small bowl: Useful for beating the egg wash so the top crust gets that lovely golden finish.
Sharp knife: You will need it for chopping the vegetables and cutting vent slits in the top crust.
Pastry brush: This helps spread the egg wash evenly over the surface.
Ingredients That Build the Perfect Filling and Crust
The beauty of this recipe is how everyday ingredients come together into something that tastes so special. Each one has a role, and together they create a pie that is deeply savory, rich, and comforting.
- Olive Oil: 1 tablespoon, this helps soften the vegetables and starts the filling with a smooth, flavorful base.
- Yellow Onion: 1 medium, diced, it brings sweetness and depth as it cooks down.
- Carrot: 1 medium, diced, it adds subtle sweetness and a soft bite that balances the beef.
- Garlic: 2 cloves, minced, it gives the filling a warm and savory backbone.
- Ground Beef: 1 pound, this is the hearty center of the pie and gives it that classic comforting character.
- Potatoes: 2 cups, peeled and diced small, they make the filling more substantial and wonderfully tender.
- All-Purpose Flour: 2 tablespoons, this thickens the broth into a gravy that holds the filling together.
- Beef Broth: 1 cup, it adds richness and helps create that luscious savory sauce.
- Tomato Paste: 1 tablespoon, it deepens the color and gives the filling a fuller, more rounded flavor.
- Dried Thyme: 1 teaspoon, it adds a gentle earthy note that works beautifully with beef and potatoes.
- Salt: 1 teaspoon, this brings the whole filling into balance.
- Black Pepper: 1/2 teaspoon, it adds a mild warmth that keeps the pie from feeling heavy.
- Refrigerated Pie Crusts: 2 crusts, these create the flaky top and bottom layers that hold everything together.
- Egg: 1 large, beaten, this gives the top crust a glossy golden finish.
Easy Swaps That Still Taste Fantastic
One of the nicest things about this pie is how forgiving it can be. A few thoughtful swaps can still give you a delicious result.
Ground Beef: Ground lamb or ground turkey.
Yellow Onion: White onion or shallots.
Carrot: Frozen peas or finely diced celery.
Potatoes: Yukon Gold or red potatoes.
Beef Broth: Chicken broth, if that is what you have on hand.
Dried Thyme: Dried rosemary or Italian seasoning.
Pie Crusts: Homemade pastry, if you want a fully from-scratch version.
The Ingredients That Really Make the Magic Happen
A couple of ingredients really shape the character of this dish, and they deserve a little spotlight.
Ground Beef: This is where the pie gets its rich, savory body. As it cooks with onion, garlic, and thyme, it becomes deeply flavorful and satisfying.
Potatoes: These soften right into the filling and absorb all that seasoned broth. They make each bite feel extra comforting and hearty.

Let’s Get This Beautiful Pie Into the Oven
Now let’s dive into the part where the kitchen starts smelling incredible. The process is simple, and each step builds toward that golden, bubbling final bake.
- Preheat Your Equipment: Preheat your oven to 400°F. Lightly grease a 9-inch pie dish and set it aside so everything is ready when the filling is done.
- Combine Ingredients: Heat the olive oil in a large skillet over medium heat. Add the diced onion and carrot, then cook for 4 to 5 minutes until softened. Stir in the garlic and cook for 30 seconds. Add the ground beef and cook until browned, breaking it up with a spoon. Stir in the diced potatoes, flour, beef broth, tomato paste, dried thyme, salt, and black pepper. Simmer for 10 to 12 minutes, stirring occasionally, until the potatoes begin to soften and the mixture thickens into a rich filling.
- Prepare Your Cooking Vessel: Fit one pie crust into the prepared pie dish, pressing it gently into the bottom and sides. Let the edges hang slightly over the rim.
- Assemble the Dish: Spoon the filling into the crust, spreading it evenly. Place the second pie crust over the top. Trim any excess pastry, then crimp the edges to seal. Cut a few slits in the top to let steam escape. Brush the surface with the beaten egg.
- Cook to Perfection: Bake for 35 to 40 minutes, until the crust is deeply golden and the filling is bubbling gently through the vents.
- Finishing Touches: Remove the pie from the oven and let it rest for 10 to 15 minutes. This helps the filling settle and makes slicing much easier.
- Serve and Enjoy: Slice and serve warm. The flaky crust, rich filling, and tender vegetables make every forkful feel comforting and complete.
The Texture and Flavor Story in Every Slice
What makes this pie so satisfying is the contrast. The crust turns crisp and flaky on top while the inside stays rich and soft. The beef brings savory depth, the onion and carrot add sweetness, and the potatoes soak up the broth until they become tender and full of flavor. Then that hint of thyme ties everything together in a way that feels classic and quietly special.
Handy Cooking Tips for the Best Result
A few small moves can make your pie even better, and these are worth keeping in mind.
- Chop the potatoes small: Smaller pieces cook more evenly and blend better into the filling.
- Let the filling thicken properly: A slightly thick filling helps the slices hold together instead of spilling apart.
- Brush the whole top crust evenly: That is how you get that beautiful glossy finish.
- Bake until truly golden: Pale pastry can look done before it actually develops the best texture.
Common Pitfalls and How to Dodge Them
Even a simple pie has a few spots where things can go wrong, but they are easy to avoid.
- Do not overfill the dish: Too much filling can make sealing the crust difficult and may lead to leaks.
- Do not use watery filling: If the gravy is too thin, the bottom crust can turn soft.
- Do not skip the resting time: Cutting too early can cause the filling to run.
- Do not forget the vent slits: Without them, steam builds up and affects the crust texture.
A Quick Look at the Nutrition
Servings: 6
Calories per serving: 430
Note: These are approximate values.
Timing That Helps You Plan Ahead
Prep Time: 20 minutes
Cook Time: 50 minutes
Total Time: 1 hour 10 minutes
Make-Ahead and Storage Tips That Save the Day
This pie fits beautifully into a busy routine, which is part of why people keep coming back to it. The filling can be made a full day ahead and stored in the fridge once cooled. When you are ready, just assemble the pie and bake.
For leftovers, cover the pie tightly or transfer slices to an airtight container and refrigerate for up to 4 days. For longer storage, wrap slices well and freeze for up to 2 months. Reheat in the oven at 350°F until warmed through for the best texture, because that helps the crust stay crisp.
My Favorite Ways to Serve It
This pie is rich and hearty, so it pairs especially well with lighter sides. A crisp green salad with a sharp vinaigrette is a lovely contrast. Steamed green beans or butter-free peas work beautifully too. For something extra cozy, serve it with a spoonful of gravy on the side and a simple cucumber salad to brighten everything up.
Smart and Tasty Ways to Use Leftovers
Leftover slices are already great, but they can become something new with very little effort. Crumble a warmed slice into a bowl and top it with a fried egg for a brunch-style meal. You can also serve the filling over mashed potatoes or spoon it into a baked potato for a cozy second-day dinner. Another good idea is reheating a slice and pairing it with a cup of soup for an easy lunch.
Extra Little Tips That Make Cooking Feel Easier
Sometimes it is the little things that make a recipe feel smooth from start to finish. Keep your pie crust cold until you are ready to use it, because it handles better that way. Taste the filling before assembling, so you can adjust the salt and pepper if needed. And place the pie dish on a baking sheet before it goes into the oven, which makes cleanup much less stressful.
How to Make It Look Extra Special on the Table
This pie already has rustic charm, but a few presentation touches can make it really shine. Brush the crust thoroughly so it bakes up glossy and golden. Crimp the edges neatly, because that gives it a classic bakery-style look. Once baked, let it cool just enough to slice cleanly, then serve each piece with the filling visible. A sprinkle of fresh thyme leaves on the plate can make the whole thing look a little more polished without feeling fussy.
Fun Variations Worth Trying
There is plenty of room to play here, and each version brings its own personality.
Cheesy Version: Stir 1/2 cup shredded cheddar into the filling before assembling for a richer, more indulgent bite.
Mushroom Twist: Add 1 cup finely chopped mushrooms with the onion for extra earthy flavor.
Pea and Herb Version: Stir in 1/2 cup frozen peas and 1 tablespoon chopped parsley near the end of simmering for a fresher finish.
Spiced Comfort Version: Add 1/2 teaspoon smoked paprika for a warmer, slightly deeper flavor.
Mini Pie Version: Divide the filling among small ramekins and top each with pastry for personal pies that look adorable and bake a little faster.
FAQ’s
Q1: Can I make the filling ahead of time?
Yes, absolutely. You can make the filling up to 1 day ahead, cool it fully, and store it in the fridge until you are ready to assemble the pie.
Q2: Can I freeze it before baking?
Yes. Assemble the pie, wrap it tightly, and freeze it unbaked. Bake from frozen, adding extra time until the crust is golden and the center is hot.
Q3: How do I know when the pie is done?
Look for a deep golden crust and filling that bubbles lightly through the vent slits. That is usually the best visual sign.
Q4: Can I use homemade crust instead of refrigerated crust?
Yes, and it will be delicious. A homemade crust works beautifully here if you have the time.
Q5: Why is my filling too runny?
It likely needed a little more simmering time on the stove. The flour and broth should cook together until the mixture thickens before it goes into the crust.
Q6: Can I add more vegetables?
Yes. Peas, celery, or mushrooms all work nicely as long as you do not overload the filling with too much moisture.
Q7: What kind of potatoes work best?
Yukon Gold and russet potatoes are both good choices. Just cut them into small, even pieces so they cook properly.
Q8: Do I need to blind bake the bottom crust?
No, not for this version. The thick filling and proper bake time usually give you a good result without that extra step.
Q9: How should I reheat leftovers?
The oven is best. Reheat slices at 350°F until warmed through, which helps the crust stay crisp.
Q10: Can I make this in individual portions?
Yes, and it works very well. Small ramekins or mini pie tins make charming personal servings.
Conclusion
A good savory pie has a way of making any meal feel more generous, and this one does exactly that. With its flaky crust, rich beef filling, tender vegetables, and cozy homemade feel, it is the kind of dish that brings real comfort to the table. Trust me, once you pull this one from the oven and cut into that golden top, you will see why it is such a keeper.
Print
Meat Pie
- Prep Time: 20 minutes
- Cook Time: 50 minutes
- Total Time: 1 hour 10 minutes
- Yield: 6 servings 1x
- Category: Dinner
- Method: Baking
- Cuisine: British-Inspired
- Diet: Low Lactose
Description
A cozy, savory meat pie with a flaky golden crust and a rich filling of ground beef, potatoes, onions, carrots, garlic, thyme, and beef broth. It is hearty, comforting, and perfect for family dinners or make-ahead meals.
Ingredients
- 1 tablespoon olive oil
- 1 medium yellow onion, diced
- 1 medium carrot, diced
- 2 cloves garlic, minced
- 1 pound ground beef
- 2 cups potatoes, peeled and diced small
- 2 tablespoons all-purpose flour
- 1 cup beef broth
- 1 tablespoon tomato paste
- 1 teaspoon dried thyme
- 1 teaspoon salt
- 1/2 teaspoon black pepper
- 2 refrigerated pie crusts
- 1 large egg, beaten
Instructions
- Preheat the oven to 400°F and lightly grease a 9-inch pie dish.
- Heat the olive oil in a large skillet over medium heat. Add the onion and carrot and cook for 4 to 5 minutes until softened. Stir in the garlic and cook for 30 seconds.
- Add the ground beef and cook until browned, breaking it up as it cooks.
- Stir in the potatoes, flour, beef broth, tomato paste, dried thyme, salt, and black pepper. Simmer for 10 to 12 minutes, stirring occasionally, until the potatoes begin to soften and the mixture thickens.
- Fit one pie crust into the prepared pie dish and spoon the filling evenly into the crust.
- Place the second pie crust over the top, trim any excess, and crimp the edges to seal. Cut a few slits in the top and brush with the beaten egg.
- Bake for 35 to 40 minutes until the crust is golden brown and the filling is bubbling.
- Let the pie rest for 10 to 15 minutes before slicing and serving.
Notes
- Let the filling cool slightly before assembling to help keep the crust flaky.
- Cut the potatoes small so they cook evenly in the filling.
- Place the pie dish on a baking sheet to catch any drips.
- Store leftovers in the refrigerator for up to 4 days or freeze for up to 2 months.
Nutrition
- Serving Size: 1 slice
- Calories: 430
- Sugar: 4g
- Sodium: 620mg
- Fat: 24g
- Saturated Fat: 8g
- Unsaturated Fat: 14g
- Trans Fat: 0.5g
- Carbohydrates: 32g
- Fiber: 3g
- Protein: 19g
- Cholesterol: 70mg
Keywords: meat pie, savory pie, beef pie, ground beef pie, potato pie, comfort food dinner, baked meat pie