Homemade Chicken Nuggets
There is something deeply comforting about biting into a warm, crispy piece of chicken that you made with your own hands. The crunch gives way to tender, juicy meat inside, and suddenly you wonder why you ever bought the frozen kind. Trust me, you’re going to love this. These homemade chicken nuggets are golden on the outside, soft and flavorful on the inside, and honestly, this one’s a total game-changer for weeknight dinners or relaxed weekend snacking.
Why These Crispy Bites Always Steal the Show
When you make them fresh at home, something magical happens. The coating turns beautifully golden, the kitchen fills with that savory aroma of garlic and paprika, and you know dinner is going to be good. They are crisp without being heavy, juicy without being greasy, and every bite has that satisfying crunch followed by tender chicken. It feels familiar and comforting, yet somehow better than anything from a box.
A Little Backstory Behind This Comfort Classic
Chicken nuggets became popular in American kitchens decades ago, originally created as a convenient way to enjoy bite sized chicken. Over time, they became a staple in households around the world. Making them from scratch brings the story full circle. You keep the fun and convenience, but you upgrade the flavor and freshness. It is simple food done right, and that is always worth the effort.
The Reasons This Recipe Works Every Single Time
Before we roll up our sleeves, let me tell you why this method never fails in my kitchen.
Versatile: Serve them as a main dish, a party snack, or slice them into wraps and salads for a quick lunch.
Budget-Friendly: Simple pantry ingredients and affordable chicken make this recipe easy on your grocery bill.
Quick and Easy: Straightforward steps and a short cooking time make it perfect for busy days.
Customizable: Adjust the seasoning, switch up the coating, or add a bit of heat to suit your taste.
Crowd-Pleasing: Kids adore them, adults reach for seconds, and they disappear fast at gatherings.
Make-Ahead Friendly: You can coat them in advance and fry just before serving.
Great for Leftovers: They reheat beautifully and still keep a nice crunch.
Chef Secrets for Perfectly Crispy Results
Let’s talk like insiders for a moment. A few small details make all the difference.
- Cut the chicken into evenly sized pieces so they cook at the same rate.
- Let the coated pieces rest for about 5 minutes before frying, this helps the coating stick better.
- Keep the oil at around 175 C or 350 F for even browning.
- Fry in batches so the temperature stays steady and the crust turns properly crisp.
Kitchen Tools That Make It Easier
Before we gather our ingredients, here are the tools that make the process smooth.
Sharp Knife: For cutting the chicken into uniform bite sized pieces.
Mixing Bowls: To set up a clean and organized breading station.
Tongs: To flip and lift the nuggets safely from hot oil.
Heavy Skillet or Deep Pan: Helps maintain consistent heat during frying.
Paper Towels: For draining excess oil after cooking.
Ingredients That Create That Perfect Crunch
Now let’s bring everything together. Each ingredient has a purpose, and when they meet, they create that irresistible texture and flavor.
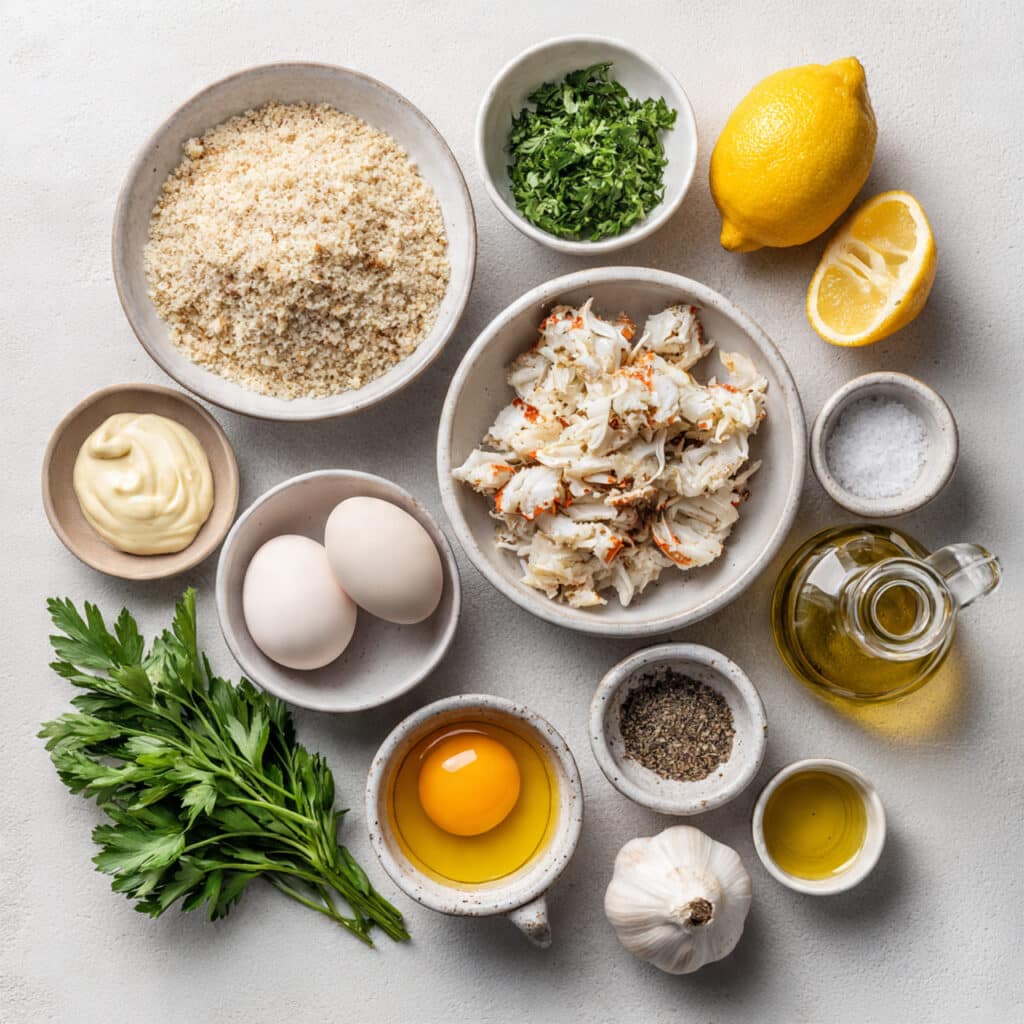
- Boneless Skinless Chicken Breast: 500 grams, cut into bite sized pieces, this is the tender and juicy base.
- All Purpose Flour: 1 cup, forms the first dry layer that helps the coating adhere.
- Eggs: 2 large, beaten, act as the binding layer between flour and breadcrumbs.
- Breadcrumbs: 1 ½ cups, preferably fine or panko style, create the golden crunchy exterior.
- Salt: 1 teaspoon, enhances the overall flavor.
- Black Pepper: ½ teaspoon, adds mild warmth.
- Garlic Powder: 1 teaspoon, brings savory depth.
- Paprika: 1 teaspoon, gives a subtle sweetness and beautiful color.
- Vegetable Oil: About 2 cups for frying, enough for shallow frying in batches.
Simple Swaps If You Need Them
Sometimes you open the pantry and realize you need to improvise, and that is perfectly fine.
All Purpose Flour: Whole wheat flour for a slightly nuttier flavor.
Breadcrumbs: Crushed cornflakes for extra crunch.
Garlic Powder: Onion powder for a softer savory note.
Vegetable Oil: Sunflower oil works just as well for frying.
Spotlight on the Stars of the Show
Chicken Breast: Lean and quick cooking, it stays juicy when not overcooked.
Breadcrumbs: They form that crisp shell that locks in moisture and gives each bite its crunch.
Let’s Get Cooking Together
Alright, and now let’s dive into the fun part. It is easier than you think, and once you start, you will see how simple it really is.
- Preheat Your Equipment: Heat the vegetable oil in a heavy skillet over medium heat until it reaches about 175 C or 350 F.
- Combine Ingredients: In one bowl, mix flour with salt, black pepper, garlic powder, and paprika. In a second bowl, beat the eggs. Place breadcrumbs in a third bowl.
- Prepare Your Cooking Vessel: Line a plate with paper towels and place it near the stove for draining the cooked nuggets.
- Assemble the Dish: Dredge each piece of chicken in the seasoned flour, dip into the beaten eggs, then press firmly into the breadcrumbs until fully coated.
- Cook to Perfection: Fry in batches for about 3 to 4 minutes per side until golden brown and cooked through. The internal temperature should reach 75 C or 165 F.
- Finishing Touches: Transfer to the paper towel lined plate and allow excess oil to drain. Sprinkle lightly with a pinch of salt while still hot.
- Serve and Enjoy: Serve immediately with your favorite dipping sauces and enjoy that perfect crunch.
The Crunch and Flavor Journey
As they cook, the coating turns deep golden and crisp, while the inside remains tender and juicy. The garlic and paprika bloom in the hot oil, filling the kitchen with a warm, savory aroma. Each bite starts with a crackly crunch, then gives way to soft, flavorful chicken that keeps you reaching for another piece.
Handy Tips for Even Better Results
If you want to elevate them even more, keep these tips in mind.
- Let the coated chicken rest briefly before frying to improve texture.
- Maintain consistent oil temperature for even browning.
- Press the breadcrumbs firmly onto the surface for a thicker crust.
- Season lightly right after frying while still hot.
Common Mistakes and How to Fix Them
Even simple recipes can go wrong, but these are easy to avoid.
- Frying at too low a temperature, which makes them oily. Keep the oil hot and steady.
- Overcrowding the pan, which drops the temperature. Fry in small batches.
- Skipping seasoning in the flour, which leads to bland coating. Season every layer.
Nutrition Snapshot
Servings: 4
Calories per serving: Approximately 420
Note: These are approximate values.
Timing at a Glance
Prep Time: 20 minutes
Cook Time: 15 minutes
Total Time: 35 minutes
Make Ahead and Storage Guide
You can coat the nuggets and refrigerate them for up to 8 hours before frying. Once cooked, store them in an airtight container in the refrigerator for up to 3 days. Reheat in the oven at 180 C or 350 F for about 10 minutes to restore crispness. They can also be frozen after cooking and reheated straight from frozen in the oven.
Serving Ideas That Make It Fun
Serve with classic ketchup, creamy honey mustard, or a simple yogurt garlic dip. Pair them with roasted potatoes, a crisp green salad, or tuck them into soft wraps with fresh lettuce and tomato. They are casual, comforting, and always welcome at the table.
Turn Leftovers Into Something New
Chop them into bite sized pieces and toss into pasta with a light sauce. Slice and add to sandwiches for a hearty lunch. You can even crumble them over a baked dish for an extra crunchy topping.
Extra Little Tricks for Big Flavor
Add a spoonful of grated cheese to the breadcrumbs for richness. A squeeze of fresh lemon right before serving brightens the flavor. If you like a bit of heat, stir a pinch of chili powder into the flour mixture.
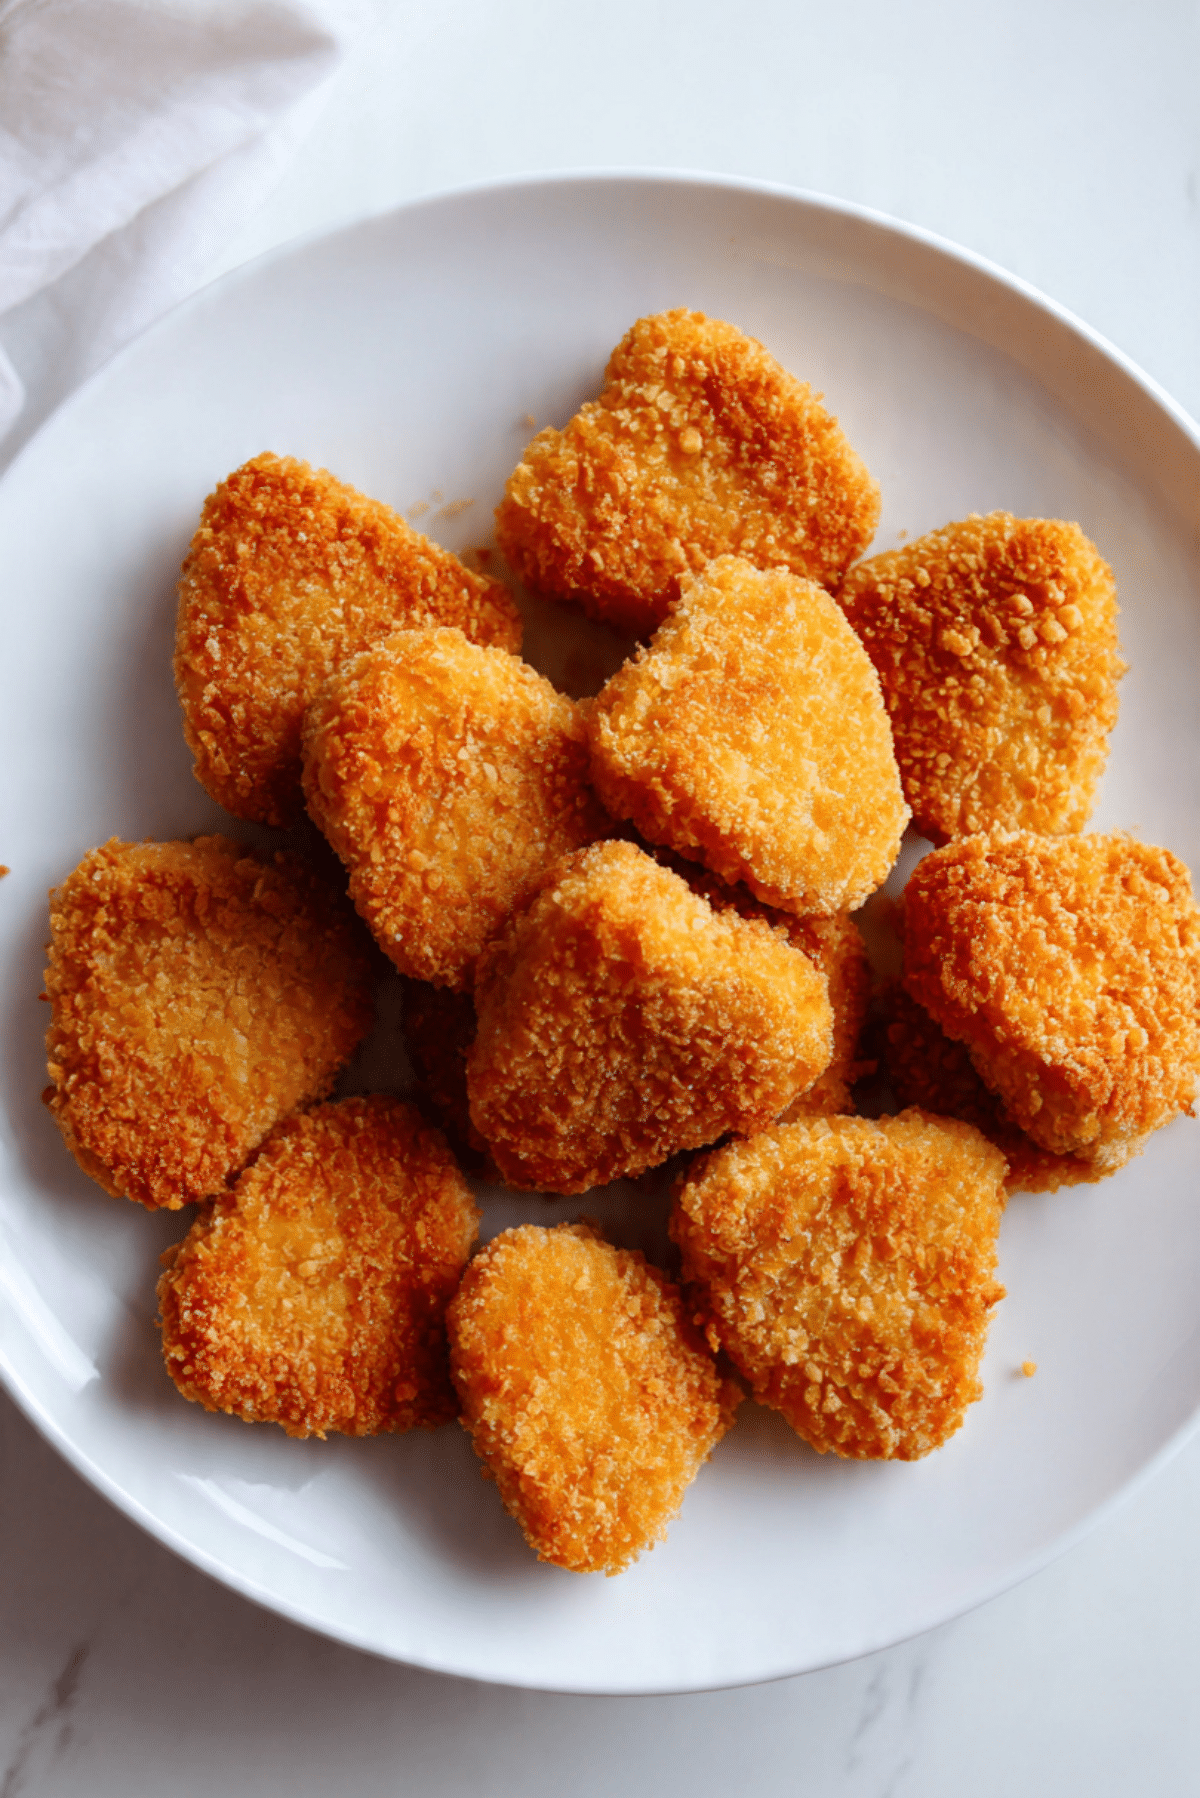
Make It Look Irresistible
Arrange them on a clean white plate and sprinkle with a little chopped parsley for color. Place a small bowl of dipping sauce in the center. That golden crust against a simple background always looks inviting.
Fun Variations to Explore
- Add dried Italian herbs to the breadcrumb mixture for an herby twist.
- Mix a little grated cheese into the coating for extra flavor.
- Use crushed tortilla chips instead of breadcrumbs for bold crunch.
- Bake at 200 C or 400 F for about 20 minutes for a lighter option.
- Add a touch of curry powder to the flour for subtle warmth.
FAQ’s
1. Can I bake these instead of frying?
Yes, bake at 200 C or 400 F for about 20 minutes, flipping halfway through.
2. How do I know they are fully cooked?
Use a thermometer and ensure the internal temperature reaches 75 C or 165 F.
3. Can I use chicken thighs?
Yes, boneless skinless thighs work well and stay very juicy.
4. How do I keep them crispy?
Drain on paper towels and avoid stacking while hot.
5. Can I freeze them before cooking?
Yes, freeze coated pieces on a tray, then transfer to a freezer bag once solid.
6. What oil is best for frying?
Use a neutral oil such as vegetable or sunflower oil.
7. Can I make them gluten free?
Yes, use gluten free flour and gluten free breadcrumbs.
8. Why is my coating falling off?
Make sure to press breadcrumbs firmly and allow them to rest before frying.
9. Can I air fry them?
Yes, cook at 190 C or 375 F for about 12 to 15 minutes.
10. How long do leftovers last?
Up to 3 days in the refrigerator when stored properly.
Conclusion
Making homemade chicken nuggets from scratch is one of those small kitchen victories that feels big. The crunch, the aroma, the juicy center, it all comes together in the most comforting way. Trust me, once you taste them fresh and golden, you might never go back to store bought again. Let me tell you, it’s worth every bite.
Print
Homemade Chicken Nuggets
- Prep Time: 20 minutes
- Cook Time: 15 minutes
- Total Time: 35 minutes
- Yield: 4 servings 1x
- Category: Main Course
- Method: Frying
- Cuisine: American
- Diet: Low Lactose
Description
Crispy on the outside and juicy on the inside, these homemade chicken nuggets are perfectly seasoned, golden brown, and made with simple pantry ingredients. A family-friendly favorite that is easy to prepare and absolutely worth every bite.
Ingredients
- 500 grams boneless skinless chicken breast, cut into bite sized pieces
- 1 cup all purpose flour
- 2 large eggs, beaten
- 1 1/2 cups breadcrumbs
- 1 teaspoon salt
- 1/2 teaspoon black pepper
- 1 teaspoon garlic powder
- 1 teaspoon paprika
- About 2 cups vegetable oil for frying
Instructions
- Heat the vegetable oil in a heavy skillet over medium heat until it reaches about 175 C or 350 F.
- In one bowl, mix flour with salt, black pepper, garlic powder, and paprika. In a second bowl, beat the eggs. Place breadcrumbs in a third bowl.
- Line a plate with paper towels and set it near the stove for draining.
- Dredge each piece of chicken in the seasoned flour, dip into the beaten eggs, then press firmly into the breadcrumbs until fully coated.
- Fry in batches for about 3 to 4 minutes per side until golden brown and cooked through. The internal temperature should reach 75 C or 165 F.
- Transfer to the paper towel lined plate and allow excess oil to drain. Lightly sprinkle with salt while still hot if desired.
- Serve immediately with your favorite dipping sauces.
Notes
- Let the coated chicken rest for 5 minutes before frying to help the coating stick better.
- Do not overcrowd the pan to maintain proper oil temperature and crisp texture.
- You can bake at 200 C or 400 F for about 20 minutes, flipping halfway through, for a lighter option.
- Store leftovers in an airtight container in the refrigerator for up to 3 days and reheat in the oven for best texture.
Nutrition
- Serving Size: 1 serving
- Calories: 420
- Sugar: 1g
- Sodium: 620mg
- Fat: 24g
- Saturated Fat: 4g
- Unsaturated Fat: 18g
- Trans Fat: 0g
- Carbohydrates: 28g
- Fiber: 1g
- Protein: 28g
- Cholesterol: 125mg
Keywords: homemade chicken nuggets, crispy chicken nuggets, easy chicken recipe, family dinner recipe, fried chicken bites