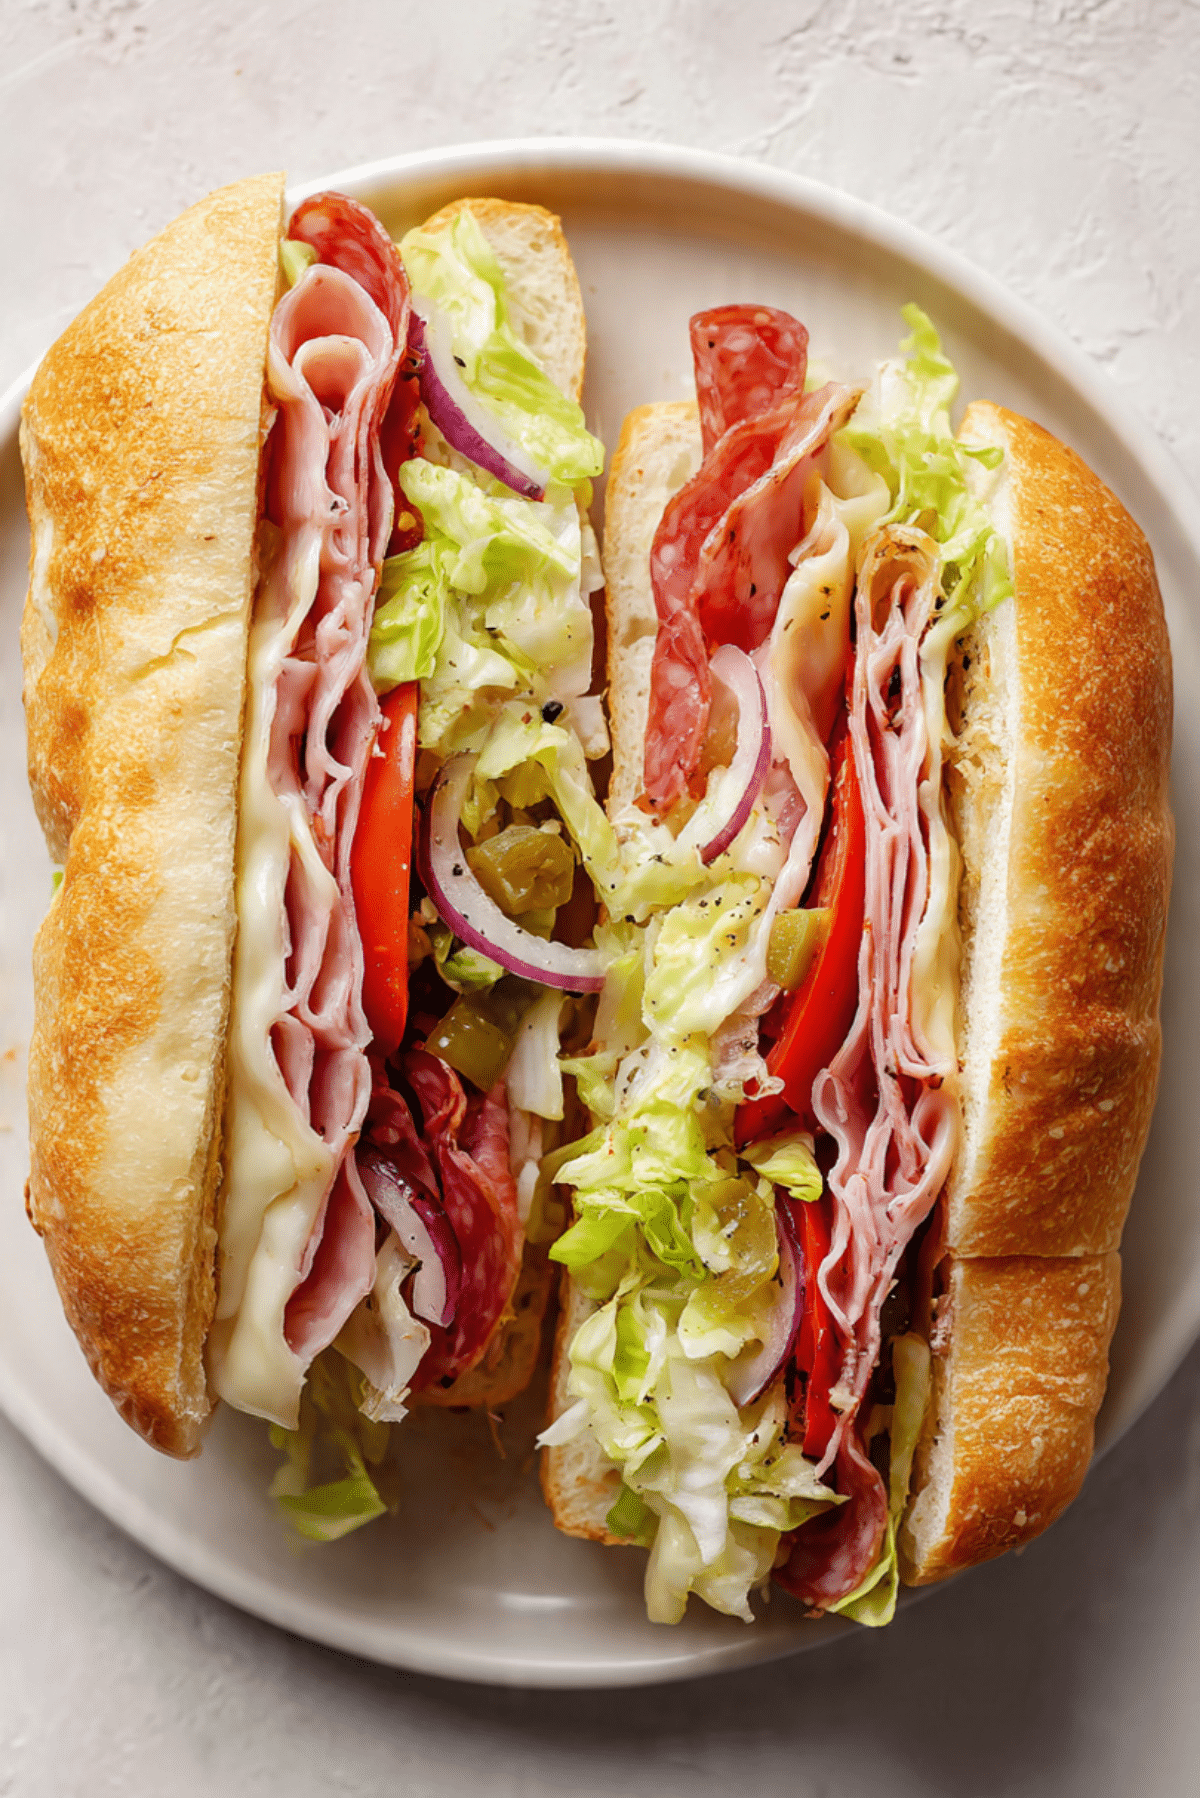
Chopped Italian Sandwich
There is something wildly satisfying about a sandwich that is packed, pressed, and bursting with flavor in every single bite. The Chopped Italian Sandwich is exactly that kind of meal. It is bold, colorful, a little messy in the best way, and honestly, it feels like a deli classic that you made with your own hands. When you slice into it and see all those layers mingling together, let me tell you, it’s worth every bite.
Why This Sandwich Is the One You Will Crave Again and Again
You know those meals that feel simple but somehow taste unforgettable? This is one of them. The combination of savory meats, creamy cheese, crisp vegetables, and tangy dressing creates a balance that hits every craving at once. It is hearty without feeling heavy, fresh without being boring, and satisfying enough to stand on its own.
Trust me, you’re going to love this. The chopped style makes every bite consistent, so you never get just bread or just lettuce. Everything is evenly distributed, which makes it a total game changer compared to a standard layered sub.
A Little Italian Deli Inspiration
The roots of this sandwich come from classic Italian American deli culture. Walk into any old school deli and you will see cured meats like salami and ham stacked high, provolone sliced fresh, and jars of pepperoncini lining the shelves. The traditional Italian sub inspired this chopped version, which simply takes all those beloved flavors and tosses them together before stuffing them into bread.
It is a modern twist on something nostalgic. Instead of neatly layered slices, everything is chopped and lightly dressed so the flavors blend together beautifully. The result feels both familiar and fresh at the same time.
Why You Can Always Rely on This Recipe
Before we dive deeper, let’s talk about why this sandwich deserves a permanent spot in your rotation.
Versatile: You can serve it for lunch, dinner, game day, or even slice it into smaller portions for a party platter.
Budget-Friendly: Deli meats, fresh veggies, and a good loaf of bread are affordable and easy to find.
Quick and Easy: From start to finish, it comes together in under 20 minutes with zero complicated steps.
Customizable: You can swap meats, adjust the dressing, or add extra crunch without breaking the balance.
Crowd-Pleasing: The bold, savory flavors appeal to both kids and adults.
Make-Ahead Friendly: The chopped filling can be prepped ahead and assembled just before serving.
Great for Leftovers: Extra filling can be tucked into wraps, salads, or even served over greens the next day.
Insider Tips for Deli-Level Flavor at Home
If you want that authentic deli taste, a few small details make a big difference.
- Chop everything evenly so each bite has a balanced mix of meat, cheese, and vegetables.
- Lightly dress the mixture, do not drench it. You want brightness, not soggy bread.
- Toast the sub rolls just enough to create structure without making them too hard.
- Let the chopped filling rest for five minutes before assembling so the flavors meld.
Essential Tools for a Smooth Prep
You do not need anything fancy, but a few basics will help.
Sharp Chef’s Knife: For finely chopping meats and vegetables evenly.
Large Cutting Board: Gives you enough space to chop and mix without spilling.
Mixing Bowl: To toss the chopped ingredients with the dressing.
Serrated Knife: Perfect for slicing through the sub rolls cleanly.
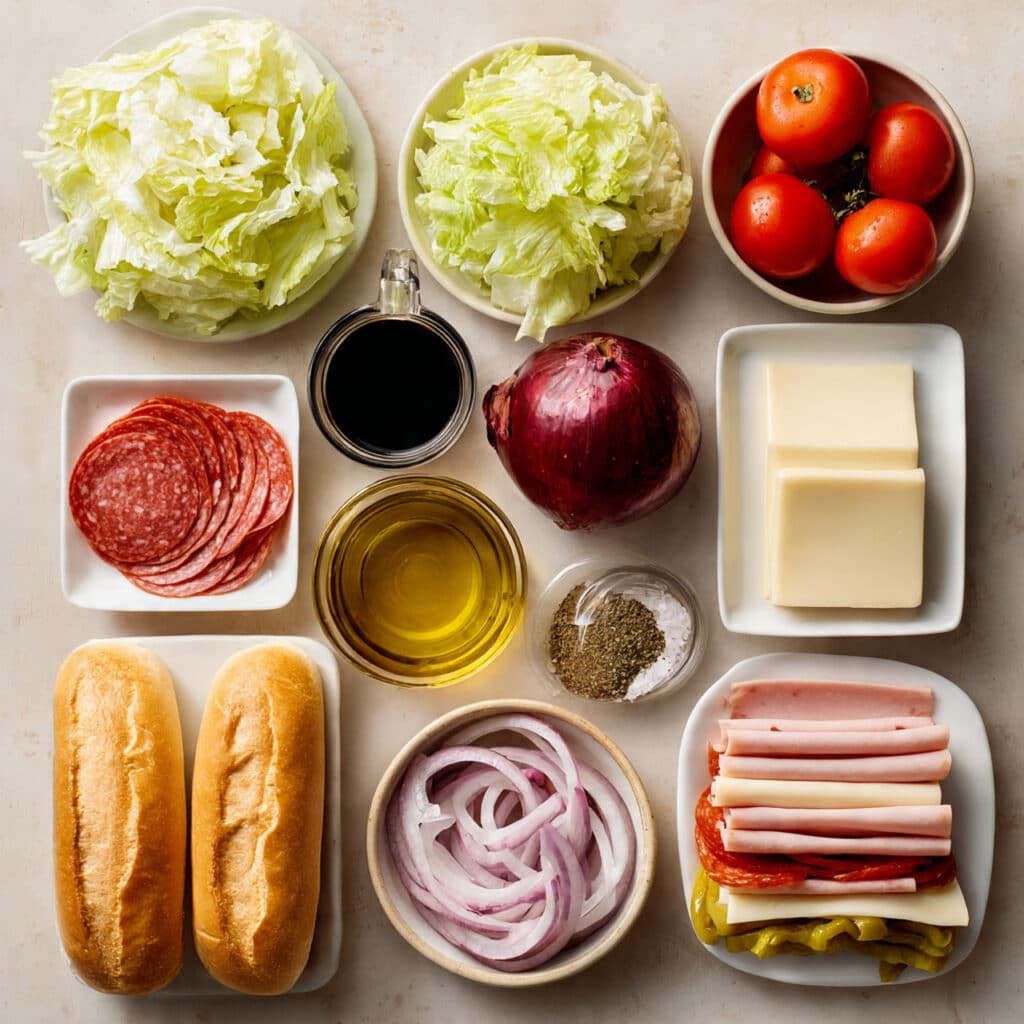
Ingredients You Will Need for This Bold and Fresh Sandwich
When these ingredients come together, they create pure magic. Each one plays its own role in flavor and texture.
- Italian Sub Rolls: 4 large rolls, about 8 inches each, lightly toasted. They hold everything together and provide a sturdy, chewy base.
- Salami: 150 grams thinly sliced. Adds rich, savory depth.
- Ham: 150 grams thinly sliced. Brings mild saltiness and balance.
- Turkey: 150 grams thinly sliced. Lightens the mix with lean protein.
- Provolone Cheese: 8 slices, about 200 grams total. Creamy and slightly sharp.
- Iceberg Lettuce: 2 cups shredded. Provides crisp freshness.
- Tomatoes: 2 medium, sliced thin. Juicy and bright.
- Red Onion: 1 small, thinly sliced. Adds a subtle bite.
- Pepperoncini: 1/2 cup chopped. Tangy and slightly spicy.
- Olive Oil: 2 tablespoons. Forms the base of the dressing.
- Red Wine Vinegar: 1 tablespoon. Adds acidity and balance.
- Dried Oregano: 1 teaspoon. Brings that classic Italian aroma.
- Salt: 1/2 teaspoon, or to taste. Enhances every layer.
- Black Pepper: 1/2 teaspoon freshly ground. Adds gentle heat.
Easy Ingredient Swaps When You Need Them
If you want to play around a little, here are some simple swaps.
Salami: Try spicy salami for extra heat.
Provolone Cheese: Swap with mozzarella for a milder profile.
Iceberg Lettuce: Use romaine for slightly more texture.
Red Wine Vinegar: Substitute with white wine vinegar for a softer tang.
Spotlight on the Stars of the Show
Provolone Cheese: This cheese melts slightly against the warm bread and adds creamy sharpness that ties everything together.
Pepperoncini: These little peppers bring a bright, tangy pop that cuts through the richness of the meats.
Let’s Build This Flavor-Packed Sandwich Together
Now let’s dive into the fun part. Here are the steps you are going to follow.
- Preheat Your Equipment: Lightly toast the Italian sub rolls in a 180°C oven for about 5 minutes until just crisp on the outside.
- Combine Ingredients: On a large cutting board, pile the salami, ham, turkey, provolone, lettuce, tomatoes, red onion, and pepperoncini. Chop everything together until evenly mixed. Transfer to a bowl and toss with olive oil, red wine vinegar, oregano, salt, and black pepper.
- Prepare Your Cooking Vessel: Line the toasted rolls on a clean surface and gently open them without tearing.
- Assemble the Dish: Spoon the chopped mixture generously into each roll, pressing slightly so it holds together.
- Cook to Perfection: No additional cooking is required, but you can warm the assembled sandwich for 2 to 3 minutes if you prefer slightly melted cheese.
- Finishing Touches: Slice each sandwich in half diagonally for that classic deli look.
- Serve and Enjoy: Serve immediately while the bread is crisp and the filling is juicy and vibrant.
The Texture and Flavor Story in Every Bite
This sandwich is all about contrast. The bread is lightly crisp outside and soft inside. The meats are savory and tender. The lettuce snaps, the tomatoes burst with juice, and the pepperoncini add a bright tang. As the olive oil and vinegar coat everything, the flavors blend into something bold yet balanced.
It is layered, crunchy, juicy, and creamy all at once. This one’s a total game changer.
Helpful Tips for the Best Results
A few simple tricks will keep everything perfect.
- Chop ingredients finely for even distribution.
- Toast the bread lightly to prevent sogginess.
- Toss dressing just before assembling to keep vegetables crisp.
What to Avoid for Perfect Results Every Time
Let’s make sure nothing goes wrong.
- Do not overdress the mixture, it can make the bread soggy.
- Avoid thick tomato slices, they can slide out easily.
- Do not skip seasoning, it makes all the difference.
Nutrition Facts at a Glance
Servings: 4
Calories per serving: Approximately 620
Note: These are approximate values.
Preparation Time Breakdown
Prep Time: 15 minutes
Cook Time: 5 minutes
Total Time: 20 minutes
Make-Ahead and Storage Tips for Busy Days
You can chop the meats and vegetables up to one day ahead and store them separately in airtight containers. Mix and dress just before assembling. If you have leftovers, store the filling separately from the bread to maintain texture. Freezing is not recommended due to fresh vegetables. Reheat gently if desired, but fresh is always best.
Serving Ideas That Elevate the Experience
Serve with kettle chips, a crisp side salad, or even a bowl of tomato soup. For gatherings, slice into smaller portions and secure with toothpicks for easy sharing.
Creative Leftover Transformations
Leftover filling can become a chopped Italian salad bowl. You can also stuff it into a wrap or layer it over toasted flatbread for a quick lunch.
Extra Tips for Even More Flavor
Add a sprinkle of extra oregano right before serving for aroma. Let the assembled sandwich rest for two minutes so the flavors settle. Use fresh cracked pepper for the best bite.
Make It a Showstopper on the Table
Wrap each sandwich halfway in parchment paper and tie with kitchen twine for that deli presentation. Slice diagonally and arrange on a wooden board for a rustic look.
Fun Variations to Try
- Add sliced mozzarella and broil briefly for a melty version.
- Include sliced olives for extra briny depth.
- Use whole wheat rolls for a nuttier base.
- Add thin cucumber slices for extra crunch.
FAQ’s
Q1: Can I make this ahead of time?
Yes, prepare the filling in advance and assemble just before serving.
Q2: Can I use different meats?
Absolutely, try roast beef or chicken if preferred.
Q3: How do I keep the sandwich from getting soggy?
Toast the bread lightly and dress the mixture right before assembling.
Q4: Is this served hot or cold?
It is traditionally served cold, but lightly warming is optional.
Q5: Can I make it gluten free?
Yes, use gluten free sub rolls.
Q6: How long does the filling last?
Up to 2 days refrigerated in an airtight container.
Q7: Can I reduce the sodium?
Choose low sodium deli meats and adjust added salt.
Q8: What cheese works best besides provolone?
Mozzarella or mild Swiss are great options.
Q9: Can I add more vegetables?
Yes, shredded carrots or cucumbers work well.
Q10: Is this kid friendly?
Yes, simply reduce onions or peppers if needed.
Conclusion
There is something so satisfying about building a sandwich that feels both comforting and exciting. The Chopped Italian Sandwich brings together bold deli flavors, crisp vegetables, and a perfectly dressed filling in every bite. Trust me, once you try it this way, you may never go back to layering slices again. It is fresh, hearty, and completely crave worthy.
Print
Chopped Italian Sandwich
- Prep Time: 15 minutes
- Cook Time: 5 minutes
- Total Time: 20 minutes
- Yield: 4 sandwiches 1x
- Category: Main Course
- Method: No-Cook
- Cuisine: Italian-American
- Diet: Low Lactose
Description
A bold and satisfying chopped Italian sandwich loaded with salami, ham, turkey, provolone, crisp lettuce, juicy tomatoes, red onion, and tangy pepperoncini, all tossed in a simple olive oil and red wine vinegar dressing and stuffed into toasted sub rolls.
Ingredients
- 4 large Italian sub rolls, about 8 inches each
- 150 grams thinly sliced salami
- 150 grams thinly sliced ham
- 150 grams thinly sliced turkey
- 8 slices provolone cheese, about 200 grams total
- 2 cups shredded iceberg lettuce
- 2 medium tomatoes, thinly sliced
- 1 small red onion, thinly sliced
- 1/2 cup chopped pepperoncini
- 2 tablespoons olive oil
- 1 tablespoon red wine vinegar
- 1 teaspoon dried oregano
- 1/2 teaspoon salt, or to taste
- 1/2 teaspoon freshly ground black pepper
Instructions
- Preheat oven to 180°C and lightly toast the Italian sub rolls for about 5 minutes until slightly crisp on the outside.
- On a large cutting board, pile the salami, ham, turkey, provolone, lettuce, tomatoes, red onion, and pepperoncini. Chop everything together until evenly mixed.
- Transfer the chopped mixture to a large bowl and toss with olive oil, red wine vinegar, dried oregano, salt, and black pepper until evenly coated.
- Open the toasted rolls gently without tearing them.
- Spoon the chopped mixture evenly into each roll, pressing lightly so the filling holds together.
- Optionally warm the assembled sandwiches in the oven for 2 to 3 minutes for slightly melted cheese.
- Slice each sandwich in half diagonally and serve immediately.
Notes
- Do not overdress the filling to prevent soggy bread.
- Chop ingredients finely for even flavor in every bite.
- Store leftover filling separately from bread in an airtight container for up to 2 days.
Nutrition
- Serving Size: 1 sandwich
- Calories: 620
- Sugar: 6g
- Sodium: 1350mg
- Fat: 32g
- Saturated Fat: 11g
- Unsaturated Fat: 18g
- Trans Fat: 0g
- Carbohydrates: 45g
- Fiber: 3g
- Protein: 38g
- Cholesterol: 95mg
Keywords: chopped Italian sandwich, Italian sub, deli sandwich, chopped sub, Italian sandwich recipe