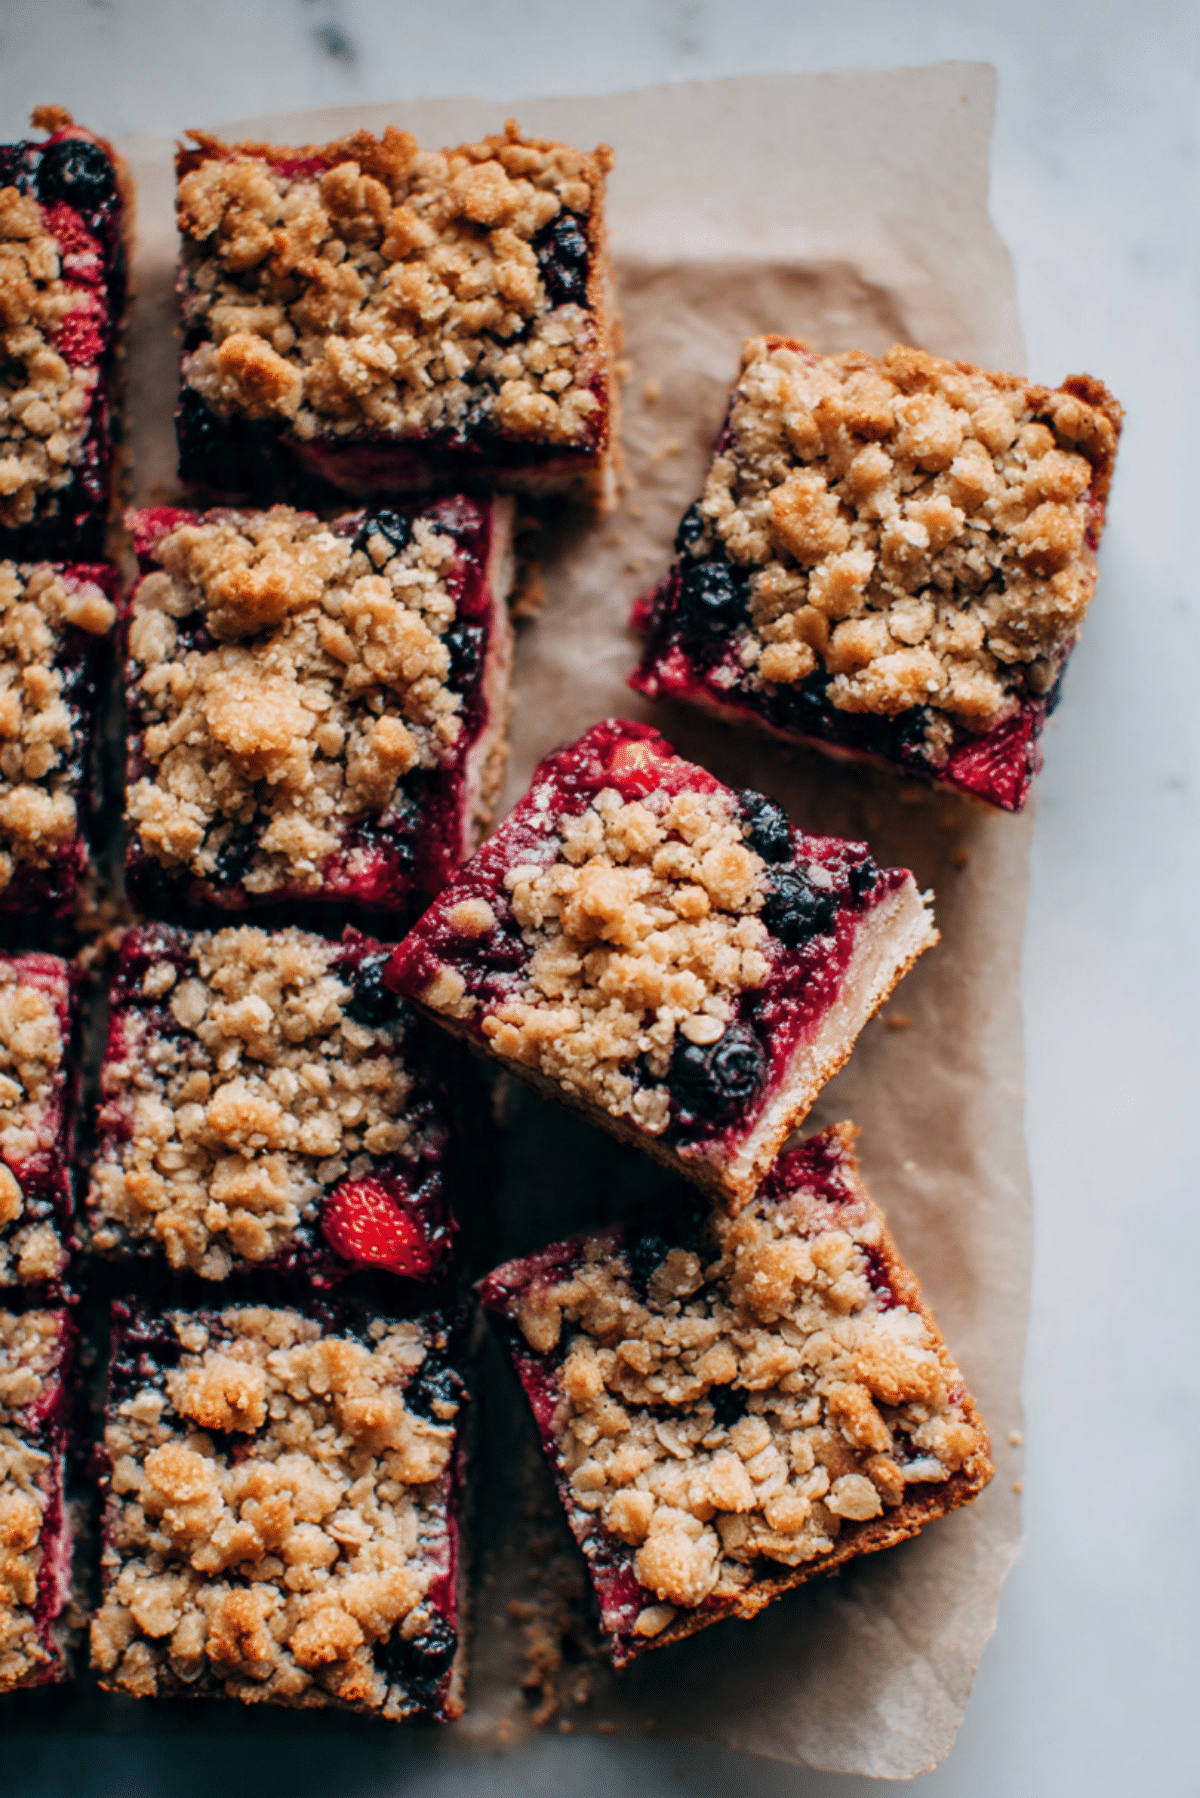
Berries Bar
There is something about a pan of fruity bars cooling on the counter that instantly makes the whole kitchen feel happier. The buttery crust, the bubbling berry layer, and that golden crumbly top all come together in a way that feels simple, cozy, and just a little irresistible. Trust me, you’re going to love this, because every bite gives you soft fruit, a tender base, and that lightly crisp topping that makes dessert feel extra special.
Why These Bars Always Hit the Sweet Spot
Some desserts look beautiful but feel fussy once you get started. This one is the opposite. It brings bright berry flavor, a soft jammy center, and a crumb topping that feels like the best part of a crisp and a cookie all at once. It is the kind of bake that works for a weekend treat, a picnic tray, or a sweet little something with coffee in the afternoon. Let me tell you, it’s worth every bite.
The Sweet Story Behind This Berry Filled Favorite
Fruit bars like these have long been loved in home kitchens because they take the comfort of pie and turn it into something easier to bake, slice, and share. They lean into that classic American bake sale charm, where buttery crusts, seasonal fruit, and simple pantry staples come together without a lot of fuss. Over time, berry bars became popular because they capture the fresh taste of summer while still feeling like a dependable, all year dessert when frozen berries are around.
Why This Recipe Earns a Permanent Spot in Your Baking Rotation
Before we head into the details, it helps to know exactly why this one works so well. It is one of those dependable bakes that feels both easy and rewarding.
Versatile: These bars work beautifully as a casual dessert, a lunchbox treat, or a sweet brunch addition. You can serve them plain, dusted with powdered sugar, or with a scoop of vanilla yogurt or ice cream.
Budget-Friendly: The ingredient list is made from simple baking staples and everyday fruit. Even when fresh berries are expensive, frozen berries keep this recipe easy on the wallet.
Quick and Easy: The crust and topping come from the same bowl, which keeps prep simple and cleanup light. That little shortcut is a total game-changer.
Customizable: You can adjust the berry mix depending on what you have on hand. Blueberries, raspberries, blackberries, and strawberries all bring their own charm to the pan.
Crowd-Pleasing: The flavor is bright and fruity, but the buttery crumble keeps it comforting and familiar. It is the kind of dessert that disappears fast once sliced.
Make-Ahead Friendly: These bars chill and slice beautifully, which means you can make them earlier in the day or even the night before serving.
Great for Leftovers: They store well in the fridge and still taste amazing the next day. In fact, the berry layer gets even more luscious after resting.
Smart Baking Secrets That Make a Big Difference
Now that you know why they are worth making, here are a few little tricks that help them turn out even better.
- Use cold butter for the crust and crumble mixture so the topping stays pleasantly crumbly instead of melting flat.
- Toss the berries with sugar, cornstarch, lemon juice, and lemon zest just before layering so the filling thickens nicely as it bakes.
- Press the bottom crust firmly into the pan so it holds together well once sliced.
- Let the bars cool completely before cutting, because the filling needs time to set.
- Line the pan with parchment paper and leave a little overhang, which makes lifting and slicing much easier.
The Kitchen Tools That Make This Bake Feel Easy
This recipe is refreshingly simple, and you do not need fancy equipment to make it shine. A few reliable tools are all it takes.
8×8-inch baking pan: This size gives the bars the perfect thickness, with enough room for a proper fruit layer and a generous crumble topping.
Mixing bowls: You will need one large bowl for the crust and topping mixture, and one medium bowl for the berry filling.
Measuring cups and spoons: Baking feels much more reliable when the measurements are precise, especially for flour, oats, and cornstarch.
Microplane or zester: Fresh lemon zest adds a bright little lift that makes the berries taste even more vibrant.
Parchment paper: This helps prevent sticking and makes lifting the bars from the pan wonderfully easy.
Pastry cutter or fork: Either one helps work the butter into the dry ingredients until the mixture turns crumbly and soft.
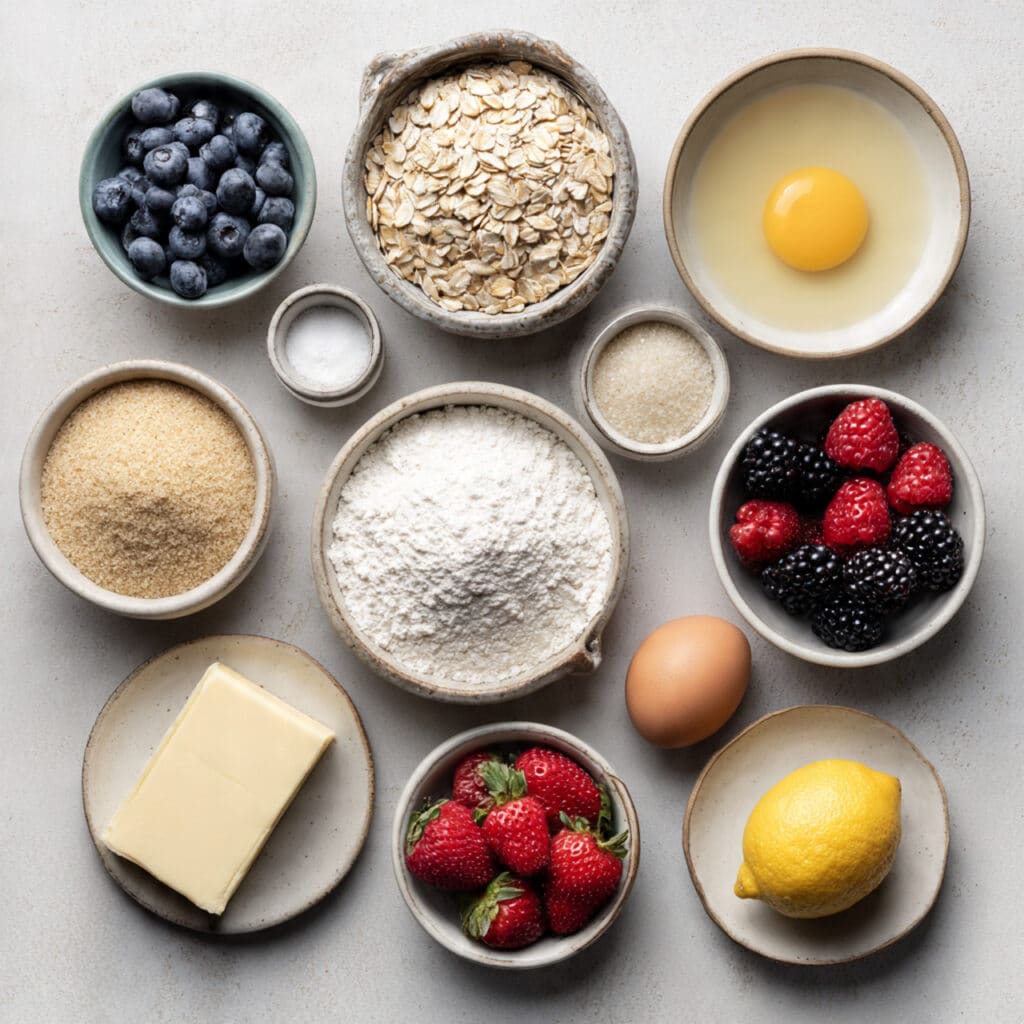
Everything You Need to Build These Irresistible Layers
And now we get to the heart of it, the ingredients that make all those textures and flavors come alive together. Each one has a purpose, and together they create a bar that tastes bright, buttery, and deeply comforting.
- All-purpose flour: 1 1/2 cups, this gives structure to both the crust and the crumble topping.
- Old-fashioned rolled oats: 1 cup, these add a hearty texture and that lovely rustic crumble feel.
- Light brown sugar: 3/4 cup, packed, this brings warmth and a gentle caramel sweetness.
- Granulated sugar: 1/2 cup, divided, this sweetens the crust mixture and helps the berries turn glossy and jammy.
- Baking powder: 1 teaspoon, this gives the crust a lighter texture so it does not feel heavy.
- Salt: 1/4 teaspoon, this balances the sweetness and keeps the buttery flavor from tasting flat.
- Unsalted butter: 3/4 cup, cold and cubed, this creates the rich, tender base and crumb topping.
- Large egg: 1, this helps bind the crust mixture together for cleaner slices.
- Blueberries: 1 cup, fresh or frozen, these add juicy pops and a deep sweet flavor.
- Raspberries: 1 cup, fresh or frozen, these melt into the filling and bring a bright tart edge.
- Blackberries: 1 cup, halved if large, these make the filling feel extra lush and full.
- Strawberries: 1 cup, hulled and diced, these soften into the berry layer and add sweetness and color.
- Cornstarch: 2 tablespoons, this thickens the filling so the bars slice neatly instead of running.
- Lemon juice: 1 tablespoon, this sharpens and brightens the berry flavor.
- Lemon zest: 1 teaspoon, this adds a fresh citrus aroma that makes the whole pan smell amazing.
Easy Swaps When You Want to Use What You Have
One of the best things about a bake like this is how forgiving it can be. If you need to swap a few ingredients, you still have plenty of room for a delicious result.
Blueberries: Use extra diced strawberries or blackberries.
Raspberries: Use extra blueberries if you want a sweeter filling.
Blackberries: Replace with more raspberries for a softer, more tart center.
Strawberries: Use chopped cherries or additional blueberries.
Light brown sugar: Dark brown sugar works too, and it gives the bars a slightly deeper flavor.
Old-fashioned rolled oats: Quick oats can work in a pinch, though the crumble will be a bit softer.
Lemon juice: Orange juice can step in if that is what you have.
The Standout Ingredients That Do the Heavy Lifting
A few ingredients really define the character of these bars, and they deserve a little spotlight before we start baking.
Mixed berries: The combination of blueberries, raspberries, blackberries, and strawberries gives the filling layers of flavor. Some berries turn jammy, some stay a little juicy, and together they create a filling that tastes bright, rich, and wonderfully balanced.
Cold butter: This is what gives the crust and topping that tender, crumbly texture. When it bakes, it creates little buttery pockets that make every bite feel extra good.
Let’s Bake These Layer by Layer
Now that everything is ready, this is where the kitchen starts to smell amazing. Here are the steps you are going to follow, and each one builds toward that bubbling fruit center and golden crumb top.
- Preheat Your Equipment: Preheat your oven to 350°F. Line an 8×8-inch baking pan with parchment paper, leaving enough overhang to lift the bars out later.
- Combine Ingredients: In a large bowl, whisk together the flour, oats, brown sugar, 1/4 cup of the granulated sugar, baking powder, and salt. Cut in the cold butter with a pastry cutter or fork until the mixture looks crumbly. Add the egg and mix until the crumbs begin to hold together when pressed.
- Prepare Your Cooking Vessel: Press about two-thirds of the crumb mixture firmly into the bottom of the prepared pan to form an even crust. Take your time here, because a firm base helps the finished bars slice cleanly.
- Assemble the Dish: In a medium bowl, gently toss the blueberries, raspberries, blackberries, strawberries, remaining 1/4 cup granulated sugar, cornstarch, lemon juice, and lemon zest until evenly coated. Spoon the berry mixture over the crust, then scatter the remaining crumb mixture over the top.
- Cook to Perfection: Bake for 42 to 48 minutes, until the topping is lightly golden and the berry filling is bubbling around the edges. The center should look set, not wet.
- Finishing Touches: Let the bars cool completely in the pan, then chill them for at least 1 hour for the cleanest slices. This step really matters, so do not rush it.
- Serve and Enjoy: Lift the bars out using the parchment paper, place them on a cutting board, and slice into 12 squares. Serve them as they are, or add a light dusting of powdered sugar if you want a pretty finish.
What Makes the Texture and Flavor So Good
As the bars bake, the berries soften and release their juices, which mix with sugar, lemon, and cornstarch into a glossy, almost jam-like layer. At the same time, the crust firms up into something tender and buttery, while the top turns lightly crisp and golden. That contrast is what makes each bite so satisfying. You get a soft fruit center, a sturdy base, and a crumble topping that adds just enough texture to keep things interesting.
Helpful Tricks for Even Better Results
Once you have the basic method down, a few small habits can make the process feel even smoother.
- Chill the bars before slicing if you want the neatest, sharpest edges.
- Cut strawberries into small, even pieces so they bake at the same rate as the other berries.
- If using frozen berries, do not thaw them first, just mix them in frozen and bake as directed.
- Use parchment paper with overhang on two sides for the easiest lift from the pan.
Common Slip-Ups and How to Avoid Them
Even an easy dessert can have a couple of little trouble spots, so it helps to know what to watch for before you begin.
- Do not skip the cornstarch, because it is what helps the berry layer set properly.
- Do not underbake the bars, or the center may stay too loose to slice well.
- Do not cut them while warm if you want neat squares, because the filling will still be soft.
- Do not pack the crumble topping too tightly, or you will lose that lovely crumbly finish.
A Quick Look at the Nutrition
Before serving, here is a simple snapshot of what to expect from each portion.
Servings: 12 bars
Calories per serving: 265
Note: These are approximate values.
Timing Your Bake Like a Pro
This recipe fits nicely into an afternoon baking session, and the steps feel relaxed rather than rushed.
Prep Time: 20 minutes
Cook Time: 45 minutes
Total Time: 1 hour 5 minutes, plus cooling and chilling time
How to Prep Ahead and Store Them Well
These bars are a dream for planning ahead, which makes them even more lovable. You can mix the crumb dough a few hours in advance and keep it chilled until you are ready to bake. Once baked, the bars keep well in an airtight container in the refrigerator for up to 5 days. They can also be frozen in individual squares, wrapped well, for up to 2 months. To enjoy again, let them thaw in the fridge or at room temperature. A quick few minutes on the counter brings back that lovely soft berry texture.
My Favorite Ways to Serve These Bars
There are so many sweet little ways to enjoy them, depending on the mood and the moment. Serve a square chilled for a firmer, fruitier bite, or let it sit out briefly for a softer texture. They pair beautifully with hot coffee, iced tea, or a spoonful of vanilla yogurt. For dessert, a small scoop of vanilla ice cream on the side makes them feel extra special without any extra effort.
Fun Ways to Reinvent the Leftovers
If you happen to have leftovers, which is never guaranteed, there are some delicious ways to give them a second life. Crumble a bar over yogurt for a quick breakfast treat. Warm a square slightly and serve it with whipped cream for an easy plated dessert. You can even chop one into chunks and fold it into a parfait with vanilla pudding or Greek yogurt for something playful and a little unexpected.
A Few More Little Details That Help
Sometimes the smallest choices are the ones that make a recipe feel smoother and more dependable.
Use fresh lemon zest: It brings a lively aroma that bottled flavor just cannot match.
Let the bars rest fully: This helps the filling settle and keeps the slices much cleaner.
Cut with a sharp knife: Wipe the blade between cuts if you want especially tidy squares.
Store in a single layer first: Once they are fully chilled, stacking becomes much easier.
Simple Ways to Make Them Look Extra Special
Presentation matters more than people think, especially with a dessert that already has such pretty natural color. Let the berry layer peek through the sides when slicing so the contrast between crust, filling, and topping is visible. A light dusting of powdered sugar can make the tops look bakery worthy. If you are serving guests, place the bars on a simple platter with a few fresh berries in small bowls nearby for color and charm.
Tasty Twists You Can Try Next Time
Once you have made the base version, it is very hard not to start dreaming up variations. This one is perfect for that.
Lemon Berry Version: Add an extra teaspoon of lemon zest to the crust mixture for a brighter, more citrusy finish.
Cinnamon Crumble Version: Stir 1/2 teaspoon ground cinnamon into the crumb mixture for a warmer flavor.
Jam Boost Version: Add 2 tablespoons berry jam to the filling for an even richer fruit layer.
Nutty Topping Version: Mix 1/3 cup chopped walnuts or almonds into the crumble for extra crunch.
Only Blueberry Version: Use 4 cups blueberries for a sweeter, deeper flavored filling with a beautiful dark purple center.
FAQ’s
1. Can I use frozen berries?
Yes, absolutely. Use them straight from the freezer and do not thaw them first, or the filling may become too watery before baking.
2. How do I know the bars are done?
Look for a lightly golden top and bubbling filling around the edges. The center should look set rather than wet.
3. Can I make these a day ahead?
Yes, and they actually slice even better the next day after chilling well in the fridge.
4. Do I need to refrigerate them?
Yes, especially because of the juicy fruit filling. Refrigeration helps them stay fresh and keeps the texture nice.
5. Can I double the recipe?
Yes, bake it in a 9×13-inch pan and keep an eye on the center as it bakes. The time may need a few extra minutes.
6. What if I only have one or two kinds of berries?
That is completely fine. Just keep the total fruit amount at 4 cups.
7. Can I reduce the sugar?
You can reduce it slightly, but not too much, because sugar helps balance the tart fruit and supports the filling texture.
8. Why did my bars fall apart?
They were likely sliced before fully cooling, or the crust was not pressed firmly enough into the pan.
9. Can I add a glaze?
Yes, a simple lemon glaze would be delicious if you want a sweeter finish, though they are lovely without it too.
10. Are these better warm or cold?
Both are good, but cold bars give cleaner slices and a firmer bite, while room temperature bars feel softer and more buttery.
Conclusion
These berry filled bars are the kind of bake that feels cheerful from start to finish. They are easy enough for a casual baking day, pretty enough to share, and delicious enough to make people reach for seconds before they even finish the first square. This one’s a total game-changer when you want something fruity, buttery, and simple without giving up that homemade wow factor. Bake a pan, let it cool, slice it up, and enjoy every bright, crumbly bite.
Print
Berries Bar
- Prep Time: 20 minutes
- Cook Time: 45 minutes
- Total Time: 1 hour 5 minutes
- Yield: 12 bars 1x
- Category: Dessert
- Method: Baking
- Cuisine: American
- Diet: Vegetarian
Description
Buttery mixed berry crumb bars with a tender oat crust, a jammy berry filling, and a golden crumble topping. Easy to slice, easy to share, and packed with bright fruity flavor.
Ingredients
- 1 1/2 cups all-purpose flour
- 1 cup old-fashioned rolled oats
- 3/4 cup light brown sugar, packed
- 1/2 cup granulated sugar, divided
- 1 teaspoon baking powder
- 1/4 teaspoon salt
- 3/4 cup unsalted butter, cold and cubed
- 1 large egg
- 1 cup blueberries, fresh or frozen
- 1 cup raspberries, fresh or frozen
- 1 cup blackberries, halved if large
- 1 cup strawberries, hulled and diced
- 2 tablespoons cornstarch
- 1 tablespoon lemon juice
- 1 teaspoon lemon zest
Instructions
- Preheat the oven to 350°F and line an 8×8-inch baking pan with parchment paper.
- In a large bowl, whisk together the flour, oats, brown sugar, 1/4 cup of the granulated sugar, baking powder, and salt.
- Cut in the cold butter until the mixture is crumbly, then mix in the egg until the crumbs begin to hold together when pressed.
- Press about two-thirds of the crumb mixture firmly into the bottom of the prepared pan to form the crust.
- In a medium bowl, gently toss the blueberries, raspberries, blackberries, strawberries, remaining 1/4 cup granulated sugar, cornstarch, lemon juice, and lemon zest.
- Spoon the berry mixture evenly over the crust.
- Sprinkle the remaining crumb mixture over the top.
- Bake for 42 to 48 minutes, until the topping is lightly golden and the berry filling is bubbling around the edges.
- Cool completely in the pan, then chill for at least 1 hour before lifting out and slicing into 12 bars.
Notes
- Use frozen berries straight from the freezer, do not thaw first.
- Let the bars cool fully before slicing for the cleanest shape.
- Store in an airtight container in the refrigerator for up to 5 days.
- Freeze individual bars for up to 2 months and thaw before serving.
Nutrition
- Serving Size: 1 bar
- Calories: 265
- Sugar: 18g
- Sodium: 85mg
- Fat: 11g
- Saturated Fat: 6g
- Unsaturated Fat: 4g
- Trans Fat: 0g
- Carbohydrates: 39g
- Fiber: 3g
- Protein: 3g
- Cholesterol: 33mg
Keywords: berry bars, mixed berry crumb bars, berry dessert bars, oat crumble bars, fruit bars